Lab 8 - Filesystems
0. Overview
Welcome to the 8th lab. Here is what we are going to do in this lab:
- Installing updates
- Getting familiar with local filesystems
- EXT4, BTRFS, XFS, FAT32
- In depth EXT4 or BTRFSServ
- LVM partition or logical volume formatted with a specific type
- Getting familiar with network filesystems
- NFS v3/v4 - mounting/umounting and exporting
- SMB
- Object Storage
Before we can continue, figure out answers to these two questions:
- How many disks does your VM have?
- Think through which directories are essential (utilise
treecommand for that). If you mount a filesystem over an essential directory, you can mess up your machine quite seriously.
1. Local Filesystems
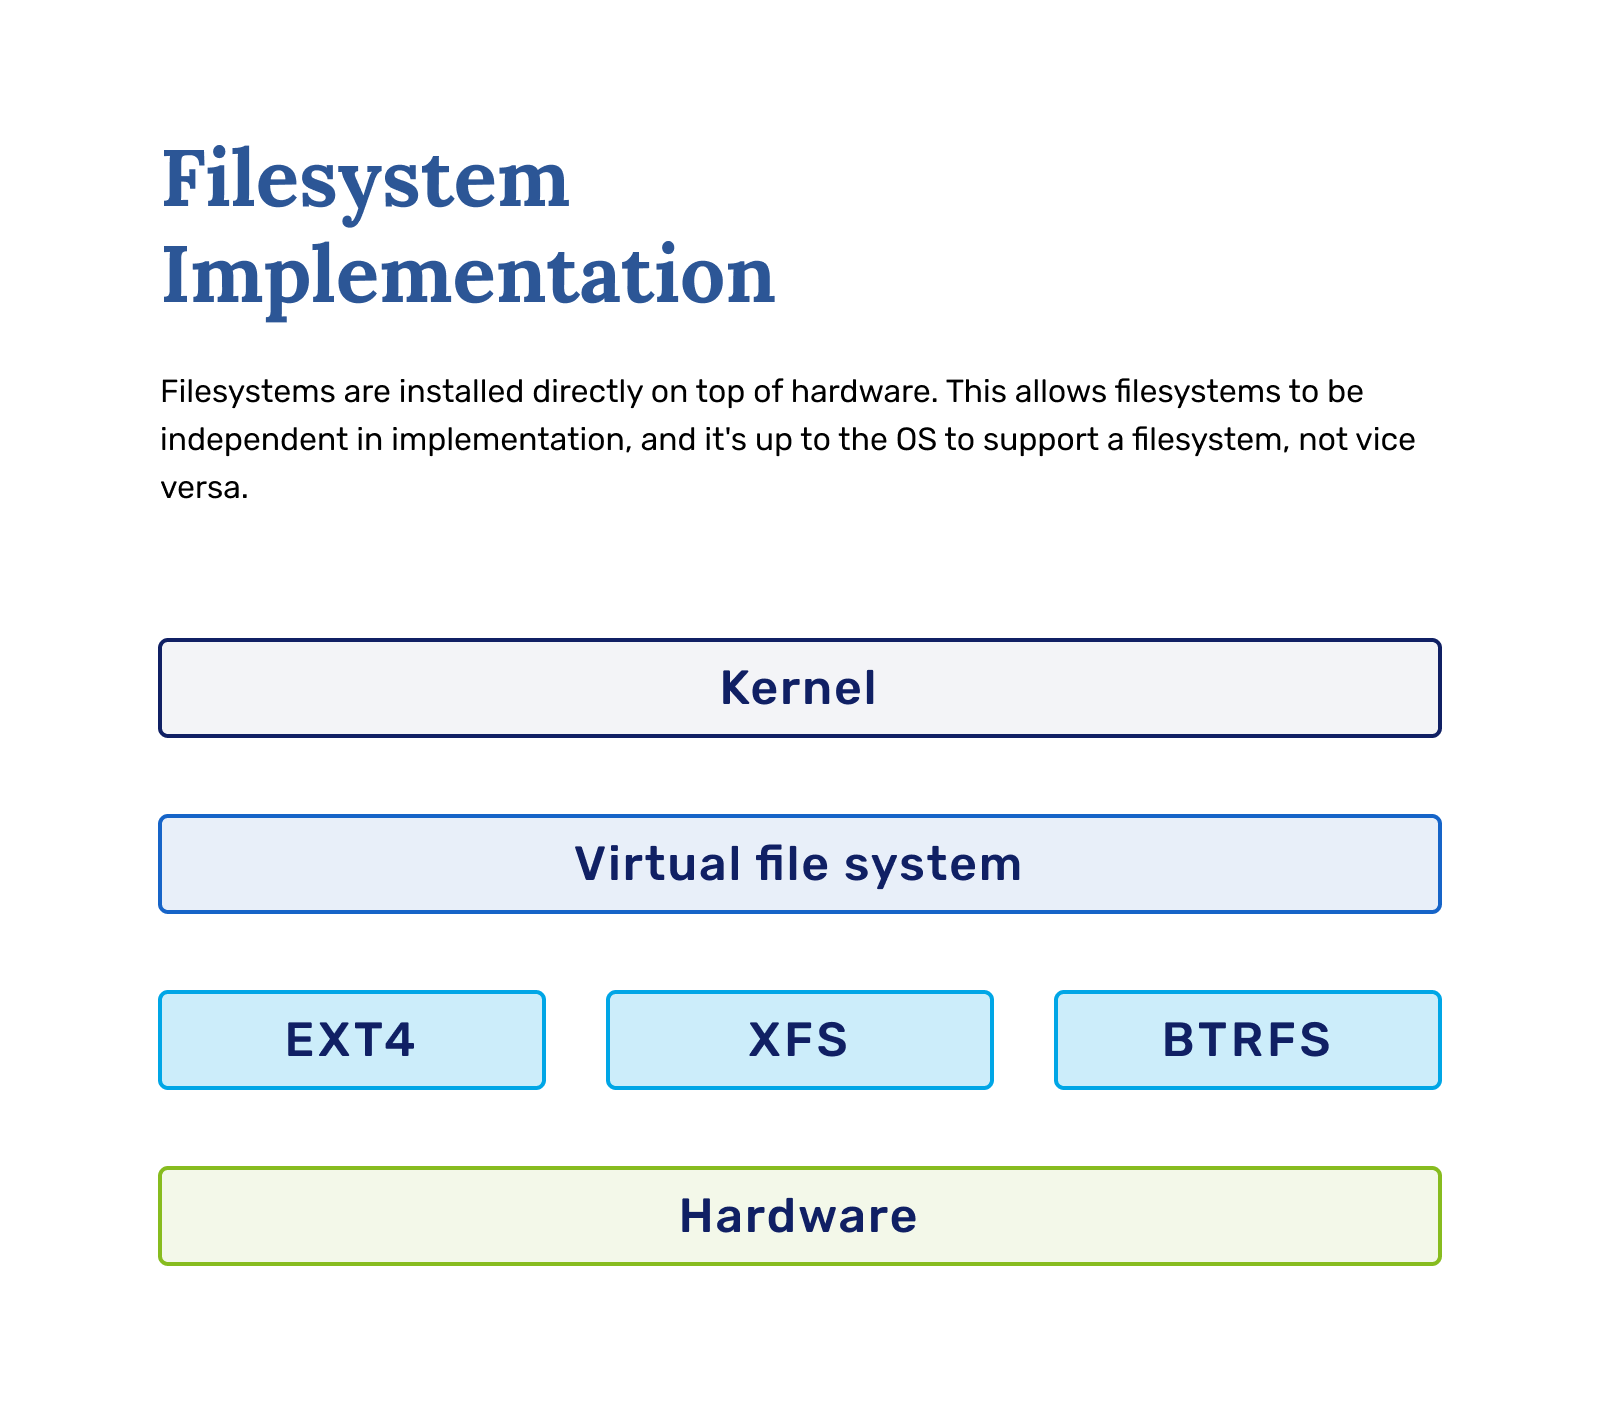
This lab discusses about local file systems (EXT4, BTRFS, XFS and fat32) and shared/network filesystems.
A file system (abbreviated as FS) is integral to any computer system. While a disk is a type of physical storage medium that stores data, a file system controls how data is written, stored and retrieved from the said physical storage. A filesystem is characterised by its structure, logic, features and more. The file system layer acts as an intermediary between hardware, no matter the data storage: USB, hard drives, SSDs, or NVME type drives; a file system mediates input-output(IO) between physical hardware and applications.
Local file systems run on a local machine and are directly attached to the machine's storage. Most local file systems are POSIX-compliant, meaning they support system calls like read(), write(), and seek(). The main differences come from a user-side perspective: scalability, performance and ease of use. When selecting an FS, the main things to consider are:
- required size
- features
- performance under the specific workload (e.g. databases, cloud)
- compatibility with an OS.
EXT4
Extended journaling file system 4 (ext4) is the 4th generation of the ext FS family introduced as a default file system in RHEL6. It has a read and write backward compatibility with ext2 and ext3; however, the past generations are incompatible with the ext4 format.
The features of ext4:
- Supported maximum file system size up to 50 TiB
- Extent-based metadata
- Delayed allocation
- Journal checksumming - provides improved reliability
- Large storage support
The extent-based metadata is an improvement in writing metadata. Rather than storing every individual block which makes up the file, it stores the address of the first and last block of each continuous range of blocks called extents. Thus, processing a large file takes less time and reduces fragmentation.
The delayed allocation allows the file system to postpone block allocation as much as possible until the data is flushed to disk. This feature enables higher performance, leading to larger, more contiguous allocations.
The journal checksumming warns the file system if there are invalid or out-of-order entities on the first mount after a crash. It avoids further damaging the filesystem.
ext4 shortens file system repair time using fsck utility by being “journaled” in case of a crash or power failure; the journal keeps all the changes not synced yet to disk, allowing for a quick recovery.
Thanks to its longevity, most Linux applications support ext4; it gives a good fight for performance to our next local file system (XFS) and is commonly used for /home.
XFS
Extents File System (XFS) is a high-performance, robust 64-bit journaling file system. It is the default file system in RHEL. XFS was initially developed in the early 1990s by SGI, and the file system has a long history of running on large servers and storage systems. That is possible due to proficient parallel IO, enabling extreme scalability of IO threads and file system bandwidth when spanning multiple storage devices.
The features of XFS:
- Supported file system size up to 8 EiB
- Metadata journaling
- Scalable and fast repair utilities
- Quota journaling
- Ability to support a large number of concurrent operations
- B-tree indexing for scalability of free space management
- Sophisticated metadata read-ahead algorithms
XFS supports file systems of a considerably larger size than ext4. It is built for large systems with enterprise workloads ensuring reliability and performance. Metadata journaling keeps file system integrity in case of a system crash by maintaining a record of file system operations that are replayed after a reboot and the filesystem remounted. XFS performs well on systems with multi-threaded, parallel IO workloads; however, single-threaded or metadata-intensive workloads make the fs behave poorly and cut the performance. Finally, XFS can only be expanded in size, unlike ext4, leading to constant efforts not to over-allocate space.
BTRFS
Btrfs (B-Tree Filesystem) is a modern copy-on-write (CoW) filesystem for Linux. Btrfs aims to implement many advanced filesystem features while focusing on fault tolerance, repair, and easy administration. The btrfs filesystem design supports high-performance and large storage servers, especially across multiple disks.
Btrfs addresses the lack of pooling, snapshots, checksums, and integral multi-device spanning in Linux file systems. The core data structure differs from ext4 and xfs in a significant way - instead of a “block” based allocation, data is kept in a generalized binary tree format, a balanced tree of pointers. This structure allows easy handling of snapshots by simply making the snapshot tree point to a different file/directory. It also facilitates seeking files since a tree can be much more easily traversed.
Advanced features:
-
Copy-on-write (COW) is an optimization in that if multiple callers ask for initially indistinguishable resources, they are pointed to the same resource. In other words, if a data unit is copied but not modified, the copy exists as a reference to the original. Only when a new byte is written, a copy is created.
-
Checksums is a sequence of characters used to check data for any occurred errors. If the checksum of an original file is known, one can confirm that their copy is identical with a checksum utility. Data on the drives can ingrain tiny errors, for example, bit flips, that can happen from magnetic issues, solar flares or, most commonly, during copying. BTRFS has metadata checksums, and it traverses all the files. Therefore one can set up the checksum scheduled to run, and the FS will inform if something has gone wrong and will try to find and fix the flipped bit.
FAT32
The FAT(File allocation table) file system was initially developed for floppy disks. While no longer the default file system for Microsoft Windows, it is still used in smaller devices and storage media. The main reason for that is the ease of implementation and support by every major OS (Win, Linux, Mac). The FAT format starts with a large table of all the file pointers of a partition followed by data blocks. This structure contrasts with ext-based filesystems, where each bit of metadata is a part of the file system block itself.
The fs limitations also favour small storage devices. The original version FAT8 only had 8-bit table entries; hence maximum partition size was 8MiB. With each implementation of FAT, the data table size increased. The last version FAT32 supports block sizes that could be changed when formatting the partition, but Windows standard settings set the maximum file size to 4GiB and partition size to 2TiB. FAT32 also supports a few extra features, especially in redundancy and recoverability. These factors and file name length limits have led to FAT-type filesystems used in relatively niche circumstances, mainly in legacy hardware or applications.
Local filesystem on practice
Finally, being done with the theoretical part, let's look at how to create, format and mount partitions on a local filesystem. A partition organises a storage device into smaller segments meaning creating partitions allows one to use some percentage of their storage space for a specific purpose and leave the rest. A partition’s typical usage case is as an ordinary filesystem.
Creating partitions
First, let's check out what block devices we have on our system and find some information about them. lsblk command shows you all block devices attached to your system:
[root@lab8 ~]# lsblk
NAME   MAJ:MIN RM  SIZE RO TYPE MOUNTPOINTS
sda      8:0    0   20G  0 disk
└─sda1   8:1    0   20G  0 part /
sdb      8:16   0    1G  0 disk
sr0     11:0    1  482K  0 rom
sda and sdb. Note
If you do not see two disks (sda, sdb), this is most likely because you forgot to request a data volume at the beginning of the semester. You request one under Storage in minu.etais.ee and attach under VM > Storage
blkid determines the type of content that a block device holds and some content metadata attributes such as UUID, BLOCK_SIZE, and TYPE. Here you can see that sdb is not listed, meaning that sdb has no filesystem on it, and therefore it is an empty block device.
[root@lab8 ~]# blkid
/dev/sr0: UUID="2025-03-25-13-11-11-00" LABEL="config-2" TYPE="iso9660"
/dev/sda1: UUID="87a15050-0fe1-49fd-bd64-1fa462d7c526" TYPE="xfs" PARTUUID="89bdc2fd-01"
/dev is a directory for special or device files. It is a crucial directory that backs one essential aspect of a filesystem on Linux - everything is a file or a directory. There are two main types of devices block or character; however, other device types exist and can be created. In general, block devices are devices that store or hold data, and character devices can be thought of as devices that transmit or transfer data. In the directory /dev, the block devices are shown as files and indicated by the b in ls -l output.
[root@lab8 ~]# ls -l /dev/ | grep '^b' # This shows all files in /dev, and then filters for only those lines that start with the letter b
brw-rw----. 1 root disk      8,   0 Mar 25 13:11 sda
brw-rw----. 1 root disk      8,   1 Mar 25 13:11 sda1
brw-rw----. 1 root disk      8,  16 Mar 25 13:11 sdb
brw-rw----. 1 root cdrom    11,   0 Mar 25 13:11 sr0
To make use of an unutilised device sdb, partitions are to be created using the fdisk command. fdisk -l gives a detailed overview of the block devices, partitions and logical volumes:
[root@lab8 ~]# fdisk -l
Disk /dev/sda: 20 GiB, 21474836480 bytes, 41943040 sectors
Units: sectors of 1 * 512 = 512 bytes
Sector size (logical/physical): 512 bytes / 512 bytes
I/O size (minimum/optimal): 512 bytes / 512 bytes
Disklabel type: dos
Disk identifier: 0x5ac37ea1

Device     Boot   Start      End  Sectors  Size Id Type
/dev/sda1  *       2048  1050623  1048576  512M 83 Linux


Disk /dev/sdb: 1 GiB, 1073741824 bytes, 2097152 sectors
Units: sectors of 1 * 512 = 512 bytes
Sector size (logical/physical): 512 bytes / 512 bytes
I/O size (minimum/optimal): 512 bytes / 512 bytes
Danger
Make sure you are formatting the empty 1Gb disk, not the disk that your VM operating system is running from. Once you overwrite the partition table for the operating system, there is no going back. Unless you have an Ansible ready to go you will have to replay all of the previous labs.
You can confirm this by examining the output of df to see whether you are editing the correct block device
fdisk is an interactive tool to create/manage/delete partitions. To start creating partitions on sdb, the command fdisk /dev/sdb executed. Let’s print the partition table by issuing ‘p’. The table is currently empty to add a partition issue option ‘n’:
[root@lab8 ~]# fdisk /dev/sdb

Welcome to fdisk (util-linux 2.32.1).
Changes will remain in memory only, until you decide to write them.
Be careful before using the write command.

Device does not contain a recognized partition table.
Created a new DOS disklabel with disk identifier 0x05d607e2.

The message is expected as it is an unused block device. Select ‘m’ option to view all the available options

Command (m for help): p
Disk /dev/sdb: 1 GiB, 1073741824 bytes, 2097152 sectors
Units: sectors of 1 * 512 = 512 bytes
Sector size (logical/physical): 512 bytes / 512 bytes
I/O size (minimum/optimal): 512 bytes / 512 bytes
Disklabel type: dos
Disk identifier: 0x05d607e2

Command (m for help): n
Partition type
p   primary (0 primary, 0 extended, 4 free)
e   extended (container for logical partitions)
Select (default p):
Let us briefly discuss partition types: Primary, Extended and Logical. You can only create 4 partitions on a given block device. This limit is caused by the Master Boot Record (MBR’s) partition being only 1-2kb in size and, therefore, unable to hold more information than 4 partitions. Hence, the concept of partitions was extended into Primary, Extended and Logical.
- Primary partition - a conventional partition created by default unless specified otherwise. A partition can be bootable only if it is a Primary one.
- Extended partition - a special type of partition which is intended to hold multiple logical partitions. It can be thought of as a container for all logical partitions. An extended partition allows you to create many logical partitions solving the problem of 4 primary partitions.
- Logical partition - a partition created inside an extended partition. It can be used in the same way as a primary partition.
Let us resume our example and create an extended partition of 1GiB in size and then create two logical partitions there:
Command (m for help): n
Partition type
p   primary (0 primary, 0 extended, 4 free)
e   extended (container for logical partitions)
Select (default p): e
Partition number (1-4, default 1):
First sector (2048-2097151, default 2048):
Last sector, +sectors or +size{K,M,G,T,P} (2048-2097151, default 2097151):

Created a new partition 1 of type 'Extended' and of size 1023 MiB.
Why does the first sector start at 2048 rather than 0?
Print the partition table and have a look at the created partition, we already used the command to see the table. Here is the output:
Disk /dev/sdb: 1 GiB, 1073741824 bytes, 2097152 sectors
Units: sectors of 1 * 512 = 512 bytes
Sector size (logical/physical): 512 bytes / 512 bytes
I/O size (minimum/optimal): 512 bytes / 512 bytes
Disklabel type: dos
Disk identifier: 0xa60b1417

Device     Boot   Start     End Sectors  Size Id Type
/dev/sdb1          2048 2097151 2095104 1023M  5 Extended
Note these changes have not been written yet; we have to issue ‘w’ to apply the changes. You can think of these changes as a preview. Let us go ahead and create two logical partitions to populate the container. Logical partition 1 should have the first sector = 4096 and the last sector = 1048574 or 510MiB. Logical partition 2 should have the first sector = 1050624 and the last sector = 2097151 or 510MiB. See the results which should look roughly like these:
Command (m for help): p
Disk /dev/sdb: 1 GiB, 1073741824 bytes, 2097152 sectors
Units: sectors of 1 * 512 = 512 bytes
Sector size (logical/physical): 512 bytes / 512 bytes
I/O size (minimum/optimal): 512 bytes / 512 bytes
Disklabel type: dos
Disk identifier: 0xa60b1417

Device     Boot   Start     End Sectors  Size Id Type
/dev/sdb1          2048 2097151 2095104 1023M  5 Extended
/dev/sdb5          4096 1048574 1044479  510M 83 Linux
/dev/sdb6       1050624 2097151 1046528  511M 83 Linux
After ensuring that we have achieved a desirable outcome. We can apply the changes by writing this new partition table, by issuing ‘w’ option:
Command (m for help): w
The partition table has been altered.
Calling ioctl() to re-read partition table.
Syncing disks.
Installing filesystem
Once we got our partitions created, we can install filesystem on to them with the help of mkfs command. It builds all necessary framework for handling and storing file metadata, so one could start adding file to the partition.
[root@lab8 ~]# mkfs #use double TAB to see the list
mkfs         mkfs.cramfs  mkfs.ext2    mkfs.ext3    mkfs.ext4    mkfs.fat     mkfs.minix   mkfs.msdos   mkfs.vfat    mkfs.xfs
Let’s install ext4 filesystem on the sdb5 and xfs on the sdb6 and call them lab8FSext4 and lab8FSxfs accordingly. -L flag assigns labels:
[root@lab8 ~]# mkfs.ext4 -L "lab8FSext4" /dev/sdb5
mke2fs 1.45.6 (20-Mar-2020)
Discarding device blocks: done
Creating filesystem with 522236 1k blocks and 130560 inodes
Filesystem UUID: 16d13727-6e25-40a8-9459-39846f4c77f4
Superblock backups stored on blocks:
    8193, 24577, 40961, 57345, 73729, 204801, 221185, 401409

Allocating group tables: done
Writing inode tables: done
Creating journal (8192 blocks): done
Writing superblocks and filesystem accounting information: done
Now we can view the created block devices with blkid. As soon as a partition is formatted, a UUID is assigned to that block device. Any unformatted block devices won’t appear in the above list. All of this info is useful when adding entries to the /etc/fstab file.
[root@lab8 ~]# blkid
/dev/sda1: LABEL="boot" UUID="57a362af-5447-4e88-9161-ff32a2feb513" BLOCK_SIZE="512" TYPE="xfs" PARTUUID="5ac37ea1-01"
/dev/sr0: BLOCK_SIZE="2048" UUID="2021-03-21-11-55-42-00" LABEL="config-2" TYPE="iso9660"
/dev/sdb5: LABEL="lab8FSext4" UUID="16d13727-6e25-40a8-9459-39846f4c77f4" BLOCK_SIZE="1024" TYPE="ext4" PARTUUID="a60b1417-05"
/dev/sdb6: LABEL="lab8FSxfs" UUID="916d1f69-d90f-4077-b23f-360619a1b6bf" BLOCK_SIZE="512" TYPE="xfs" PARTUUID="a60b1417-06"
Mounting filesystem
By running lsblk, you can see sdb5 and sbd6 are not mounted yet, so we need to do so(Make sure they are formatted by checking blkid command). You can manually mount and unmount the partitions with the commands: mount and umount. However, the mount command is not persistent across boots, so we must also deal with that.
Warning
It is vital to test your /etc/fstab because any errors inside will stop your machine reboot.
Let’s take a look what is inside the /etc/fstab file:
[root@lab8 ~]# cat /etc/fstab
#
...
#
UUID=bfedb9fb-9860-47f2-8355-9b654605bbb4 /                       xfs     defaults        0 0
UUID=57a362af-5447-4e88-9161-ff32a2feb513 /boot                   xfs     defaults        0 0
From man fstab: “The file fstab contains descriptive information about the filesystems the system can mount. fstab is only read by programs, and not written; it is the duty of the system administrator to properly create and maintain this file. Each filesystem is described on a separate line. Fields on each line are separated by tabs or spaces. Lines starting with '#' are comments. Blank lines are ignored.”
You need to add a new entry in this file to automount your FS. Each entry has 6 fields.
- 1 column - the block special device or remote filesystem to be mounted
- 2 column - the mount point (target) for the filesystem
- 3 column - the type of the filesystem
- 4 column - the mount options associated with the filesystem
- 5 column - This field is used by dump(back-up utility) to determine which filesystems need to be dumped. Defaults to zero (don't dump) if not present.
- 6 column - used by fsck(8) to determine the order in which filesystem checks are done at boot time
Let us create two directories where the partitions will be mounted into with mkdir -p command and name them /lab8/fs-ext4 and /lab8/fs-xfs accordingly. With your favourite text editor, open /etc/fstab and add two lines to describe your partitions.
Here is an example of lines:
UUID=16d13727-6e25-40a8-9459-39846f4c77f4 /lab8/fs-ext4          ext4      defaults        0 0
UUID=916d1f69-d90f-4077-b23f-360619a1b6bf /lab8/fs-xfs          xfs      defaults      0 0
Now execute mount -a command to test your new configuration. It will mount all devices specified in the /etc/fstab, unless they are already mounted. Then run systemctl daemon-reload to update systemd and lsblkto check out your new setup
Task 1 - Local filesystem recap
- View all block devices attached to your system and identify an empty one.
-
Create partitions:
- create an extended partition with size
1 GiBthat has two logical partitions510 MiBfor the first partition and511 MiBfor the second partition.
- create an extended partition with size
-
Install filesystem
ext4andxfsfilesystem to the two logical partitions, and label them withlab8FSext4andlab8FSxfsaccordingly. -
Mount the filesystems:
- create mount directories
/lab8/fs-ext4and/lab8/fs-xfs - edit
/etc/fstabto add entities for both partitions (here is some hints):- column 4 -> defaults
- column 5 -> 0
- column 6 -> 0
- test config
mount -a
- create mount directories
Verify
You can check for the created partition with lsblk or ls -l /dev | grep "sdb" You can analyse block devices with file command: file -sL /dev/sdb5, make sure the volume name is correct. mount -a tests your new fstab config.
Ansible
While Ansible has modules to create/delete/format filesystems, we do not recommend to do so as it might mess up your machine. In general, filesystem modifications should not be automated. However, it is fine to mount volumes with Ansible. To do the tasks with Ansible, you can utilise posix module from Ansible
2. Network Filesystems (NFS)
NFS is a distributed file system protocol originally developed by Sun Microsystems ( acquired and renamed by Oracle in 2009) in 1984. The protocol allows a user on a client computer to access files over a computer network as if local storage is accessed. The protocol builds on the Open Network Computing Remote Procedure Call (ONC RPC) system. NFS is an open standard defined in a Request for Comments (RFC), allowing anyone to use the protocol.
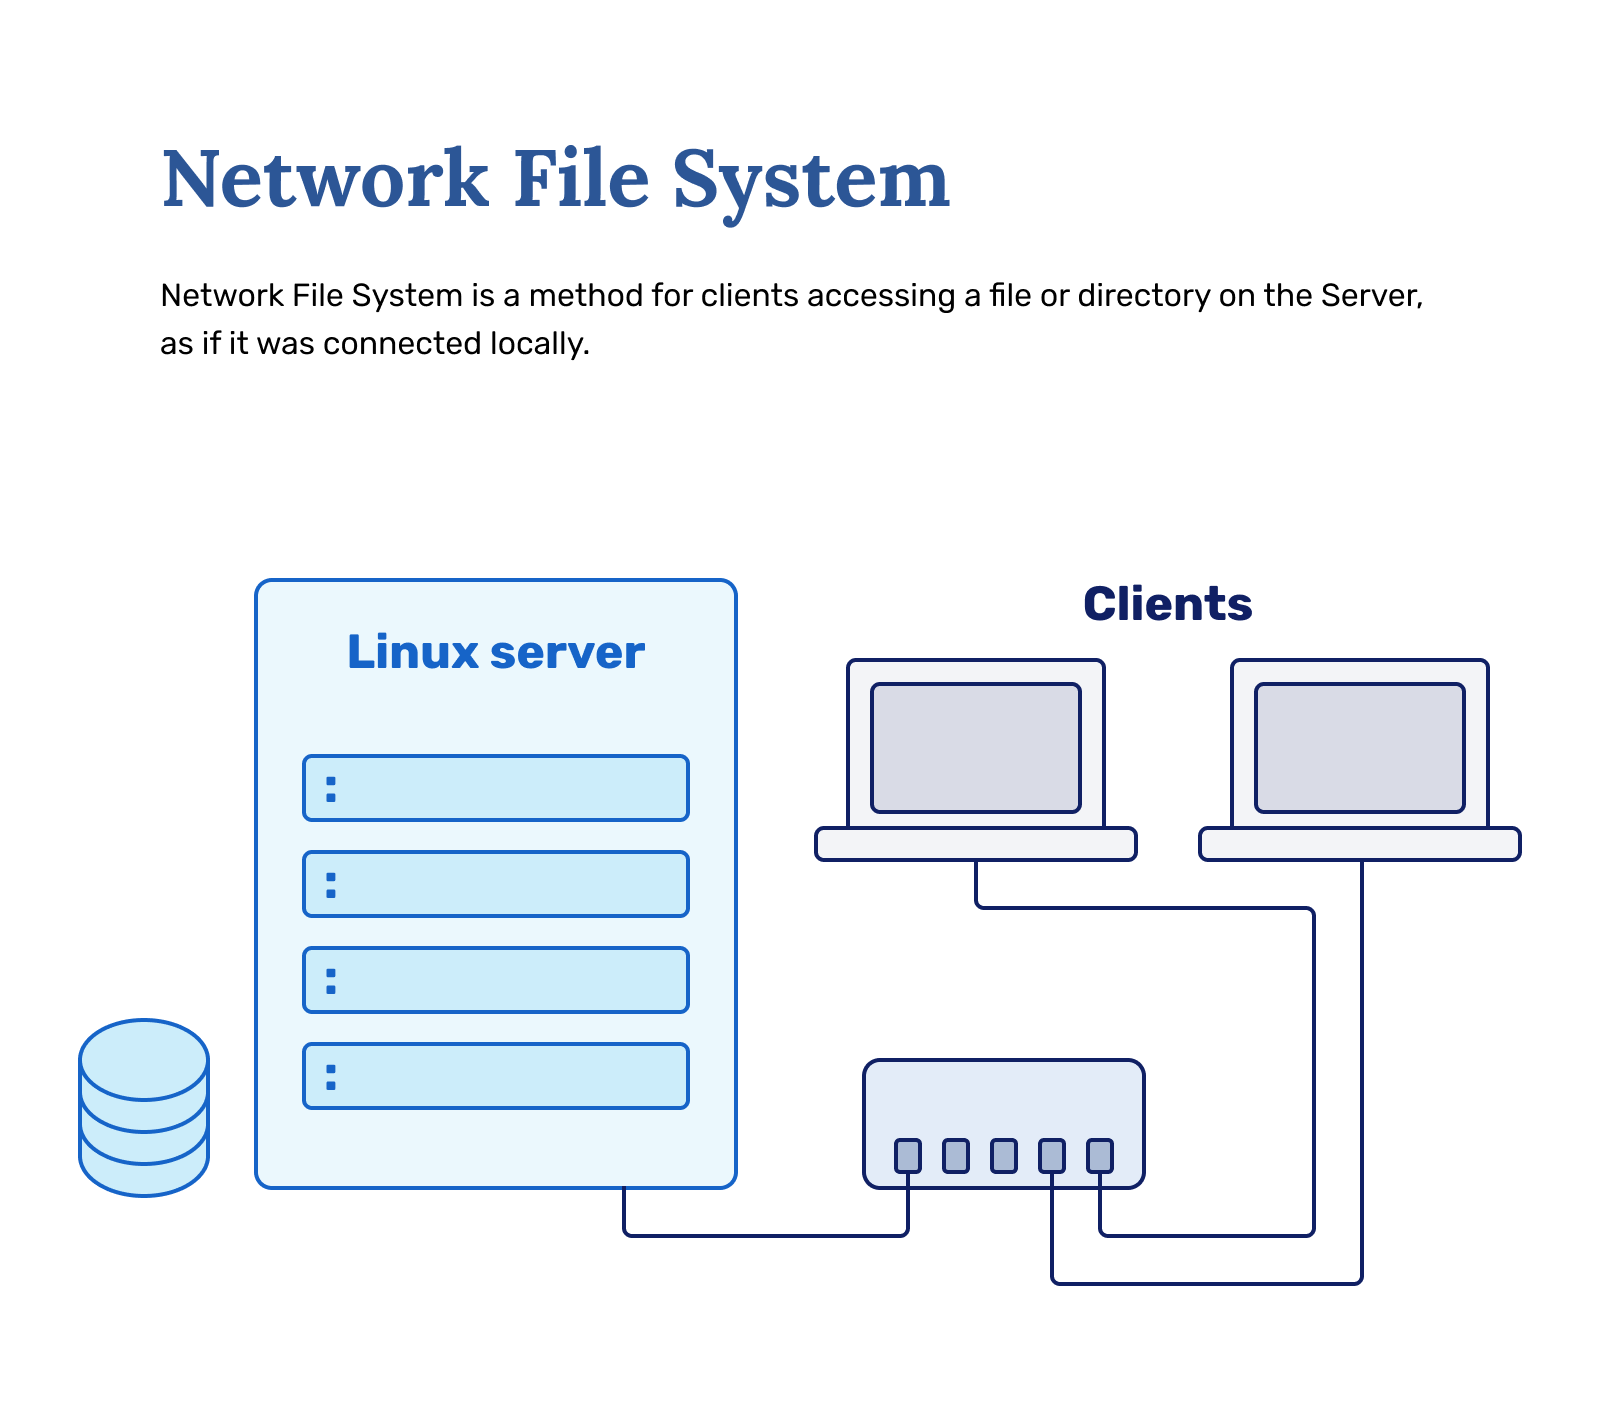
NFS is often the easiest way to set up filesystem sharing in UNIX environments (BSD, Linux, Mac OSX). As students have one machine to work with, your machine will both be the NFS server (party providing the filesystem) and the NFS client (party accessing the filesystem).
Important files:
/etc/fstabdescribes filesystems that the OS should automount on boot/etc/exportsdescribes your exported NFS filesystems from
Task 2 - Set up NFS
- Install the
nfs-utilspackage. - Start
nfs-serverservice. - Use the man pages or the internet, to find out the format of
/etc/exportsfile. - Make the directory that you will export -
/shares/nfs - Make the directory you will mount the exported filesystem to -
/mnt/nfs. - Setup export using
/etc/exportsfile.- You want to give your own machine read-write access to the
/shares/nfsdirectory. - As you are eventually mounting from your own machine, you can give permissions to localhost.
- You want to give your own machine read-write access to the
- After changing
/etc/exports, useexportfs -acommand to publish the configuration change. - Mount the filesystem using the following command:
mount -t nfs <vm_name>.sa.cs.ut.ee:/shares/nfs /mnt/nfs- this command should work without any output. If there is, something went wrong.
- Open ports
111and2049(TCP) - Add entry to
fstabto make the mount persistent
Verify
If your mount command worked without any output, then your filesystem should be mounted. This should be visible in the outputs of the following commands: mount, df -hT Also, when creating a file in /mnt/nfs, it should appear in /shares/nfs and vice versa.
3. CIFS, SMB, SAMBA
SMB protocol is another communication protocol for providing shared access to files, printers and serial ports between nodes on a network. The Server Message Block (SMB) protocol is a network file-sharing protocol that allows applications on a computer to read and write to files and request services from server programs in a computer network. The SMB protocol can be used on top of its TCP/IP protocol or other network protocols. Using the SMB protocol, an application (or the user of an application) can access files or other resources at a remote server. The protocol allows applications to read, create, and update files on the remote server. SMB can also communicate with any server program configured to receive an SMB client request. SMB is a fabric protocol used by Software-defined Data Center (SDDC) computing technologies, such as Storage Spaces Direct and Storage Replica. For more information, see Windows Server software-defined data center.
The first standard implementation of SMB is called CIFS (Common Internet File System), initially developed by IBM, then later merged under the SMB name. With the release of Windows 95 in the early 1990s, Microsoft made considerable modifications to the most commonly used SMB version. Microsoft then merged the updated version of the SMB protocol (and rebranded it as CIFS) with the LAN Manager product, bringing client and server support. Later Microsoft then dropped the CIFS name in favour of SMB.
While IBM developed the first revision of SMB to run on NetBIOS, Unix-like operating systems do not support SMB protocol communication by default; SAMBA was created to accommodate communication between two systems. Samba runs on linux clients but implements a native Windows protocol, which means SAMBA is an open-source CIFS/SMB implementation. Samba is the standard Windows interoperability suite of file systems on Unix-like operating systems.
Recap:
- CIFS was developed by IBM
- Microsoft modified it and released CIFS/SMB 1.0
- Microsoft then dropped the CIFS name and continued with SMB 2.0
- SAMBA was then created as a tool to create and mount CIFS/SMB type share file systems
Task 3 - Set up SAMBA
- Install the following packages:
samba samba-common samba-client cifs-utils - Make the directory that you will export -
/shares/samba - Make a directory to mount to -
/mnt/samba - Create a samba group:
groupadd samba_group - Add some users to this group:
usermod -a -G samba_group scoring # Necessary for Nagios checks!usermod -a -G samba_group centos # Used for your own testing
- Add samba passwords to these users using
smbpasswd:scoring- Set the password to be,2daysuperadmin- Repeat for other users you want to use
- Set appropriate permissions:
chmod -R 0755 /shares/sambachown -R root:samba_group /shares/sambachcon -t samba_share_t /shares/samba
-
Edit the samba configuration file
/etc/samba/smb.conf, and add following section:[smb] comment = Samba share for SA lab valid users = @samba_group path = /shares/samba browsable =yes writable = yes -
Start and enable the smb service.
We will also need to open the following ports: 139 and 445 TCP
Verify
Command testparm shows whether samba configuration is valid. You can use smbclient -L //localhost -U <user> to list all the accessible shares in a system. This command can be used with users that you gave a password to. For mounting the filesystem, use the following command: mount -t cifs -o username=scoring //localhost/smb /mnt/samba/
4. Object Storage
Object storage, often referred to as object-based storage, is a data storage architecture for handling large amounts of unstructured data. The data does not conform to or cannot be organized easily into a traditional relational database with rows and columns. Today’s Internet communications data is mainly unstructured such as email, videos, photos, web pages, audio files, sensor data, and other media and web content (textual or non-textual). This content streams continuously from social media, search engines, mobile, and “smart” devices.
Objects are discrete units of data stored in a structurally flat data environment. There are no complex hierarchies like folders, symlinks, file permissions or file types as in a file-based system. Each object is a simple, self-contained repository that includes the data, metadata (descriptive information associated with an object), and a unique identifying ID number (instead of a file name). This information enables an application to locate and access the object. Large storage pools aggregate object storage devices and allow distribution over the pools across locations. This leads to unlimited scale, as well as improved data resiliency and disaster recovery.
Object storage removes the complexity and scalability challenges of a hierarchical file system with complex hierarchies. Objects can be stored locally but most often reside on cloud servers, with accessibility from anywhere in the world.
You can store any number of static files on an object storage instance to be called by an API. Additional RESTful API standards are emerging beyond creating, retrieving, updating, and deleting objects. These allow applications to manage the object storage, containers, accounts, multi-tenancy, security, billing, etc.
In reality, object storage is being used as a bit of a medium to accommodate routine workflows. Most object storage software still allows folders to segregate objects into different folders while allowing regular, filesystem like access on top of API access.
This is why Amazon Web Services decided to use the concept of Object Storage to create their own standardized service called S3. Object Storage is a computer data storage architecture that manages data as objects, as opposed to other storage architectures like file systems which manage data as a file hierarchy, and block storage which manages data as blocks within sectors and tracks. [1] S3 service allows you to access the storage similar to accessing a website using HTTP and HTTPS protocols.
Even though NFS and Samba can be used to solve most file-sharing problems, it is a configuration hell once machines are in different parts/networks of the world, with tera- or petabytes of data on them to share filesystems between the machines. For example, NFS requires at least ports 111 and 2049 on the server side. Opening weird ports is a security issue itself. On top of that, both Samba and NFS are very difficult to load balance. Object Storage, with its unique HTTP based workflow, uses the same tools for load balancing as websites, for example.
Let us play around with object storage a bit. First of all, let us make an account. Now, the lab tutors have set up a system where you can add a user yourself. Usually, the Object Storage service provider makes these users for you.
Task 4 - Set up Consul
Inside your VM, there's a service called Consul running. This service is responsible for advertising your machine's existence to our Scoring server. This is how we automatically find out your machine's IP address and name.
This service also has a subsystem called a Key-Value store. You can write values into this store. We have utilized this to allow you to make users for yourself.
While adding a key-value pair into consul, make sure to not use a personal password, as this value can be read by any other students by doing /usr/local/bin/consul kv get object/<machine_name> <password>. Also, even though it's technically possible for you to change other people's passwords as well, if you do that, you will have automatically failed this course. (We will know, there's monitoring in place)
Run the following command to insert a passphrase:
/usr/local/bin/consul kv put object/<machine_name> <password>
<password> should be at least 8 characters long, alphanumeric string. <machine_name> . Do not use the full domain name. This value should be lowercase, otherwise you cannot make a bucket later.
After having running the put command, you should now have access to the Object Storage. First things first, let's see if the Object Storage service answers and is accessible with your username and account.
Go to https://scoring.sa.cs.ut.ee:9000. Access Key is your machine name, Secret Key is your password. When you sign in, it should look rather empty. If you cannot log in, make sure you chose an appropriate password, and try again. There will be a small delay of around ~5 minutes until your credentials update.
This interface is a web interface for object storage. It is not always the same, as this is dependent on the service that provides the interface. Our interface is called "Minio", and it is enterely open source (you can download and run it yourself).
It looks empty because we have configured your user to only have access to buckets with the same username, utilizing policies. Buckets are logical containers in which data is held in Object Storage. You can think of them like folders inside normal filesystems, but there are differences.
Here is the policy each of students users have been applied to:
{
  "Version": "2012-10-17",
  "Statement": [
    {
      "Action": [
        "s3:CreateBucket",
        "s3:PutBucketPolicy",
        "s3:GetBucketPolicy",
    "s3:DeleteBucket",
        "s3:DeleteBucketPolicy",
        "s3:ListAllMyBuckets",
        "s3:ListBucket"
      ],
      "Effect": "Allow",
      "Resource": [
        "arn:aws:s3:::${aws:username}"
      ],
      "Sid": ""
    },
    {
      "Action": [
        "s3:AbortMultipartUpload",
        "s3:DeleteObject",
        "s3:GetObject",
        "s3:ListMultipartUploadParts",
        "s3:PutObject"
      ],
      "Effect": "Allow",
      "Resource": [
        "arn:aws:s3:::${aws:username}/*"
      ],
      "Sid": ""
    }
  ]
}
Task 5 - So let's configure your VM to use object storage, and make your own bucket.
- Inside your VM, download and set up the following tool: minio . We trust you to be able to download and install it yourself, but we give a few pointers:
- You want to use the "64-bit Intel" download.
- Optionally, move the file to /usr/bin/, so you can use it without specifying the path.
- Make sure it is owned by root.
- Make sure it is executable.
mc --helpshould output no errors.
- After having done that, we need to configure your machine to be able to talk to the Object Service.
- Check all the configured hosts:
mc alias list - Add our own:
mc alias set scoring https://scoring.sa.cs.ut.ee:9000 <machine_name> <password> - Make sure it shows in the check command. (
mc alias list)
- Check all the configured hosts:
- If everything went well, now we should be in a state where we can start using the storage. First things first, make a bucket.
mc mb scoring/<machine_name>- You can also try making a bucket when substituting
with something else, it should fail.
This is a point where a bucket should show up in the web interface as well. You can try playing with the storage now.
The command structure is as following:
mc [FLAGS] COMMAND [COMMAND FLAGS | -h] [ARGUMENTS...]
This means:
- List all files in a remote bucket:
mc ls <host>/<bucket>, or in our case,mc ls scoring/<machine_name> - Copy a local file to remote bucket:
mc cp /path/to/file <host>/<bucket>/<file> - Cat a file in remote bucket:
mc cat <host>/<bucket>/<file>
All these files should show up in the web interface as well.
For the intents of Nagios check, please make a file called scoringtestfile, with only your machine name written in it, and add it into the uppermost path in your bucket.
Nagios will do the following check: mc cat scoring/<machine_name>/scoringtestfile
For the intents of a tutorial, this lab is over. You are free to play around with the object storage to learn, as Object Storage is widely used in Google Cloud Services and Amazon Web Services, and if you're ever going to be an IT technical person, you cannot do without these.
Extra materials for self-learning:
mccommand complete guideresticcommand - a backup solution built on top of Object Storage