Lab 7 - Transport Layer Security (TLS)
Nowadays, everything is on the internet. Not only cat pictures but also financial institutions, mail services, schools, and even the government.
The problem is, that as a person, you usually do not want someone else to read your private emails or access your bank account. Especially if that someone has malicious intent.
This is entirely the job of System Administrators. They try to protect the privacy of data. Thankfully, to make their job easier, mathematicians have come up with a technology called asymmetric cryptography.
Asymmetric cryptography allows you to generate a pair of certificates - usually called certificate and key. The key is secret, you never let anyone know the key. But you do let them know the certificate.
Then, when anyone wants to send you anything private, they take your certificate and encrypt the data they want to send with this certificate. Now, after encryption, the only way to decrypt this data is using your key. This is the same idea SSH keys use.
The same concept can be used, when you are hosting your services. You can take a certificate/key pair, and tell the Apache web server to use this pair. This means, that any time someone connects to Apache, they are given a public certificate to encrypt their information with. When they encrypt and send their data to the server, the server takes the private key and decrypts the data. This allows you to exchange data with a server while remaining completely safe from prying eyes.
For example, you can see Google's public certificate by doing: openssl s_client -connect google.com:443 Under the server certificate section, you can see the public certificate.
Now that certificates have entered the picture, there is yet another security issue. If everyone could generate a certificate/key pair for any web service, then it would be very easy to fake a web server, for example, a bank. To prevent this, these certificate/key pairs are made in the following steps:
- Generate a private key
- Create a certificate request based on this key
- Send the certificate request to a Certificate Authority
- Validate why you should be able to generate a certificate for this domain
- Done over email, phone, DNS secret, or HTTP secret
- Wait until you receive your email and start using it
This process allows a client to check if the certificate/key pair is trusted. Most computer systems have a built-in Certificate Authority list with their keys, and can cryptographically check the validity of all certificate/key pairs. Even your browser has one built-in, and you can check it.
Because this process takes time, and/or costs money (CAs like Digicert, Namecheap, etc.) or requires a service on the public web (Lets Encrypt), then we are going to use a CA made by the teachers, and we will sign our own certificates.
Further reading (HIGHLY RECOMMENDED!)
Signing a certificate in the scoring server
For our own little Certificate Authority, we have set up a service named vault in our scoring system.
Vault is a secrets' engine, capable of securely storing secrets and generating them if necessary.
The main access point for vault is the web GUI - https://scoring.sa.cs.ut.ee:8200/ui/
For the authentication method, choose LDAP and log in with your University of Tartu central credentials.
You should see that a secrets' engine named pki_int (PKI: Public Key Infrastructure, INT: Shorthand for intermediate) is available to you, and under that field, you can see a field for signing certificates under the domain sa.cs.ut.ee. Clicking on sa.cs.ut.ee will bring you to the form where you can request your certificates.
You can generate certificates for every virtual host (www, proxy, wordpress, mail) using <service-name>.<vm-name>.sa.cs.ut.ee in the Common Name field. You can also make a general name certificate bundle using *.<vm-name>.sa.cs.ut.ee for the Common name. This type of certificate is called a wildcard certificate, and it allows the certificate to secure multiple subdomains in a single domain. So a certificate for *.testing.ee could be used for www.testing.ee, wordpress.testing.ee, shop.testing.ee, etc.
In practice wildcard certs need to be used carefully. Their main issue is that if one service is compromised and your private key is exposed, all services using that certificate become vulnerable. For this course, using a wildcard certificate is okay, especially when adding certificates manually. Later, when you implement Ansible automation, managing individual certificates for each service will become significantly easier.
Complete
To sign a certificate, you need to provide some additional data
- Under
Common nameprovide the Fully Qualified Domain Name(FQDN) for your certificate.- For ex. for the web domain we would provide
www.<vm-name>.sa.cs.ut.ee - Or you could generate a wildcard certificate for
*.<vm-name>.sa.cs.ut.ee
- For ex. for the web domain we would provide
- Under
Formatmake sure it is set topem
There is nothing for you to change under the extra options part, the default TTL of the certificate is set to 1 year and should be sufficient for this course.
After generating the certificate, make sure you save each part - once you close the window, Vault does not display the data for you anymore.
If you lose the data or forget to save it, just generate a new certificate - in this course they are free.
Saving the certificate, key, and chain certificate by individually copy-pasting is in the beginning a completely valid option. For this, you can copy the data with the small clipboard icon (next to the eye). In the bottom there is also a button 'Copy credentials' that copies the data in json format, but then you'll have to format each piece yourself. At the end of the lab manual, there is a section about implementing certification requests entirely using Ansible.
The most common location for saving files related to certificates is /etc/pki/tls/ and usually filenames are prepended with the domain of the certificate
- Certificate file
/etc/pki/tls/certs/www_server.crt - Private key file
/etc/pki/tls/private/www_server.key - Since the CA chain is the same for each domain (we only have 1 CA in this lab), you can keep a generic name
- CA chain file
/etc/pki/tls/certs/cacert.crt - NB! The chain Vault gives back has the certificates in the wrong format (separated by a comma).
- Find out what the correct format is. The name of the format is
.pem.
- CA chain file
- You won't need to separately save the issuing CA certificate. As you can see, the issuing CA certificate is already present in the CA chain.
TLS in Apache (HTTPS)
Using certificate/key pair in Apache is fairly straightforward, but first, make sure you have generated a valid certificate.
The thing to remember is that the HTTPS uses port 443 instead of 80. You should also verify that your firewall rules reflect this.
TLS related site configuration directives can initially be found in the /etc/httpd/conf.d/ssl.conf file. We will use this as the template and create the configuration for the virtual hosts in their appropriate site configuration files.
You should familiarize yourself with the following Apache httpd configuration directives before moving to the next task:
Now, let's enable TLS with our web services.
Complete
- Install the
mod_sslpackage using the package manager.- This package is an httpd web server module, that allows it to deal with HTTPS connections.
- For each of the virtual hosts you made in the webserver lab, do the following:
- In the virtual host file, duplicate the listening virtual host.
- Instead of the new virtual host listening on port 80, set it to listen on port 443 (HTTPS port).
- Add an
SSLEnginedirective, and set it toon. - Add the following SSL settings:
SSLCertificateFile /etc/pki/tls/certs/www_server.crt SSLCertificateKeyFile /etc/pki/tls/private/www_server.key SSLCACertificateFile /etc/pki/tls/certs/cacert.crt - Repeat this for each of these virtual hosts:
www,proxy,wordpress. We will deal withmaillater. - Make sure to open port 443 on all firewalls.
- Restart your webserver.
Verify
Now you should be able to access your HTTPS virtual host in the web browser:
- Open for example
https://www.<vm_name>.sa.cs.ut.eewith your browser.- You must create a security exception for your self-signed certificate.
- This is intended, as we have not imported our private CA's root certificate to our browsers yet, so it does not know to trust this web page.
- Nevertheless, you should see the same content as on the
http://www.<your-domain>.sa.cs.ut.eewhen you accept the exception.
-
To remove the security exception, you must download
cacert.crtto your host machine (not your VM) and then import it into a browser. -
In Firefox import
cacert.crtby enteringabout:preferences#privacyinto your address bar and findingSecurity -> Certificates -> View Certificates -> Authorities -> Import -> Select File -> ... -
In Chrome
Settings -> Show advanced settings ... -> Manage certificates -> trusted Root Certificate Authorities -> Import -> Next -> File name: cacert.crt ; type: All Files -> Next -> Place all certificates in the following store; Certificate store: Trusted Root Certification Authorities -> Finish -> Yes -> OK -
Close browser and try again: error "Not Secure" should be removed.
- In order to see Certificate info in
ChromepressCTRL+SHIFT+iand in the windows that opens choosesecuritytab andView certificate->Details.
- In order to see Certificate info in
- Now try accessing the HTTPS site again, it should not throw any errors since we added our CA into the browser to recognize.
- If the other virtual hosts also work like
https://proxy.<vm_name>.sa.cs.ut.eeandhttps://wordpress.<vm_name>.sa.cs.ut.ee, then you have configured them correctly.
- If the other virtual hosts also work like
Danger
Adding trusted certificate authorities to your browser is not an every-day normal thing to do and is only meant to be a demonstration on TLS contained in this course. Browsers come pre-configured with a set of trusted certificate authorities, and most websites use certificates issued by these recognized CAs. Adding custom certificate authorities to your browser's trust store can be dangerous as it potentially exposes you to man-in-the-middle attacks if malicious certificates are trusted without proper verification.
TLS in Postfix
Last week we set up Postfix in a non-secure way. Anybody either in the client's network, or your personal VM's network, can eavesdrop on network traffic, and see any passwords and/or emails your email server sends or receives.
To remediate that, the solution is, again, using TLS. Enabling TLS means the following in Postfix:
Complete
Generate a new certificate for postfix mail server mail.<vm_name>.sa.cs.ut.ee. Add TLS for the mail server virtual host the same way it was added for other virtual hosts in the previous task.
In postfix main.cf configuration file, change the following:
smtpd_tls_security_level = may
smtpd_tls_cert_file=/etc/pki/tls/certs/postfix.pem
smtpd_tls_key_file=/etc/pki/tls/private/postfix.key
smtpd_tls_loglevel = 1
smtp_tls_loglevel = 1
Also, copy the certificate and key in place of the files we specified above, or sign a new one and copy that.
Complete
In postfix master.cf configuration file: - Find the ''submission'' port declaration, it should look something like this:
submission inet n       -       n       -       -       smtpd
-o syslog_name=postfix/submission
-o smtpd_tls_security_level=encrypt
-o smtpd_sasl_auth_enable=yes
-o smtpd_tls_auth_only=yes
-o smtpd_reject_unlisted_recipient=no
-o smtpd_client_restrictions=$mua_client_restrictions
-o smtpd_helo_restrictions=$mua_helo_restrictions
-o smtpd_sender_restrictions=$mua_sender_restrictions
-o smtpd_recipient_restrictions=
-o smtpd_relay_restrictions=permit_sasl_authenticated,reject
-o milter_macro_daemon_name=ORIGINATING
- Enable the ''submission'' block (uncomment the header line)
- In the options list (lines starting with
-o) in the submission block make sure the following options are enabled:(In case some of the options are missing, you should add them)-o syslog_name=postfix/submission -o smtpd_tls_security_level=encrypt -o smtpd_sasl_auth_enable=yes -o smtpd_sasl_path=private/auth -o smtpd_sasl_security_options=noanonymous -o smtpd_relay_restrictions=permit_sasl_authenticated,reject -o milter_macro_daemon_name=ORIGINATING
Now let's also enable secure submission over explicit TLS (SMTPS). We will use the same limitation policies as in the ''submission'' block
Complete
Again in the master.cf file. - Find the ''smtps'' port declaration, it should look something like this:
#smtps     inet  n       -       n       -       -       smtpd
#  -o syslog_name=postfix/smtps
#  -o smtpd_tls_wrappermode=yes
#  -o smtpd_sasl_auth_enable=yes
#  -o smtpd_reject_unlisted_recipient=no
#  -o smtpd_client_restrictions=$mua_client_restrictions
#  -o smtpd_helo_restrictions=$mua_helo_restrictions
#  -o smtpd_sender_restrictions=$mua_sender_restrictions
#  -o smtpd_recipient_restrictions=
#  -o smtpd_relay_restrictions=permit_sasl_authenticated,reject
#  -o milter_macro_daemon_name=ORIGINATING
(It is disabled by default)
- Enable the ''smtps'' block (uncomment the header line)
- In the options list (lines starting with
-o) in the submission block make sure the following options are enabled: -o syslog_name=postfix/smtps-o smtpd_tls_wrappermode=yes- SMTPS connection runs in TLS pipe (See submission block options) so we do not have to enroll any in-line TLS encryption, therefore we omit the
tls_security_leveloption here. -
The rest of the options you may configure similarly to the submission block
-o smtpd_sasl_auth_enable=yes -o smtpd_sasl_path=private/auth -o smtpd_sasl_security_options=noanonymous -o smtpd_client_restrictions=permit_sasl_authenticated,reject -o smtpd_relay_restrictions=permit_sasl_authenticated,reject -o milter_macro_daemon_name=ORIGINATING -
Save the file
- To fix a new issue caused by a Postfix update, install the package
cyrus-sasl-plain - Restart the
postfixservice - Make sure to open ports 465 and 587 in all the firewalls.
Verify
You can check whether your changes work, by doing the following:
openssl s_client -connect mail.<vm_name>.sa.cs.ut.ee:587 -starttls smtp -CAfile <path_to>/cacert.crtopenssl s_client -connect mail.<vm_name>.sa.cs.ut.ee:465 -CAfile <path_to>/cacert.crt
The most important part is the Verify return code field. If that is 0, everything is working, and CA validation also works.
If it is complaining about "self signed certificate", then either the CA certificate is not working, you're using the wrong certificate, or something else is wrong.
TLS in Dovecot
Encrypting the traffic of the mail server itself is useless if the authentication credentials can be still seen by malicious people when logging into the mail server.
This is why we also need to encrypt traffic in Dovecot.
Complete
- In the
/etc/dovecot/conf.d/10-ssl.conffile, set the following parameters:ssl = yes ssl_cert = </etc/pki/dovecot/certs/dovecot.pem ssl_key = </etc/pki/dovecot/private/dovecot.pem - Also make sure to copy the certificate into those files, again, or generate a new certificate.
- Restart your Dovecot service.
- Open port 993 in firewalls.
Verify
You can check whether everything works again, by utilizing openssl command:
openssl s_client -connect mail.<vm_name>.sa.cs.ut.ee:993 -CAfile <path_to>/cacert.crt
The most important part is the Verify return code field. If that is 0, everything is working, and CA validation also works.
If it is complaining about "self signed certificate", then either the CA certificate is not working, you're using the wrong certificate, or something else is wrong.
Self-signed certificates in a nutshell 
Source for the image. Published on 11.01.2017 by E.William in The Barbed Wire.
Wireshark
This part is not mandatory, but it will help you to understand why we were doing what we were doing.
We will try to see if we can sniff some traffic.
First, go install yourself a tool called wireshark. (To your personal computer)
- install it from your package manager
- e.g.
yum install wireshark
brew install wireshark
Once you have it installed, start it up with the highest permissions in your machine (Administrator in Windows, root in Linux and Mac).
You should get a window like this:
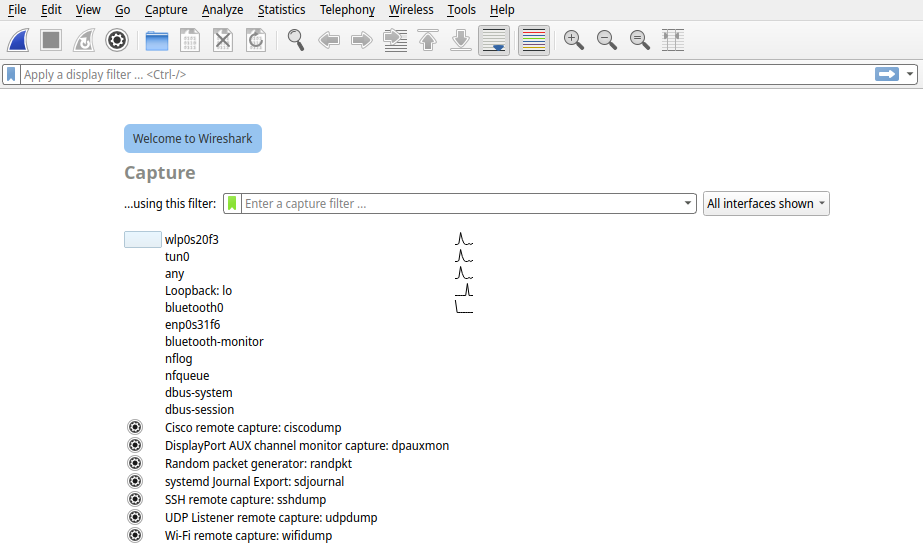
From there, you need to choose the proper interface. This depends on which interface your University VPN tunnel is working. If you hit the correct interface and double-click it, you should be getting a lot of traffic on the screen. If not, you're using the wrong interface.
Then, instead of the "Apply a display filter" line, write the following: ip.dst == <your_vm_ip> and (http or tls) And press enter.
After having done that, go and access the web pages on your machine. Use both http:// and https:// pages. You should be getting traffic on Wireshark.
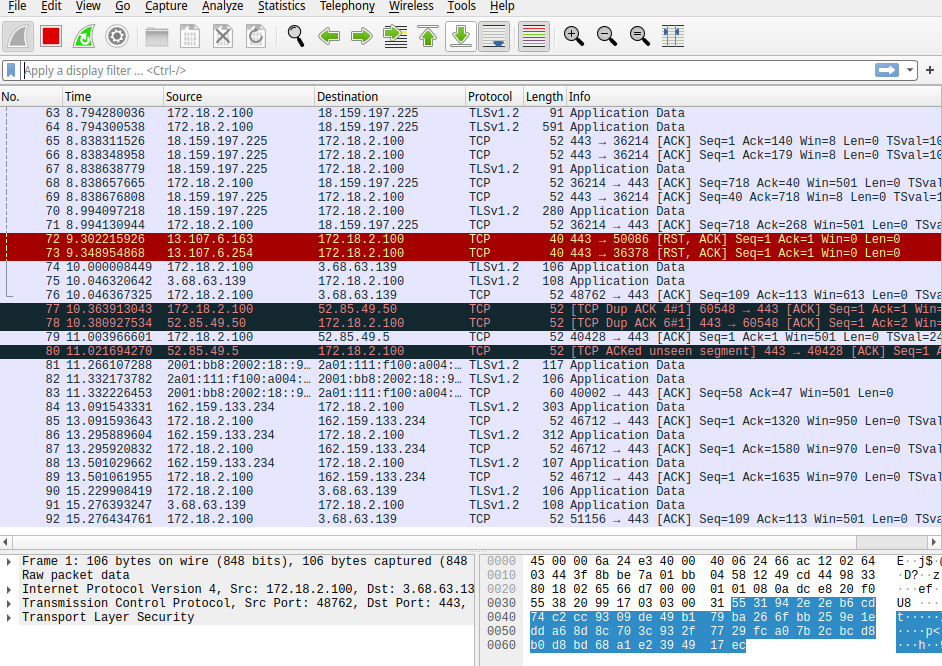
After having done that, go and click on the traffic lines. See how different is TLS and HTTP information. With HTTP, you can see all the information that was exchanged. With TLS you cannot.
Just HTTP traffic: 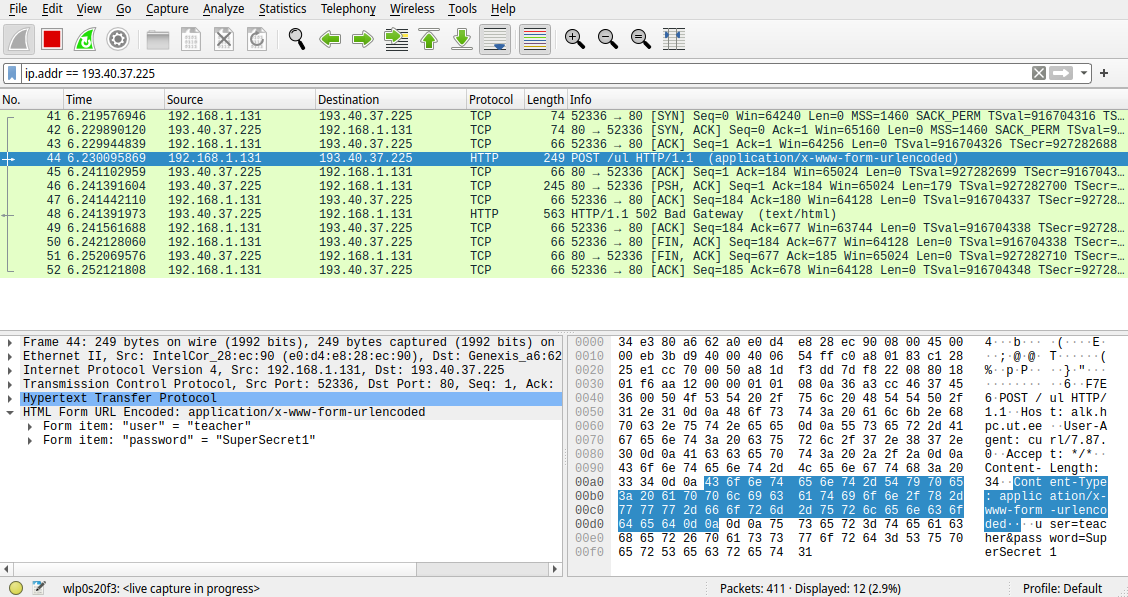
Versus TLS traffic: 
You can also try it with other pages on the world wide web, just remove the ip.dst filter.
Ansible and TLS
Requesting a certificate from HashiCorp Vault
To talk with our HashiCorp Vault instance we are going to use an Ansible community collection called hashi_vault. Install it by running this command:
ansible-galaxy collection install community.hashi_vault
We are interested in the vault_pki_generate_certificate module, which allows us to communicate to a Vault instance and generate a new set of credentials from there. Here is an example on how to use it:
- name: Request a certificate from HashiCorp Vault PKI
  community.hashi_vault.vault_pki_generate_certificate:
    url: "https://scoring.sa.cs.ut.ee:8200"
    auth_method: "ldap"
    username: "{{ vault_ldap_username }}"
    password: "{{ vault_ldap_password }}"
    engine_mount_point: "pki_int"
    role_name: "sa.cs.ut.ee"
    common_name: "www.<vm-name>.sa.cs.ut.ee"
  register: vault_pki_response
  delegate_to: localhost
  become: false
Danger
Storing your authentication information (passwords, usernames) in plain-text is a really bad idea. Especially here, because you need to use your university credentials to authenticate with our HashiCorp Vault.
One option is to implement an interactive Ansible prompt, so the playbook will ask you to fill out the variable before/during playbook execution. This solution is sufficient for this lab but in a real word scenario will get quickly overwhelming as you might need to fill out many sensitive variables in a complex playbook.
Ansible has its own solution for protecting sensitive information, and it is called Ansible Vault. And yes, naming software is a difficult thing and in this lab we are using two different Vaults: Ansible Vault and HashiCorp Vault.
Using Ansible Vault is quite simple and can be used to encrypt whole variable .yml files. We will go through the steps to encrypt a single variable and use it in a playbook to give you an idea how it works.
To encrypt a variable, run:
ansible-vault encrypt_string --prompt
- Ansible Vault will ask you for a password that it uses for encryption and later decryption. Use a secure password!
- Then it will ask you for a variable name. Based on the example task above, let's use
vault_ldap_password. - Finally it will ask you to enter the string you want to encrypt, enter your university password and press
Enter.
You will then see something similar to this in your terminal:
vault_ldap_password: !vault |
      $ANSIBLE_VAULT;1.1;AES256
      37653965313432646137383039396538306333353566626135343034386566393839396464646266
      3762386237356638353666663137623763623162613439320a303331613233353339666437333034
      63353937633938393038646237386535386239373039653061613261633636316130643231643366
      6639633730333966360a313961316561363732346131363863343736633633653839656663363034
      3464
To use it in a playbook, you need to add the variable with the encrypted content somewhere where Ansible can access it during the playbook run. We recommend creating a separate .yml file that contains only the encrypted variable. You can use the Ansible include_vars module to read the file and its contents into Ansible.
Even though the content is encrypted, there is no point in pushing it to Git. Add the newly created secret variable file to .gitignore.
Now you need to add the --ask-vault-pass flag to the ansible-playbook command the next time you want to run your playbook. Ansible will prompt you to enter the Ansible Vault password you set earlier and use it to decrypt the variable during runtime.
Let's go over the vault_pki_generate_certificate module parameters:
| Parameter | Description |
|---|---|
url | Specifies the URL of our HashiCorp Vault instance. |
auth_method | Specifies the authentication method that we are using to access Vault. We are using Tartu University LDAP. |
username | Authentication username. This is your university account username in this context. |
password | Authentication password. Your university account password in this context. |
engine_mount_point | Specifies the PKI engine mount point. Our Vault has it mounted on pki_int. |
role_name | Specifies the name of the role to create the certificate against. |
common_name | Specifies the Common Name for the certificate. |
This module has many more parameters, you can see them all in the official documentation. The parameters described above are all you need for this practical.
The example task has some keywords defined in addition to the module parameters:
| Keyword | Description |
|---|---|
register | This instructs Ansible to save the output of the module (in this case the information that HashiCorp Vault returns) to a variable with the specified name. |
delegate_to | By default Ansible will run your tasks on the machines that you specify in your inventory. This keyword allows you to make exceptions to this rule and run certain tasks on different hosts. Here we delegate the task to localhost meaning your local machine that runs Ansible. |
become | Controls privilege escalation on the task level. We set it to false, because this module runs on your local machine and does not need root privileges. |
Keep in mind that every rerun of this task will go and ask for new credentials even when they might not be needed (valid certificates/keys are already present). This makes it not truly idempotent, although with clever use of conditionals you can check if the certificate files exist and skip the task if necessary. As mentioned before, the credentials in this course are free.
Using the HashiCorp Vault PKI response
Now we know how to get the credentials from HashiCorp Vault, but we need to also figure out how to get this data into our remote host.
We used the register keyword to put the PKI response into a variable called vault_pki_response. Use the Ansible debug module to examine this variable and the data inside it or refer to the return values section of the certificate generation module.
After getting familiar with the structure of the data, try to use the task below to create your credential files on the remote host. Make sure you understand what this task does and what you need to write in place of the xxx. Pay attention to the way the CA chain is stored, here is a small tip for what you have to do.
- name: Populate certificate files with Vault PKI response
  ansible.builtin.copy:
    content: "{{ item.content }}"
    dest: "{{ item.path }}"
    mode: "{{ item.mode }}"
  with_items:
    - { path: '/etc/pki/tls/certs/www_server.crt', content: "{{ xxx }}", mode: '0644'}
    - { path: '/etc/pki/tls/certs/cacert.crt', content: "{{ xxx }}", mode: '0644'}
    - { path: '/etc/pki/tls/private/www_server.key', content: "{{ xxx }}", mode: '0600'}
Putting it all together
The following suggestions and steps are just guidelines, if you think you can do better, feel free to do so.
Just because it is reasonable to do some bits manually doesn't mean you can't still use the playbook even if manual intervention is expected in the middle of the playbook. Read about the pause module from Ansible. This allows you to stop your playbook execution, do things manually on the host in the meantime and then continue executing the playbook by simply pressing Enter in the terminal. This pause module is an option for issuing the openssl commands from the lab manual.
Complete
- Generate the certificates you need using Ansible. You can generate separate certificates for each subdomain or stick to one wildcard certificate.
- Put the certificates/keys/chain to the correct locations. If you are reusing the same file in multiple places on the remote host then try to figure out how to copy files inside the remote host.
- Use the
filemodule (ortemplate) for the all the virtual host files used byhttpd. - Use
fileortemplatemodule onmain.cfandmaster.cffor Postfix. - Use
fileortemplatemodule for10-ssl.conffor Dovecot. - Open necessary ports with Ansible.
- Restart affected services with Ansible.
Keep your playbook safe
As per usual always push your playbook to the course's Gitlab.
Complete
- In your ansible playbook directory:
git add .git commit -m "TLS lab"git push -u origin master
Verify
Go to your GitLab page to see whether all of your latest pushes reached the git repository. If you play around with your repository and have made changes to the ansible that you wish to utilize also in the future, always remember to commit and push them.