Lab 6 - Email
Welcome to the mail lab. Here is a quick action list of what we will be doing in the lab:
- Validation of previous week's tasks
- Setting an MX record in your DNS server
- Email
- MTA and SMTP
- IMAP and POP3
- Postfix
- Setting up an SMTP and MTA server
- Send local email
- Open ports for remote sending
- Setup Postfix to allow for remote email
- Test sending to domains
- Dovecot
- Setting up an IMAP server
- Testing IMAP login
- Setting up a web service for mailbox access
1. Validation of previous week's tasks
Please make sure the following is true before starting this lab:
- Personal domains are configured. Machine is accessible over
.sa.cs.ut.ee inside the University network. - All the tests on scoring.sa.cs.ut.ee are green.
- The DNS of your personal computer is set up correctly and can resolve
sa.cs.ut.eedomains. - Apache web server is up and running.
2. Setting up an MX record in your DNS server
Sending email between servers utilizes an MX or mail exchange record. This record defines which server on which IP address is responsible for accepting a domain's email. If there is no MX record, it is impossible to send emails to the domain.
Our goal is to set up the MX records so that the emails for the <vm_name>.sa.cs.ut.ee domain will be directed to mail.<vm_name>.sa.cs.ut.ee, which in turn points to the IP of your virtual machine - this means that you will need to create an A record pointing to your mail server.
In the case of MX records, we also have something called priority. Priority is an extra parameter in the DNS record which allows you to set, in the case of multiple MX servers, which servers are more responsible than others. The format is the following:
<vm_name>.sa.cs.ut.ee. IN MX 0 mail.<vm_name>.sa.cs.ut.ee.
Where 0 stands for the highest priority possible. If you specify multiple servers here, each with different priority values, then the lowest one will be receiving the most email.
Here are some extra materials for MX records:
Complete
Edit the zone # <vm_name>.sa.cs.ut.ee in your DNS configuration.
- Add a type
Arecord formail.<vm_name>.sa.cs.ut.eepointing to your VM's external IP. - In the same Zone file, add an
MXrecord pointing to the hostnamemail.<vm_name>.sa.cs.ut.ee.- Set the priority value to
10.
- Set the priority value to
- Think about the order, how should the records be organized in the Zone files:
MXfirst thenArecord or vice-versa? Is there a difference? - Save the zone file
- Did you change the serial?
- Test the Zone syntax
- Remember
named-checkzonecommand
- Remember
- If everything is OK, restart the
namedservice
Verify
To test, query for the A and MX records you have just created:
dig -t A mail.<vm_name>.sa.cs.ut.eedig -t MX <vm_name>.sa.cs.ut.ee- NB! The DNS changes might take time to propagate
3. Email in general
One would think explaining email is unnecessary because it's being used everywhere. Sadly, you would be surprised how basic and insecure email is, mainly due to its protocol for the sending/receiving part - SMTP.
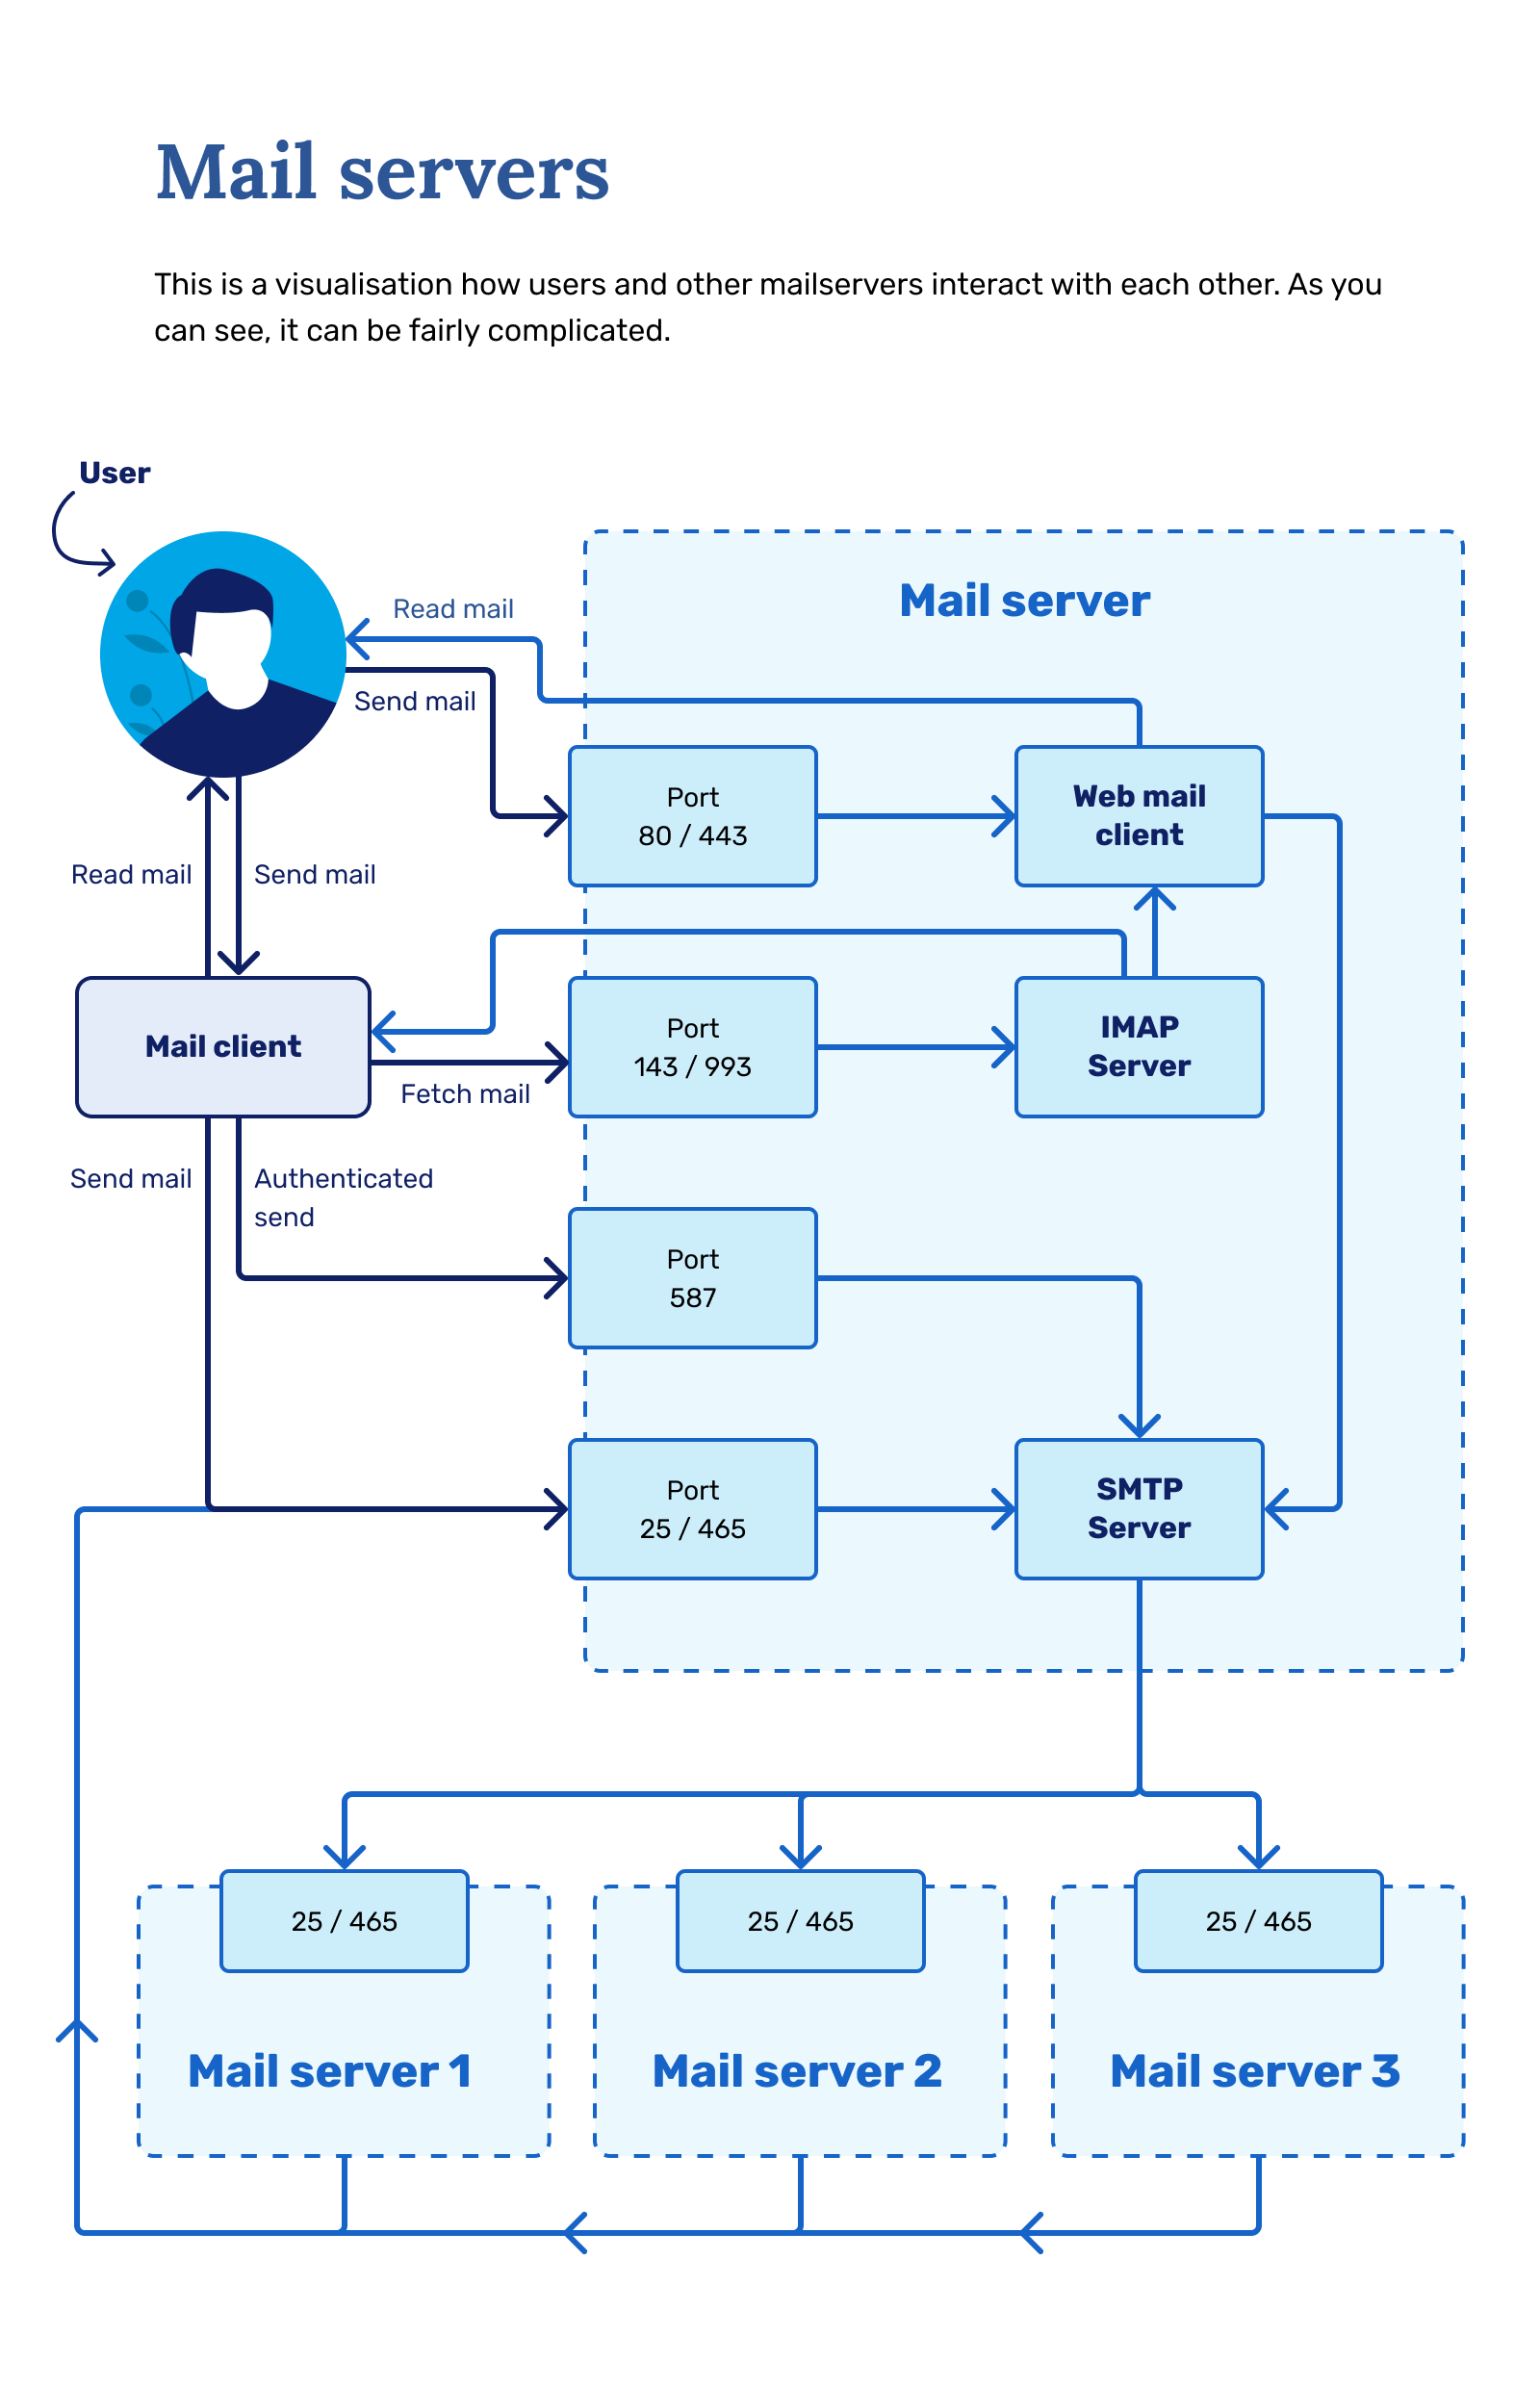
The other part of the service is the protocol that allows email clients (webmail, outlook, thunderbird, etc.) to access mail inside the servers - IMAP. IMAP is a protocol that synchronizes email between the client and the server by occasionally polling and checking the inbox in the server.
3.1 SMTP and MTA
Within the Internet email system, a message transfer agent or mail transfer agent MTA or mail relay is software that transfers electronic mail messages from one computer to another using Simple Mail Transfer Protocol or SMTP.
SMTP is a text-based protocol - the messages sent are represented in UTF8 text nowadays. Even files, images or encrypted messages are first converted into a binary message, and then that binary message is transformed into a textual representation before being added to an email.
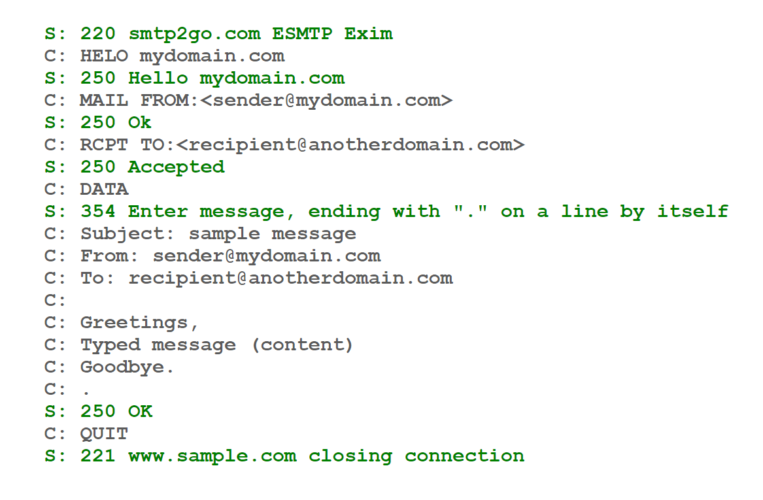
There are three parts to an SMTP message:
- The first is the headers, like "Subject", "From", and "To" in the picture. These define the message's metadata, including the sender and receiver address.
- Then there's the "Body" or the actual message. This contains the message you usually see when opening the email.
- In the end, there's an optional part for attachments. These are usually massive blocks of seemingly random text, which is the textual representation of the binary we talked about.
All email security works additively - methods are applied on top of this core methodology. For example, encrypted emails do what is being done with images - encrypt the message, convert to binary representation, convert to textual representation and finally add it to the body. If you read that encrypted email with an email client that does not support encryption, it will look like a scrambled mess of letters.
Network design-wise, the SMTP server uses several ports for different purposes:
- 25 - Primary SMTP relay port - used for submission as well, but not recommended nowadays.
- 465 - Used to be a valid secure SMTP (SMTPS) port. It should not be used nowadays.
- 587 - This is the default mail submission port. This uses a proper authenticated approach and can be encrypted.
We will be using port 25 until the TLS lab.
3.2 IMAP and POP3
IMAP stands for Internet Message Access Protocol, and it's the open standard that describes how to access messages in a remote email mailbox.
Due to SMTP being text-based, IMAP has to be text-based as well. The conversation between a client and a server looks something like this:
C: <open connection>
S:   * OK IMAP4rev1 Service Ready
C:   a001 login mrc secret
S:   a001 OK LOGIN completed
C:   a002 select inbox
S:   * 18 EXISTS
S:   * FLAGS (\Answered \Flagged \Deleted \Seen \Draft)
S:   * 2 RECENT
S:   * OK [UNSEEN 17] Message 17 is the first unseen message
S:   * OK [UIDVALIDITY 3857529045] UIDs valid
S:   a002 OK [READ-WRITE] SELECT completed
C:   a003 fetch 12 full
S:   * 12 FETCH (FLAGS (\Seen) INTERNALDATE "17-Jul-1996 02:44:25 -0700"
      RFC822.SIZE 4286 ENVELOPE ("Wed, 17 Jul 1996 02:23:25 -0700 (PDT)"
      "IMAP4rev1 WG mtg summary and minutes"
      (("Terry Gray" NIL "gray" "cac.washington.edu"))
      (("Terry Gray" NIL "gray" "cac.washington.edu"))
      (("Terry Gray" NIL "gray" "cac.washington.edu"))
      ((NIL NIL "imap" "cac.washington.edu"))
      ((NIL NIL "minutes" "CNRI.Reston.VA.US")
      ("John Klensin" NIL "KLENSIN" "MIT.EDU")) NIL NIL
      "<B27397-0100000@cac.washington.edu>")
      BODY ("TEXT" "PLAIN" ("CHARSET" "US-ASCII") NIL NIL "7BIT" 3028
      92))
S:   a003 OK FETCH completed
C:   a004 fetch 12 body[header]
S:   * 12 FETCH (BODY[HEADER] {342}
S:   Date: Wed, 17 Jul 1996 02:23:25 -0700 (PDT)
S:   From: Terry Gray <gray@cac.washington.edu>
S:   Subject: IMAP4rev1 WG mtg summary and minutes
S:   To: imap@cac.washington.edu
S:   cc: minutes@CNRI.Reston.VA.US, John Klensin <KLENSIN@MIT.EDU>
S:   Message-Id: <B27397-0100000@cac.washington.edu>
S:   MIME-Version: 1.0
S:   Content-Type: TEXT/PLAIN; CHARSET=US-ASCII
S:
S:   )
S:   a004 OK FETCH completed
C    a005 store 12 +flags \deleted
S:   * 12 FETCH (FLAGS (\Seen \Deleted))
S:   a005 OK +FLAGS completed
C:   a006 logout
S:   * BYE IMAP4rev1 server terminating connection
S:   a006 OK LOGOUT completed
There also is another protocol with the same purpose - POP3, but this one is much-much older and incapable of several essential features. It also wants to pull all the emails from the remote server to your device and will not leave a copy in the remote server. It is recommended never to use this protocol anymore.
IMAP network design by port usage:
- 143 - Standard, unsecured IMAP port.
- 993 - Secure IMAP (IMAPS) port.
4. Postfix
The first task will be to set up a service capable of sending and receiving emails. We use an open-source service called Postfix for that. It's the default MTA for many Linux distributions.
Postfix's documentation is available http://www.postfix.org/.
4.1 Setting up an SMTP and MTA server
Using the package manager, install a package named postfix.
The locations of the Postfix configuration and log files:
- Configuration file:
/etc/postfix/main.cf - Log file for e-mail related log messages:
/var/log/maillog
Complete
Before we continue, edit /etc/postfix/main.cf and set inet_protocols to ipv4. Make sure to restart the service afterwards.
4.2 Send local email
As a test, we can see if emails work, by sending an email from a user inside the VM (the user you run as) to a user inside the VM (the user specified in the command), by doing:
echo "text" | sendmail "root@localhost"
There will be no output from this command. But what will happen is that an email will be put into the root users' inbox.
You can check how the email was transferred from the mail log, /var/log/maillog:
Mar 14 08:35:38 b123123 postfix/cleanup[2440729]: EA7172402742: message-id=<20220314063538.EA7172402742@b123123.sa.cs.ut.ee>
Mar 14 08:35:38 b123123 postfix/bounce[2440732]: D41A62402740: sender delivery status notification: EA7172402742
Mar 14 08:35:38 b123123 postfix/qmgr[2432807]: EA7172402742: from=<>, size=1966, nrcpt=1 (queue active)
Mar 14 08:35:38 b123123 postfix/local[2440731]: EA7172402742: to=<root@b123123.sa.cs.ut.ee>, relay=local, delay=0.02, delays=0.01/0/0/0.01, dsn=2.0.0, status=sent (delivered to mailbox)
Mar 14 08:35:38 b123123 postfix/qmgr[2432807]: EA7172402742: removed
Should look something like that.
You can also check the root user's inbox to see if the email was received. User's inboxes are, if not configured otherwise, in /var/spool/mail/<username>. If you cat the file for root user's inbox, you should see the email you sent together with the headers and other information.
4.3 Open ports for remote sending
Even though we can send emails between the users inside the machine, sending between different devices is more complicated. The first thing to do is open up the mail submission port 25, but you can also open up the other SMTP ports ahead of time.
4.4 Setup Postfix to allow for remote email
We also need to configure Postfix to listen on all interfaces and be able to accept email for our domain before we can send email between machines.
Verify
The postconf command is used to print the active configuration variables loaded. If we refer to manual man postconf we may discover a couple of useful features:
- -n switch: Prints only the configuration that has been changed (omits default values)
- -d switch: Prints only the default configuration (good to check what was the initial value of the variable)
Complete
Now let's modify postfix's main.cf file so that we can start sending emails remotely.
Change the configuration file so that it meets the following criteria. Most of the variables are already defined. Try not to define them multiple times. You can search for a string in nano with Ctrl+W and vi and vim by pressing /.
- The output of
postconf | grep -e "^myhostname"should returnmail.<vm_name>.sa.cs.ut.ee, but it does not currently.- Do you know why?
- Set the correct
$myhostnamemanually in the configuration file. $mydomainparameter should not be manually specified. It should be derived from$myhostnameautomatically by thepostfixsoftware.
- The domain name for the outbound mail should be set to
$mydomain.- Name of the parameter to set outbound mail address is
$myorigin.
- Name of the parameter to set outbound mail address is
inet_interfacesparameter should be set toallto listen on all possible IP addresses.- Server should handle mail for the following addresses (
mydestination parameter):mail.<vm_name>.sa.cs.ut.eelocalhost.<vm_name>.sa.cs.ut.eelocalhost<vm_name>.sa.cs.ut.ee
- Ensure that the trusted networks parameter (mynetworks_style) is set to
host:- Make sure that
relayhostandmynetworksparameters are not used in the config. - Set
mynetworks_style = host, which forces postfix to trust only the directly attached VM networks.
- Make sure that
After making sure all the ports are open, you can restart your postfix server.
Now we can test sending emails between the different users in your VM and also other machines.
4.5 Try sending to domains
Complete
- Create a new user with username
mailuser - Set a password that is secure and that you can remember.
Danger
Do not reuse any of your passwords, as currently, the traffic is insecure and can be listened to by anyone
Verify
- Change your user to mail testing user.
sudo su - mailuser- If you want, you can use
alpinemail client. Install it with the package manager, and runalpinemail client.
- Send an email to
centosuser - Check the inbox.
- If sending emails between the local users' works, try to exchange emails with other lab systems (ask for their email addresses).
- If sending the mail to another system fails, make sure its name resolves and that it answers with an MX record.
Complete
- To pass
Lab6: Test if mailuser has sent email to nagios@scoring.sa.cs.ut.ee Nagioscheck, send an email frommailuser@<vm_name>.sa.cs.ut.eetonagios@scoring.sa.cs.ut.ee.- If the email From: header matches the format of
mailuser@<vm_name>.sa.cs.ut.ee, the check will pass. - If you have sent an email, and this does not turn green soon, then check your postfix logs to find possible issues. (
/var/log/maillog)
- If the email From: header matches the format of
- You can send all kinds of e-mail from terminal
echo -e "Subject: terminal email-01 \n\nHello! \nthis is a e-mail sent with sendmail command from terminal\nby $USER" from $HOSTNAME | sendmail <user>@<domain>
- Or you can use Alpine to send the email.
5. Dovecot
We used a "local mailbox" model for testing the email service, but as you can see, it's not very convenient. Nowadays, reading email is mainly done over the network protocols such as IMAP and POP3. Most popular, by far, are web-based solutions like Gmail, but these also usually use IMAP behind the scenes.
5.1 Setting up an IMAP server
We will now set up an IMAP server called Dovecot. Install it with the package manager.
Main configuration file for dovecot is /etc/dovecot/dovecot.conf and because of the modular design each module has separate configuration file under /etc/dovecot/conf.d directory.
Details about Dovecot configuration files are available here: Dovecot documentation - Dovecot Config File Syntax
PS! Similar to postconf, there is a doveconf command for checking the Dovecot configuration. The manual man doveconf suggests that most of the switches are similar to the ones of the postconf command (-n, -d, -P).
Complete
- Install
dovecot
Configure the Dovecot IMAP server's logging module:
- Edit
/etc/dovecot/conf.d/10-logging.conffile:- Set
mail_debugtoyes
- Set
- Save the file
-
Restart the
dovecotservice -
Edit
dovecot's main configuration file in/etc/dovecot/dovecot.confand allowimapprotocol (protocolsparameter)
5.2 Configuring dovecot authentication module
The most straightforward authentication mechanism is PLAIN. The client simply sends the password unencrypted to Dovecot. All clients support the PLAIN mechanism, but obviously, there's the problem that anyone listening on the network can steal the password. For that reason (and some others), other mechanisms were implemented. But this week, for learning, we will set it up without any security mechanisms.
Complete
Allow dovecot to use PLAIN and LOGIN authentication methods:
- Edit
/etc/dovecot/conf.d/10-auth.conffile:- Set
auth_mechanismsvariable to allowplainandlogin - set
auth_username_formatto%n - Save the file
- Set
One step of setting up Dovecot involves moving the incoming email from the /var/spool/mail location to now using something called maildir format. Instead of putting incoming emails to where they were before, they are now put into the user's home directory.
Complete
Setup the dovecot mail directory (~/mail) and mailbox (/var/mail).
- Edit
/etc/dovecot/conf.d/10-mail.conffile:- Set
mail_locationvariable tomaildir:~/mail
- Set
- Check default mail folder permissions
ls -ld /var/mail- This is where the incoming mail is stored.
- You can see that only
rootand themailgroup have write permissions to the/var/mail. Did you notice the symlink?- You'll need to give
dovecot's mail processes the ability to belong tomailgroup by settingmail_privileged_groupvariable tomail
- You'll need to give
- Save the file
- Now make sure that user
dovecotis in themailgroup- You can use
id $USERto see which groups a user belongs to - You can add a user to a group using the
usermodcommand. Find the correct flags to add a user to a secondary group.
- You can use
Also, let's enable automatic folder creation to prevent problems.
Complete
- Edit
dovecot's mailboxes module/etc/dovecot/conf.d/15-mailboxes.conf - To each defined mailbox, add
auto = createanalogous to the following example:
mailbox Trash {
  auto = create
  special_use = \Trash
}
- Also define a mailbox called "Spam" with
special_useset to\Junk
Also, before we can start testing the IMAP login, open up the necessary ports from firewalls. You can check the netstat command or /etc/dovecot/conf.d/10-master.conf to see which ports to open.
5.3 Testing IMAP login
Verify
Now that you have set up the basic configuration for dovecot, it's time to test it.
- Make sure
dovecotservice is started (restarted if you have changed configurations in the meantime) - Make sure
mailuserhas its password set and you know it. - Using your package manager, install
telnet - Connect to the
IMAPport usingtelnet - If the connection is successful, try logging in as
mailuserby connecting to port143oflocalhostusingtelnet
$ telnet 127.0.0.1 143
Trying 127.0.0.1...
Connected to 127.0.0.1.
Escape character is '^]'.
* OK [CAPABILITY IMAP4rev1 SASL-IR LOGIN-REFERRALS ID ENABLE IDLE LITERAL+ STARTTLS AUTH=PLAIN AUTH=LOGIN] Dovecot ready.
- Use IMAP commands to authenticate as mailuser in the format of
$COMMAND_ID login user password. Command ID can be any string and is mainly used for session tracking.
A1 login mailuser mailuser
A1 OK [CAPABILITY IMAP4rev1 SASL-IR LOGIN-REFERRALS ID ENABLE IDLE SORT SORT=DISPLAY THREAD=REFERENCES THREAD=REFS THREAD=ORDEREDSUBJECT MULTIAPPEND URL-PARTIAL CATENATE UNSELECT CHILDREN NAMESPACE UIDPLUS LIST-EXTENDED I18NLEVEL=1 CONDSTORE QRESYNC ESEARCH ESORT SEARCHRES WITHIN CONTEXT=SEARCH LIST-STATUS BINARY MOVE SNIPPET=FUZZY PREVIEW=FUZZY LITERAL+ NOTIFY SPECIAL-USE] Logged in
- Log out
A1 logout
* BYE Logging out
A1 OK Logout completed (0.001 + 0.000 secs).
Now try connecting with telnet but instead of 127.0.0.1 connect to mail.<vm_name>.sa.cs.ut.ee As you can see, you get an error logging in:
* BAD [ALERT] Plaintext authentication not allowed without SSL/TLS, but your client did it anyway. If anyone was listening, the password was exposed.
a1 NO [PRIVACYREQUIRED] Plaintext authentication disallowed on non-secure (SSL/TLS) connections.
The error is because, by default, dovecot requires encrypted connections from anyone trying to log in from outside. Of course, this is quite a sane thing to do to protect the users' private info from hackers who might be listening to the network traffic. We, however, want to disable encrypted connections for now and tackle traffic encryption in a later lab, as mentioned before. To allow login from unencrypted connections:
Complete
- Edit
dovecot's10-auth.confand setdisable_plaintext_authtono - Edit
dovecot's10-ssl.confand setssltono - Restart
dovecotand try to authenticate tomail.<vm_name>.sa.cs.ut.eewithtelnet. It should work now.
5.4 Give mailbox handling from postfix to dovecot
SMTP communication between mail servers uses smtp port 25. On the other hand, Mail clients often submit outgoing emails to a mail server on submission port 587.
That is because port 25 usually doesn't require authentication, which is fine if you want to receive mail to the mail server from other mail servers since it is practically impossible to have every mail server authenticate themselves to yours. However, relaying mail with no authentication is an absolutely horrible idea - it would allow anyone to send emails via your mail server. So let's get to configuring now.
Complete
- Add
lmtpprotocol todovecot's main/etc/dovecot/dovecot.confconfiguration file- It should only have
imapandlmtpoptions there now.
- It should only have
Complete
-
Now define the
lmtplistener in/etc/dovecot/conf.d/10-master.conf- This creates an LMTP socket through which
postfixcan communicate withpostfix. The socket is created as a file forpostfixto read and write.
- This creates an LMTP socket through which
-
Define the
lmtplistener as follows:service lmtp { unix_listener /var/spool/postfix/private/dovecot-lmtp { # unix_listener $PATH_TO_SOCKET mode = 0600 # Socket permissions user = postfix # Socket owner group = postfix # Socket group } } -
In
/etc/postfix/main.cf- Set
mailbox_transporttolmtp:unix:private/dovecot-lmtp- This tells postfix to hand all incoming mails to the
lmtpsocket we created before.
- This tells postfix to hand all incoming mails to the
- Set
- Restart
postfix
Complete
Set postfix to also listen on submission port 587 In postfix's master.cf configure submission section as follows:
submission inet n       -       n       -       -       smtpd
  -o syslog_name=postfix/submission
  -o smtpd_sasl_auth_enable=yes
  -o smtpd_recipient_restrictions=permit_mynetworks,permit_sasl_authenticated,reject
  -o smtpd_relay_restrictions=permit_sasl_authenticated,reject
  -o smtpd_sasl_type=dovecot
  -o smtpd_sasl_path=private/auth

# Explanations:
#  -o syslog_name=postfix/submission: The name with which submission related events are logged
#  -o smtpd_sasl_auth_enable=yes:     Enable sasl authentication (`plain` in our case)
#  -o smtpd_recipient_restrictions=permit_mynetworks,permit_sasl_authenticated,reject: Permit recepients outside of $mynetworks only to authenticated users
#  -o smtpd_relay_restrictions=permit_sasl_authenticated,reject: Allow mail relaying only for authenticated users
#  -o smtpd_sasl_type=dovecot:      Set dovecot as the SASL provider
#  -o smtpd_sasl_path=private/auth: Set authentication socket location
Complete
You'll also have to configure dovecot to create a socket over which postfix can communicate login information to dovecot for mail submission.
In dovecot's 10-master.conf file, create a UNIX listener for the auth service:
service auth {
    unix_listener /var/spool/postfix/private/auth {
      mode = 0600
      user = postfix
      group = postfix
    }
}
- This creates a socket file into
/var/spool/postfix/private/auth, where postfix can access it. - Now that everything is configured, restart
postfixanddovecot.- Try sending a new email from one user to another from within your system to test the setup.
- If the mail doesn't reach its destination, you can find debug information from
/var/log/maillog.
- If the mail doesn't reach its destination, you can find debug information from
- Try sending a new email from one user to another from within your system to test the setup.
Verify
Now let's test if authentication works.
- Create a base64 string of your
mailuserand its password with the following command:printf '\0%s\0%s' 'mailuser' '$mailuser_password' | openssl base64. The output should be something like this:$ printf '\0%s\0%s' 'mailuser' 'mailuser' | openssl base64 AG1haWx1c2VyAG1haWx1c2Vy - Now, using telnet connect to 127.0.0.1 port 587:
$ telnet 127.0.0.1 587 Trying 127.0.0.1... Connected to 127.0.0.1. Escape character is '^]'. 220 mail.server.sa.cs.ut.ee ESMTP Postfix - Say hello to the server:
ehlo server 250-mail.not-nice.sa.cs.ut.ee 250-PIPELINING 250-SIZE 10240000 250-VRFY 250-ETRN 250-STARTTLS 250-AUTH PLAIN LOGIN 250-ENHANCEDSTATUSCODES 250-8BITMIME 250-DSN 250 SMTPUTF8 - Try to authenticate using the base64 string created before:
auth plain AG1haWx1c2VyAG1haWx1c2Vy 235 2.7.0 Authentication successful - If the authentication was successful, everything is configured correctly this far.
5.5 Recap and testing
We should be in a state where we have three main ports in use.
- Port 25 is just for relaying mail without authentication.
- Port 143 is used to view users' emails with the Dovecot protocol.
- Port 587 is used by email clients to submit email; this requires authentication.
This kind of setup is close to what is used in the real world. We are only missing TLS from our configuration, and we could become a fully-fledged email provider.
Before going forward, let's test whether the new setup works. Send an email to your mailuser user, and let's see if we can see it from the dovecot login.
Verify
Let's login to dovecot once more, and try to get emails this time.
$ telnet 127.0.0.1 143 # (1)
Trying 127.0.0.1...
Connected to 127.0.0.1.
Escape character is '^]'.
* OK [CAPABILITY IMAP4rev1 SASL-IR LOGIN-REFERRALS ID ENABLE IDLE LITERAL+ STARTTLS AUTH=PLAIN AUTH=LOGIN] Dovecot ready.

A1 login mailuser mailuser # (2)
A1 OK [CAPABILITY IMAP4rev1 SASL-IR LOGIN-REFERRALS ID ENABLE IDLE SORT SORT=DISPLAY THREAD=REFERENCES THREAD=REFS THREAD=ORDEREDSUBJECT MULTIAPPEND URL-PARTIAL CATENATE UNSELECT CHILDREN NAMESPACE UIDPLUS LIST-EXTENDED I18NLEVEL=1 CONDSTORE QRESYNC ESEARCH ESORT SEARCHRES WITHIN CONTEXT=SEARCH LIST-STATUS BINARY MOVE SNIPPET=FUZZY PREVIEW=FUZZY LITERAL+ NOTIFY SPECIAL-USE] Logged in

b select inbox # (3)
* FLAGS (\Answered \Flagged \Deleted \Seen \Draft)
* OK [PERMANENTFLAGS (\Answered \Flagged \Deleted \Seen \Draft \*)] Flags permitted.
* 1 EXISTS
* 0 RECENT
* OK [UIDVALIDITY 1647324753] UIDs valid
* OK [UIDNEXT 2] Predicted next UID
b OK [READ-WRITE] Select completed (0.005 + 0.000 + 0.004 secs).

2 FETCH 1:* (FLAGS INTERNALDATE BODY.PEEK[HEADER.FIELDS (SUBJECT)]) # (5)
* 1 FETCH (FLAGS (\Seen) INTERNALDATE "15-Mar-2022 08:32:28 +0200" BODY[HEADER.FIELDS (SUBJECT)] {2}

)

3 FETCH 1 BODY[TEXT] # (4)
* 1 FETCH (BODY[TEXT] {6}
my email body
)
3 OK Fetch completed (0.004 + 0.000 + 0.003 secs).
- This is a command you run.
- This is a command you run.
- This is a command you run.
- This is a command you run. The response to this command should be the bodies of the emails you sent after setting up the dovecot-postfix handoff.
- This is a command you run.
As you can see, our Dovecot works but is not that pleasant to actually use. Usually, this is solved by utilizing a desktop mail client, but nowadays, mail clients are particular about which servers they connect to and might fail when there's no TLS, so instead, let's set up a webmail service.
6. Setting up a web service for mailbox access
Roundcube is an open-source webmail client that you can use to access your email account. It works by connecting to the Dovecot service with your credentials and then mediates the connection between the client and Dovecot, giving it a friendly UI.
Complete
First install epel-release and dnf-plugins-core with dnf and run dnf update.
Then run dnf config-manager --set-enabled crb.
-
Now you can install the following packages:
make,ImageMagick,ImageMagick-devel,ImageMagick-perl,pcre-devel,zlib,zlib-devel,libzip,libzip-devel,libmcrypt-devel,php,php-fpm,php-devel,php-pear,php-cli,php-gd,php-curl,php-xml,php-mysqlnd,php-mbstring,php-intl,php-ldap,mariadb,mariadb-serverandhttpd.- Use your package manager to install them.
-
Install
imagick,mcryptandzipextensions with pecl:
pecl install <package>
- For each of the extensions installed with
pecl, create a file named20-<extension_name>.iniinto/etc/php.d/and into the file writeextension=<extension_name>
Verify
Now that all the necessary packages are there, make sure the following services are running and enabled:
httpdmariadbphp-fpm
After that, set up a database for Roundcube to use.
Complete
- Generate a random password for the database user with
openssl rand -base64 16 - Connect to the database service
mysql -u root -p
Now that you have entered the MariaDB command line, Set up the database with the following commands:
MariaDB [(none)]> CREATE DATABASE roundcubemail /*!40101 CHARACTER SET utf8 COLLATE utf8_general_ci */;
MariaDB [(none)]> CREATE USER 'roundcube'@'localhost' IDENTIFIED BY 'the_random_password';
MariaDB [(none)]> GRANT ALL PRIVILEGES ON roundcubemail.* TO 'roundcube'@'localhost';
MariaDB [(none)]> FLUSH PRIVILEGES;
MariaDB [(none)]> exit;
Roundcube can be downloaded from its github repository. Currently the latest release is 1.6, so lets set it up in /var/www/html/roundcubemail.
Complete
Download the Roundcube release:
wget https://github.com/roundcube/roundcubemail/releases/download/1.6.1/roundcubemail-1.6.1-complete.tar.gz -O /var/www/html/roundcube.tar.gz
- Since the downloaded file is compressed, you need to uncompress it with
tar. Useman tarto learn the syntax of the program and the appropriate flags for uncompressing. - Remove the compressed file
- Rename the uncompressed directory to
roundcubemailwith themvcommand - Set correct owner, group and permissions to
/var/www/html/roundcubemailso thatapachecan access it. Make sure to use therecursiveflag so the changes also apply to files and directories within the/var/www /html/roundcubemaildirectory. - Run
chcon -t httpd_sys_rw_content_t /var/www/html/roundcubemail -Rto get correctselinuxpermissions for the directory
Now that we have set up the necessary files and a database, we can create a web server configuration for Roundcube.
Complete
- Create a configuration file called
mail.<vm_name>.sa.cs.ut.ee.confin/etc/httpd/conf.d/ - Populate the file with the following information:
<VirtualHost *:80>
  ServerAdmin root@<vm_name>.sa.cs.ut.ee
  ServerName mail.<vm_name>.sa.cs.ut.ee
  DocumentRoot /var/www/html/roundcubemail
  <Directory /var/www/html/roundcubemail>
      Allowoverride all
  </Directory>

  ErrorLog /var/log/httpd/mail.<vm_name>.sa.cs.ut.ee-error.log
  CustomLog /var/log/httpd/mail.<vm_name>.sa.cs.ut.ee-access.log combined
  ForensicLog /var/log/httpd/mail.<vm_name>.sa.cs.ut.ee-forensic.log
</VirtualHost>
- Restart the httpd service and ensure it restarted successfully
After you have done all that, Roundcube setup page should be available from mail.<vm_name>.sa.cs.ut.ee/installer. Make sure that all the PHP extensions are OK. Once you have verified that Roundcube can find its extensions, click "Next" and set up Roundcube with the following information:
Complete
product_nameshould beWebmail - <vm_name>.sa.cs.ut.ee- In Logging & Debugging:
- Set
log_dirto/var/log/roundcube - Also ensure the
/var/log/roundcubedirectory exists
- Set
- In database setup:
- Set
Database typetoMySQL - Set
Database servertolocalhost - Set
Database nametoroundcubemail - Set
Database username toroundcube - Set
Database passwordto the random password you generated before
- Set
- In IMAP settings:
- Set
imap_hosttolocalhost:143
- Set
- In SMTP settings:
- Set
smtp_hosttolocalhost:587
- Set
- Click on
Create config - This saves the configuration PHP file called
config.inc.phpinto/var/www/html/roundcubemail/config- Make sure the file permissions are correct
- The same output file could be used with Ansible to configure the Roundcube installation automatically
- Contiue and review the configuration on the
Test config page - If everything else besides the DB Schema is OK, you can initialize the database
- If the configuration tests are good, make sure to remove the
installerdirectory from/var/www/html/roundcubemail/
After this is all done, you should be able to access the mailboxes of the mail accounts you set up before by using the username and password of these users by going to the website you set up. If you cannot access the mailboxes, ensure that:
- The user exists
- Dovecot is running and configured correctly
If you could log in, try sending mail to another student's mailuser account from your mailuser. If you get an error, make sure that:
- The other student has their
postfixup and running - That you have your
postfixservice up and running and configured correctly.
7. Ansible
The most difficult part of this lab to automate is the management of the MySQL users and databases. Thankfully, Ansible has necessary utilities for this. Ansible has following modules
- mysql_db
- mysql_user
Which can manage MySQL easily. Examples:
Example
- name: Create a new database with name '<database_name>'
  community.mysql.mysql_db:
    name: <database_name>
    state: present

- name: Create database user using password with all database privileges
  community.mysql.mysql_user:
    name: <database_user>
    password: '<database_password>'
    priv: '<database_name>.*:ALL'
    state: present
Note
There might be authentication failures at first using these modules. For this to work, Ansible needs to be able to access the database. The best way to allow for this, is to make a ~/.my.cnf file for the root user:
[client]

password = <root_pass>