Lab 5 - Apache Web Services lab
Welcome to the Web Services lab. Here's a quick overview of this week's tasks:
- Validation of previous week's tasks
- Introduction to web services
- HTTP protocol
- HTTP Flow
- HTTP Messages
- HTTP Headers
- Setting up a personal web server
- Understanding DNS CNAME records
- Virtual Web Hosts Using Apache Web Server
- Utilizing a web server as a proxy
- WordPress setup
- Configuring apache modules
- Forensic logging
- Security-hardening our webserver using mod_security
- Ansible tips
- Tags
- Recommended modules
- Handlers
1. Validation of previous week's tasks
Please make sure the following tasks have been completed before starting this lab, as we are using services from the previous labs:
- Personal domains are configured. Machine is accessible over
<machine_name>.sa.cs.ut.eeinside the University network. - All the tests on
scoring.sa.cs.ut.eeare green.
For helping you to better debug and view the web services you'll be setting up this week, it's also ideal to validate your personal machine's DNS servers.
Danger
Your personal machine's (the computer you are using - NOT THE VM) DNS servers should be set to:
-
ns.ut.ee (IP: 193.40.5.39)
-
ns2.ut.ee (IP: 193.40.5.76)
The University VPN service should set these automatically, but please validate this. Without having the DNS servers set, you will have problems connecting to the websites you set up, and this will cause a lot of confusion.
You can validate by trying to resolve <machine_name>.sa.cs.ut.ee from your personal machine.
2. Introduction to web services
Before we can host our own web services, we need to understand how the browsers work. As most of the web works by utilizing the HTTP protocol, we'll first have a look into that.
2.1 HTTP protocol
HTTP is a protocol for fetching resources such as HTML documents. It is the foundation of any data exchange on the Web and it is a client-server protocol, which means requests are initiated by the recipient, usually the Web browser.
Each individual request is sent to a server, which handles it and provides an answer called the response. Between the client and the server there are numerous entities, collectively called proxies, which perform different operations and act as gateways or caches, for example.

In reality, there are more computers between a browser and the server handling the request: there are routers, modems, and more. Thanks to the layered design of the Web (OSI layers), these are hidden in the network and transport layers. HTTP is on top, as the application layer. Although important for diagnosing network problems, the underlying layers are mostly irrelevant to the description of HTTP.
To display a Web page, the browser sends an original request to fetch the HTML document that represents the page. It then parses this file, making additional requests corresponding to execution scripts, layout information (CSS) to display, and sub-resources contained within the page (usually images and videos). The Web browser then combines these resources to present the complete document, the Web page. Scripts executed by the browser can fetch more resources in later phases and the browser updates the Web page accordingly.
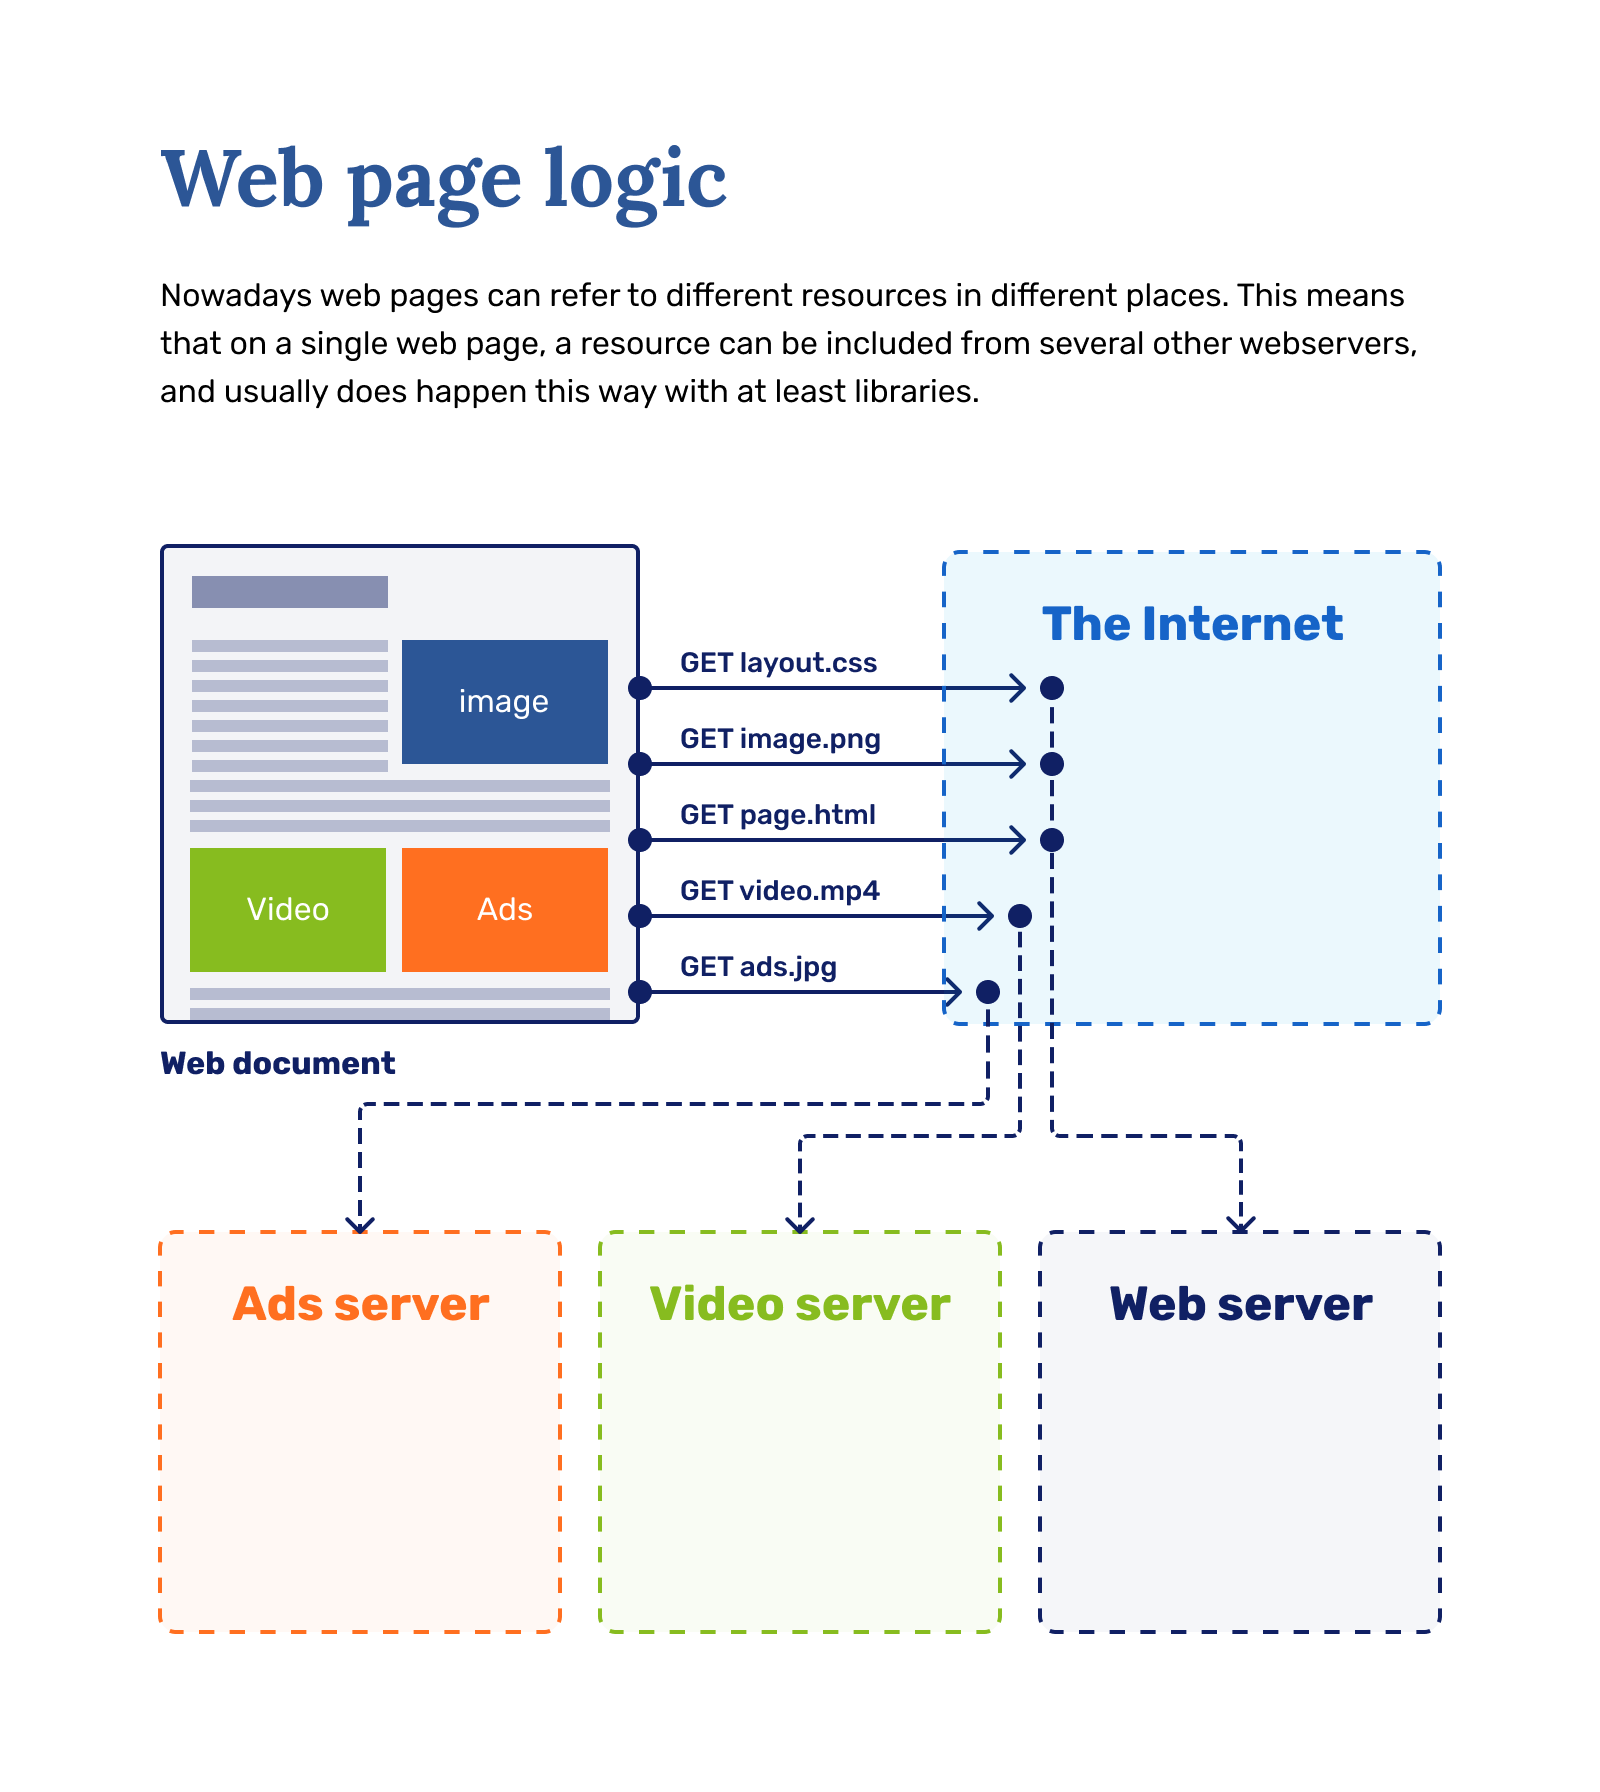
A Web page is a hypertext document. This means some parts of the displayed content are links, which can be activated (usually by a click of the mouse) to fetch a new Web page, allowing the user to direct their user-agent and navigate through the Web. The browser translates these directions into HTTP requests and further interprets the HTTP responses to present the user with a clear response.
Something to also mind is that HTTP is stateless (but not sessionless). This means that it's up to the client to track the success of requests. For doing this, every response given by the servers also contains a response code, which is an indication of whether something went wrong and what.
Examples of status codes: - 200 - OK
-
401 - Unauthorized (the client must authenticate itself to get the requested response)
-
403 - Forbidden (The client does not have access rights to the content; that is, it is unauthorized, so the server is refusing to give the requested resource.)
-
404 - Not found (Requested resource is not found on the server)
-
405 - Method Not Allowed (HTTP Method used is not allowed by the server)
-
418 - I'm a teapot (The server refuses the attempt to brew coffee with a teapot.)
2.2 HTTP Flow
When a client wants to communicate with a server, either the final server or an intermediate proxy, it performs the following steps:
-
Open a TCP connection: The TCP connection is used to send a request or several, and receive an answer. The client may open a new connection, reuse an existing connection, or open several TCP connections to the servers.
-
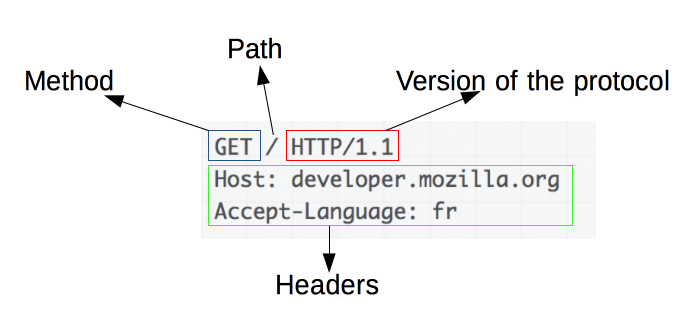
Send an HTTP message: HTTP messages (before HTTP/2) are human-readable. With HTTP/2, these simple messages are encapsulated in frames, making them impossible to read directly, but the principle remains the same. For example:
GET / HTTP/1.1\ Host: developer.mozilla.org\ Accept-Language: fr
-
Read the response sent by the server, such as:
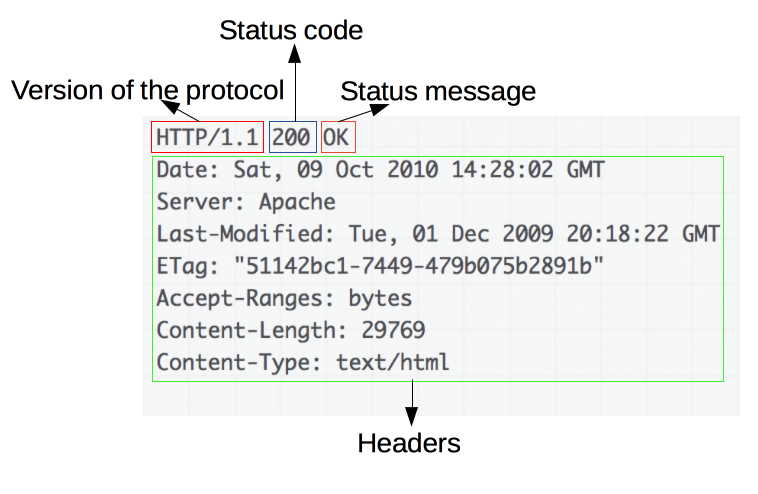
HTTP/1.1 200 OK\\ Date: Sat, 09 Oct 2010 14:28:02 GMT\\ Server: Apache\\ Last-Modified: Tue, 01 Dec 2009 20:18:22 GMT\\ ETag: "51142bc1-7449-479b075b2891b"\\ Accept-Ranges: bytes\\ Content-Length: 29769\\ Content-Type: text/html\\ \\ <!DOCTYPE html... (here come the 29769 bytes of the requested web page) -
Close or reuse the connection for further requests.
HTTP Messages
There are two types of HTTP messages, requests, and responses, each with its own format.
An example HTTP request
Requests consist of the following elements:
-
An HTTP method, usually a verb like GET, POST, or a noun like OPTIONS or HEAD that defines the operation the client wants to perform. Typically, a client wants to fetch a resource (using GET) or post the value of an HTML form (using POST), though more operations may be needed in other cases.
-
The path of the resource to fetch; the URL of the resource stripped from elements that are obvious from the context, for example without the protocol (http://), the domain (here, developer.mozilla.org), or the TCP port (here, 80).
-
The version of the HTTP protocol.
-
Optional headers that convey additional information for the servers.
-
A body, for some methods like POST, similar to those in responses, which contain the resource sent.
An example HTTP response
Responses consist of the following elements:
-
The version of the HTTP protocol they follow.
-
A status code, indicating if the request was successful or not, and why.
-
A status message, a non-authoritative short description of the status code.
-
HTTP headers, like those for requests.
-
Optionally, a body containing the fetched resource.
2.4 HTTP Headers
HTTP headers let the client and the server pass additional information with an HTTP request or response, on top of the actual body. An HTTP header consists of its case-insensitive name followed by a colon (:), then by its value. Whitespace before the value is ignored.
Headers can be grouped according to their contexts:
-
Request headers contain more information about the resource to be fetched, or about the client requesting the resource.
-
Response headers hold additional information about the response, like its location or about the server providing it.
-
Representation headers contain information about the body of the resource, like its MIME type, or encoding/compression applied.
-
Payload headers contain representation-independent information about payload data, including content length and the encoding used for transport.
Examples of more important headers:
-
Authorization: Basic <credentials>- Allows to send authorization information with headers. -
Wiewport-Width: <number>- Upon a request to a site, tell it how wide the screen is for appropriate site rendering in the browser. -
Accept: <MIME_type>/<MIME_subtype>- In a request, tell the server which kind of data is allowed to be returned. -
Set-Cookie: name=value- This HTTP response header is used to send a cookie from the server to the user agent so that the user agent can send it back to the server later. Very useful for persistent sessions. -
Content-Type: text/html; charset=UTF-8- Indicates the type of content which is sent in the message body.
There's a large amount of other headers, that are being widely used. Which headers browsers or web servers accept depends on the software used, and even though most headers are agreed upon nowadays, there are still differences between the different browsers. This makes web developer's job a nightmare at times.
3. Setting up a personal web server
3.1 Understanding DNS CNAME records
In some situations there is a need for one system to have multiple DNS names, all pointing to the same IP. This could be the case when hosting multiple websites or running multiple services on the same IP using service-specific host names, like:
-
www.<vm_name>.sa.cs.ut.ee -
ftp.<vm_name>.sa.cs.ut.ee -
myservice.<vm_name>.sa.cs.ut.ee
As we have a single machine, that's exactly what we will do - for every service, add a new record. For our main domain, we already have something like this.
-
student-test.sa.cs.ut.ee IN A 193.40.154.247
-
247.154.40.193 IN PTR student-test.sa.cs.ut.ee
... and for the rest of the hostnames which we are going to use, we will do the following.
-
www.student-test.sa.cs.ut.ee IN CNAME student-test.sa.cs.ut.ee
-
ftp.student-test.sa.cs.ut.ee IN CNAME student-test.sa.cs.ut.ee
-
myservice.student-test.sa.cs.ut.ee IN CNAME student-test.sa.cs.ut.ee
NB! Make sure you think through where you put a . in the end!
A CNAME record maps a domain name (alias) to another domain name (real name). Resolving CNAME record takes two steps - first, the alias is resolved to the resulting domain name, then that domain name is resolved to the IP address (using A record).
Something like this: Alias -> Domain Name -> IP
If the name has multiple CNAME aliases pointing to it, one just needs to change the real name's type A record to "move" all the names to a new IP address.
There can be however no reverse record for CNAME aliases, the corresponding IP will be always resolved to the actual A record. Additionally, the MX records and NS records can be only in use with A or AAAA records, we cannot assign them pointing to CNAME records.
More details about Canonical Name Record (CNAME) with examples you can read here
Complete
- Create a CNAME record for
wwwinside/etc/named/<vm_name>.sa.cs.ut.eezone file.www IN CNAME <vm_name>.sa.cs.ut.ee.
Mind the dot in the end. That is important, because if you do not add it, DNS server will add another "<vm_name>.sa.cs.ut.ee" part in the end, so your CNAME becomes:
<vm_name>.sa.cs.ut.ee.<vm_name>.sa.cs.ut.ee
Verify
Afterwards:
- Reload the DNS and make sure the CNAME was added correctly.
journalctl -r -u nameddig www.<vm_name>.sa.cs.ut.ee- To make sure everything new gets read in, did you update the
Serial?
3.2 Virtual Web Hosts Using Apache Web Server
Apache is the most popular web server software in use (as of February 2021). Apache supports a wide variety of features and can be extended with modules. We will use the ''virtual host'' functionality to set up multiple web hosts on the same web server.
Complete
-
Install Apache Web Server
# dnf install httpd
-
Add the default Security group in
ETAIScalledwebwithtcpport80to your Virtual machine, if necessary. -
Also, either add port
80or servicehttpas a rule to yourfirewalldservice. -
Afterwards you can start HTTPD service with the default configuration
# systemctl start httpd
Verify
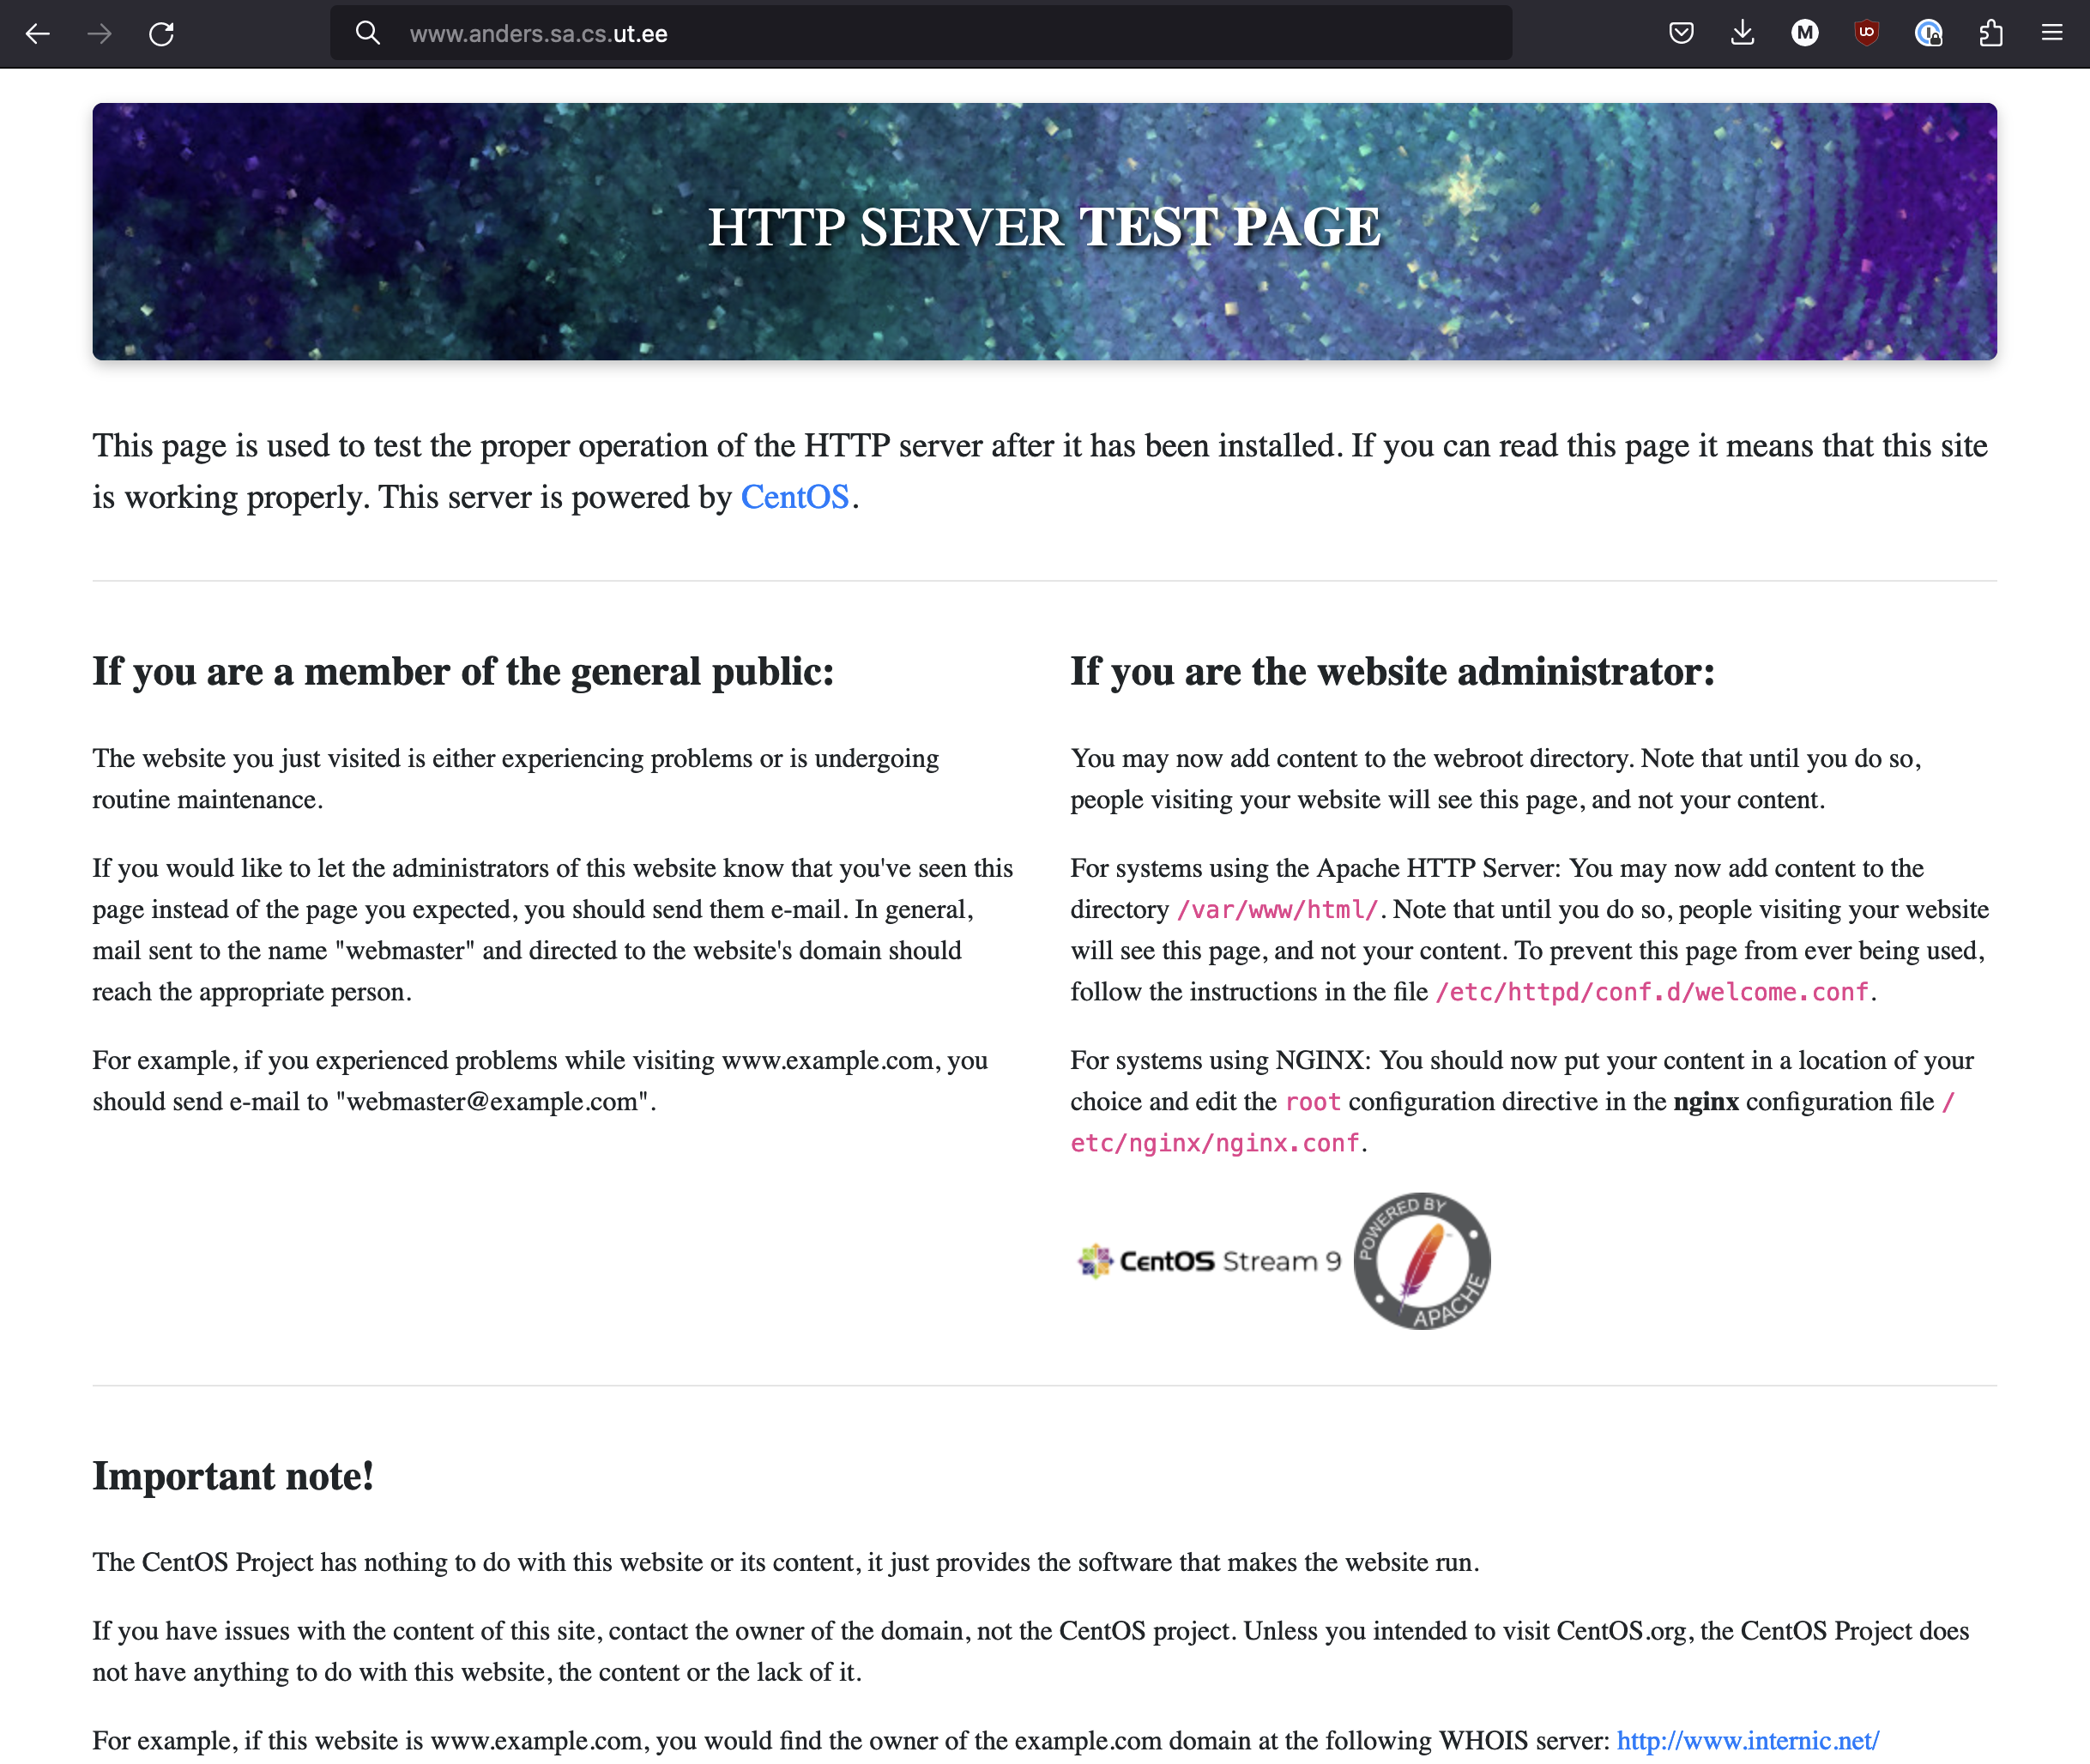
Check if you can access the default web page:
-
Check if you can ping your virtual machine from your personal computer (laptop)
$ ping 172.17.XX.XXor$ ping <vm_name>.sa.cs.ut.ee(last will work if yourbindconfiguration is right AND you have set your personal computers DNS servers to be 193.40.5.39 and 193.40.5.76) -
If previous steps are successful then in your web browser type address
http://172.17.XX.XXorhttp://<vm_name>.sa.cs.ut.ee. You should see a web page.
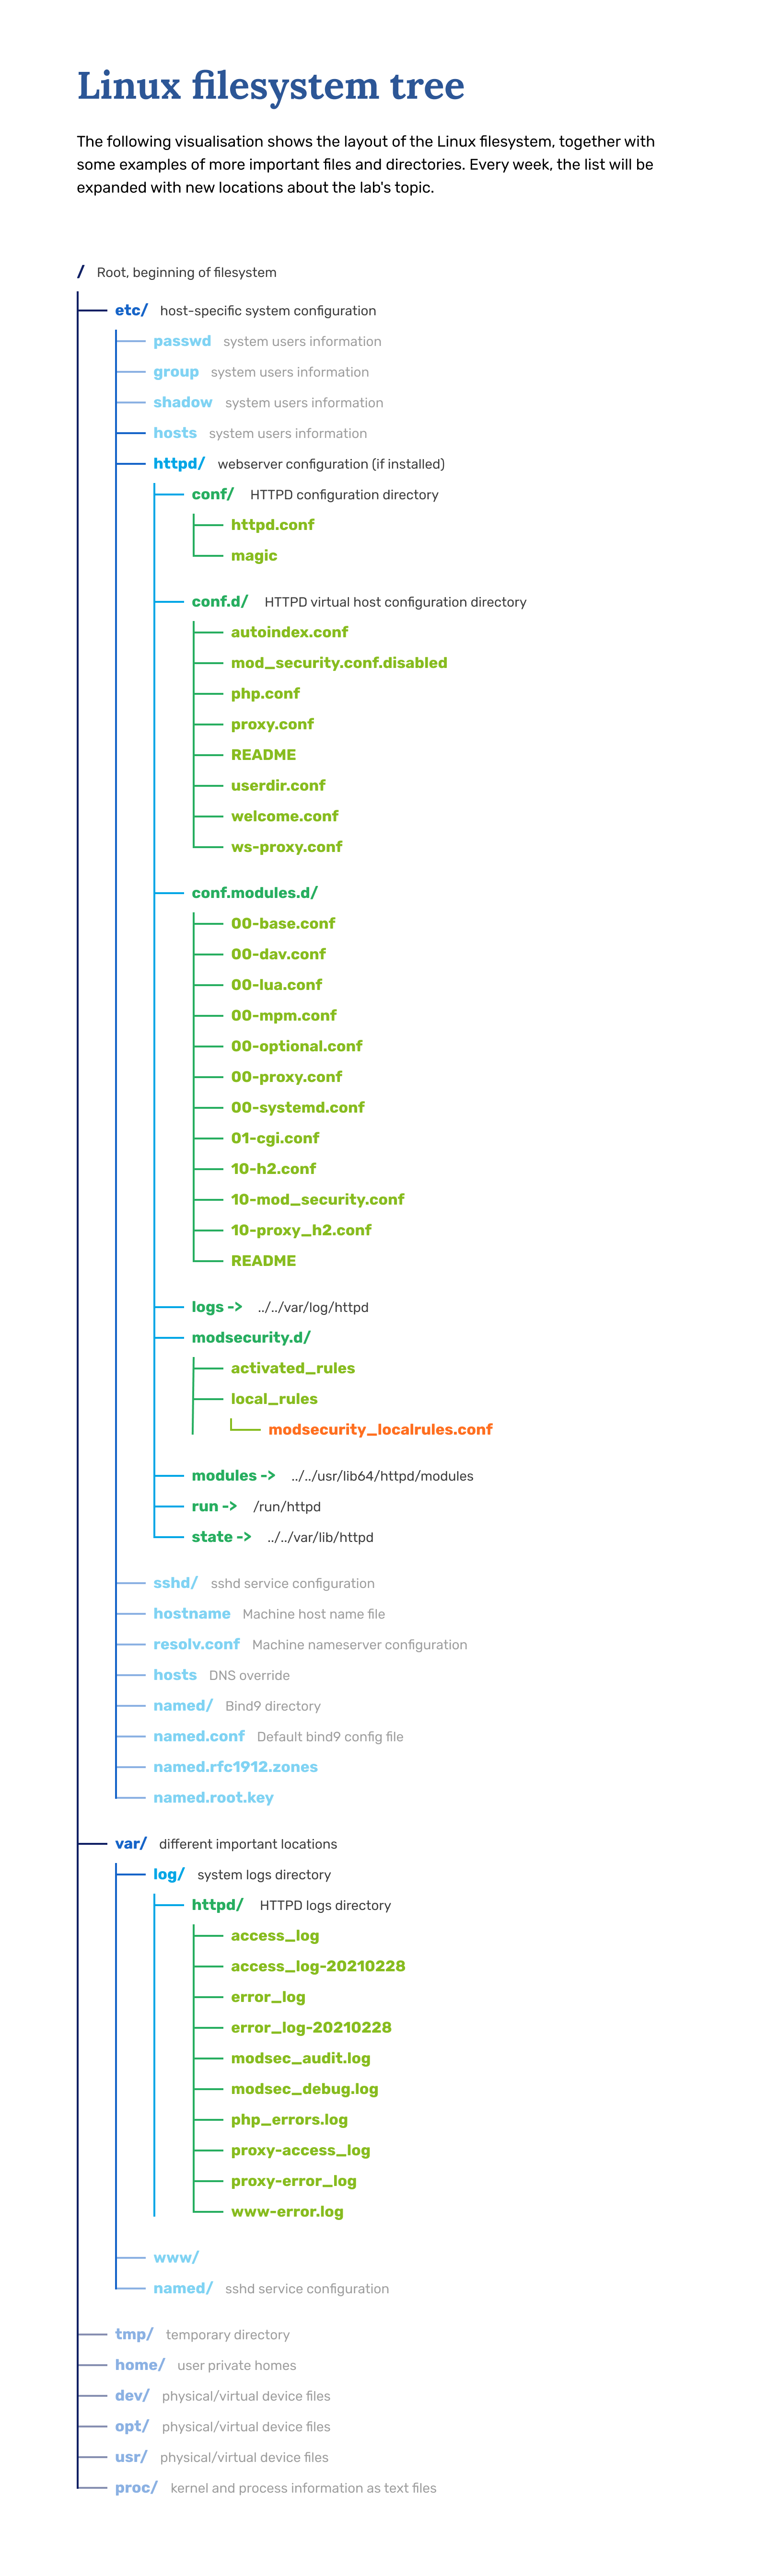
In CentOS 8, the main configuration file for Apache is /etc/httpd/conf/httpd.conf. Although it is not really important which config file you use, it is recommended to keep different parts of the setup in different .conf files. The additional site and module configuration files are kept in /etc/httpd/conf.d directory, i.e. ports.conf.
This kind of separation offers better flexibility when adding and removing different web applications, modules and domains. When some parts of the configuration are kept in separate /etc/httpd/conf.d/*.conf files it is easier to navigate the setup and enable/disable blocks of instructions.
For example, directive Include mods-enabled/*.conf will load every .conf file in this directory and their instructions will be automatically included in the Apache configuration, everything else will be ignored. This way, adding or removing a bit of functionality can be just a matter of creating an appropriate my-functionality.conf file or changing the file extension to something other than .conf. For example - to my-functionality.conf.disabled without editing the actual .conf files
Additionally, adding appropriate files into place with Ansible is much easier, than adding/removing parts to an existing file.
The log files for the Apache webserver are located in the /var/log/httpd/ directory, where query (access_log) logs and error logs (error_log) are kept separately. It is recommended to have a separate log file for each virtual host as well.
Extra reading:
During this lab, we will configure Apache to use name-based virtual hosts. With name-based virtual hosting, the server relies on the client to report the hostname as part of the HTTP headers. Using this technique, many different hosts can share the same IP address
First, configure the actual virtual host. We will create a virtual host for www.<vm_name>.sa.cs.ut.ee.
Apache documentation for Virtual Host and more specifically Name-based Virtual Host
Complete
-
Create a virtual host webroot directory. The contents of this directory will be published to web via HTTP. For
www.<vm_name>.sa.cs.ut.ee,/var/www/htmldirectory is created during Apache installation for default page (usually web pages are located in /var/www/directory or /var/www/html/directory). Create a directory calledwww.<vm_name>in the /var/www/html directory and another one namedpublic_htmlinside it. The end result should be something like/var/www/html/www.<vm_name>/public_html/. -
Create a configuration file for said virtual host. The file must be in the
/etc/httpd/conf.d/directory. As the file name, usewww.<vm_name>.conf- e.g.<vm_name>.conf,www.<vm_name>.conf(name does not actually matter, it just makes it easier for you to keep track of things, just make sure that the file ends with .conf) -
Into the virtual host configuration file just created, add the configuration directives to define a new name-based virtual host. This is just an example (given below), you should insert correct values
<VirtualHost *:80> ServerName InsertRightValueHere DocumentRoot /var/www/html/www.<vm_name>/public_html # Possible values include: debug, info, notice, warn, error, crit, alert, emerg. LogLevel warn ErrorLog /var/log/httpd/InsertRightValueHere-error.log CustomLog /var/log/httpd/InsertRightValueHere-access.log combined </VirtualHost> -
Overview of the important parameters/directives for the virtual host you will need to set:
ServerName- the full DNS name for virtual host i.e.www.student-test.sa.cs.ut.eeDocumentRoot- Directory from where Apache servers domain related files, for www would be/var/www/html/www.<vm_name>/public_htmlErrorLog,CustomLog- error log and access (query) log for the virtual host - the name and location of log files can be set to any value, but we recommend to stick to common values e.g.:<Apache log dir>/webmail-error.logand<Apache log dir>/webmail-access.logcombined. In most casesis located at /var/log/httpd/- For easier troubleshooting change
LogLeveltodebug
Verify
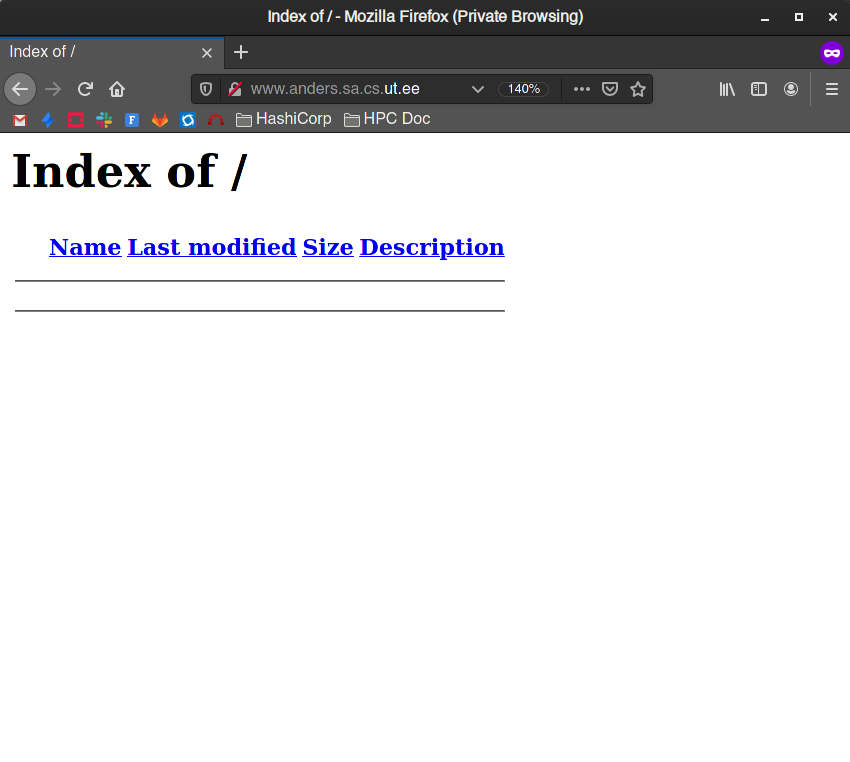
If all was done correctly, your website default canvas should be ready. It should look something like this:
Complete
This default page contains the necessary information for you.
- Find the location of the default Apache HTTP server page.
Follow the instructions inside it.
TIP: Read the page carefully.
Verify
Try accessing your web server now:
http://www.<yourdomain>.sa.cs.ut.ee- You should see an empty page saying Index of /
You may have noticed that your page is empty. The next step is to create some content for the virtual hosts. To do that you need to be familiar with basic HTML tags and how a web page is constructed. If needed, refer to very good public tutorials here: https://www.w3schools.com/html/html_intro.asp and https://www.w3schools.com/html/html_basic.asp .
Complete
- In the root directory of your
www.<your-domain>.sa.cs.ut.eevirtual host, create anindex.htmlfile. The content of this file can be freely chosen, but should also contain your machine's full hostname.- This index.html should also have a string of
www.<vm_name>.sa.cs.ut.eesomewhere inside it for the scoring server to test.
- This index.html should also have a string of
Verify
Use the # apachectl configtest to test the configuration syntax or if all the configuration files are visible and can be loaded by Apache.
The output should be Syntax OK.
Now it is time to restart the Apache httpd server.
Complete
- Enable and start/restart the Apache webserver (the service name is
httpd)# apachectl restart
Verify
You do not need to restart the Apache service every time as the pages will be re-read on each request. But since we just created a new index.html file a restart to make sure everything is in order does not hurt at this point.
- If you visit your page again you should see your personal demo page now.
http://www.<yourdomain>.sa.cs.ut.ee
Sometimes modern web browsers don't understand a page has been changed and just displays local cache version therefore if in doubt always refresh with <CTRL> + F5 key.
There are situations when you want to restart your Apache server, but can't interrupt its work. Imagine that you have a few hundred clients currently downloading files from your server and you need to avoid disconnecting them. In such situations you can use the following command:
# apachectl graceful
This will ''gracefully'' restart your Apache server with a new configuration without affecting your client's connections.
Verify
Test by accessing the web pages:
-
View the web pages for the virtual host you created, make sure that you are getting the right content for the virtual host.
- try
http://www.<your-domain>.sa.cs.ut.ee
- try
-
In the
/var/log/httpd/directory, look at the access and error logs for your virtual host.- Understanding error messages is an important part of system administration. Some future tasks (e.g. exam) may require you to get and understand the troubleshooting information from the Apache logs independently.
3.3 Utilizing a web server as a proxy
Very often, a web server is not utilized to serve files directly but used for forwarding requests to another service that is a web server itself, but is either less secure or does not support settings a proper webserver does. A good example is Python (Flask, Tornado), NodeJS, or Go web applications. This is called proxying.
This allows a systems administrator to have a single point of control over security settings, without having to delve into the application configuration or code.
In this example, we will use Python Flask, but you can use anything capable of serving the web. We will start a service on localhost port 5000, and proxy that to the internet.
Complete
-
Install
PIP(a tool to manage python libraries.)dnf install python3-pip
-
Install Flask libraries.
pip3 install flask
Now you have the necessary libraries to run a flask program.
Complete
Create a create random file, for an example /root/website.py, and add the following code there:
#!/bin/env python3

from flask import Flask
app = Flask(__name__)

@app.route("/")
def hello():
    return "Hello World!"

if __name__ == "__main__":
    app.run(port=5000)
Verify
The following steps require two terminals. Run this Python application in one of the terminals, by doing python3 /root/website.py. The other terminal we use to continue setting up appropriate settings for proxy.
Once you have run the python program, test if it works by doing curl localhost:5000. It should answer with whatever the program is programmed to do.
Now, to set up the proxy, do the following steps:
Complete
-
Set up a domain name
proxy.<vm_name>.sa.cs.ut.ee, that points to your machine. -
Run the command
setsebool -P httpd_can_network_connect=1. This allows HTTPD to connect to your python program. -
Add the following code into a new HTTPD config file, called
proxy.conf.<VirtualHost *:80> ServerName proxy.<vm_name>.sa.cs.ut.ee # ServerName sets the name to listen for with requests ErrorLog /var/log/httpd/proxy-error_log CustomLog /var/log/httpd/proxy-access_log common ProxyPreserveHost On ProxyPass / http://localhost:5000/ ProxyPassReverse / http://localhost:5000/ </VirtualHost> - The
ProxyPassdirective here tells apache where to look for your "real" application After doing this, you should be able to check whether your python program is available from the nameproxy.<vm_name>.sa.cs.ut.ee.
Verify
Try accessing your page either by:
-
curl proxy.<vm_name>.sa.cs.ut.ee. -
Using a web browser.
Now, because you cannot keep a terminal open constantly to keep this web service up, nor is it a good practice to run things like this, we are going to use our service manager, to keep our python service up for us. This also allows the service to start again when the machine reboots.
Complete
-
Close the proxy server
-
Make a
proxyuser. -
Move your python file to /usr/local/lib/server.py.
-
Give ownership of your python file to
proxyuser. -
Create a file
/etc/systemd/system/proxy.servicewith following contents:# systemd unit file for the Python Proxy Service [Unit] # Human readable name of the unit Description=Python Proxy Service [Service] # Command to execute when the service is started ExecStart=/usr/bin/python3 /usr/local/lib/server.py # Disable Python's buffering of STDOUT and STDERR, so that output from the # service shows up immediately in systemds' logs Environment=PYTHONUNBUFFERED=1 # Automatically restart the service if it crashes Restart=on-failure # Our service will notify systemd once it is up and running Type=simple # Use a dedicated user to run our service User=proxy [Install] # Tell systemd to automatically start this service when the system boots # (assuming the service is enabled) WantedBy=default.target -
Reload systemctl service files
systemctl daemon-reload -
Start a service called
proxy. -
Enable a service called
proxyto be started on boot.
Verify
-
See if something is listening on port
5000. -
Test if your website is working.
-
Check if service starts on machine reboot.
4. Let's add a default WordPress setup to our current setup
Let's install the prerequisite package necessary for a default WordPress setup.
Complete
# dnf install php-mysqlnd php-fpm mariadb-server httpd tar curl php-json
Startup the MariaDB service
Complete
# systemctl start mariadb
And let's enable it, so it starts up every time the VM boots up.
# systemctl enable mariadb
If you haven't already done so, do the same for httpd service.
Complete
The following command starts up a command-line-based procedure. The purpose of this is to override the default mariadb settings and make it more secure by removing the default settings.
When you are asked to 'Set root password?' write it down for future purposes. Put it somewhere you know to look for. The root password can be changed when you have root access to said machine, but that means you would have to google for a solution yourself (There are a plethora of guides on the internet that can help you achieve your goal).
Otherwise using recommended settings, is recommended, pun intended. You will recognize recommended option by the capitalized letter, i.e. [Y/n], here Y (Yes is recommended).
# mysql_secure_installationNOTE: RUNNING ALL PARTS OF THIS SCRIPT IS RECOMMENDED FOR ALL MariaDB SERVERS IN PRODUCTION USE! PLEASE READ EACH STEP CAREFULLY! In order to log into MariaDB to secure it, we'll need the current password for the root user. If you've just installed MariaDB, and haven't set the root password yet, you should just press enter here. Enter current password for root (enter for none): OK, successfully used password, moving on... Setting the root password or using the unix_socket ensures that nobody can log into the MariaDB root user without the proper authorisation. You already have your root account protected, so you can safely answer 'n'. Switch to unix_socket authentication [Y/n] n ... skipping. You already have your root account protected, so you can safely answer 'n'. Change the root password? [Y/n] n ... skipping. By default, a MariaDB installation has an anonymous user, allowing anyone to log into MariaDB without having to have a user account created for them. This is intended only for testing, and to make the installation go a bit smoother. You should remove them before moving into a production environment. Remove anonymous users? [Y/n] Y ... Success! Normally, root should only be allowed to connect from 'localhost'. This ensures that someone cannot guess at the root password from the network. Disallow root login remotely? [Y/n] Y ... Success! By default, MariaDB comes with a database named 'test' that anyone can access. This is also intended only for testing, and should be removed before moving into a production environment. Remove test database and access to it? [Y/n] Y - Dropping test database... ... Success! - Removing privileges on test database... ... Success! Reloading the privilege tables will ensure that all changes made so far will take effect immediately. Reload privilege tables now? [Y/n] Y ... Success! Cleaning up... All done! If you've completed all of the above steps, your MariaDB installation should now be secure. Thanks for using MariaDB!
Complete
Login into the MySQL database with the password you just created for user root.
# mysql -u root -p
Let's create a database for WordPress, naming it WordPress.
mysql> CREATE DATABASE <database name>;
Now we need to create a new user admin, with an insecure password pass.
mysql> CREATE USER `admin`@`localhost` IDENTIFIED BY 'pass';
Let's grant user admin access to the database we created.
mysql> GRANT ALL ON WordPress.* TO `admin`@`localhost`;
Now, since we have just granted user admin access to a new database wordpress, we need to reload the grant tables, with the following command:
mysql> FLUSH PRIVILEGES;
mariadb bit is done for now.
mysql> exit
Now let's download the wordpress tarball, unpack it and move it to a proper webroot.
Complete
# curl https://wordpress.org/latest.tar.gz --output wordpress.tar.gz
The tar command unpacks the wordpress.tar.gz into a directory wordpress in the current working directory.
# tar xf wordpress.tar.gz
We can place the freshly unpacked wordpress directory into /var/www/html. We could just as easily create a new directory wordpress.<vm_name> for a more structured look (like we did for www previously), but it is not critical, as long as you know what you are doing.
# cp -r wordpress /var/www/html
Let's grant user apache the right to work in /var/www/html/wordpress directory. And change the file SELinux security context.
Complete
-
# chown -R apache:apache /var/www/html/wordpress -
# chcon -t httpd_sys_rw_content_t /var/www/html/wordpress -R
Now let's consolidate our WordPress PHP logs to one place.
Complete
- Edit both
/etc/php-fpm.confand/etc/php-fpm.d/www.conf- In both files, find the directive
error_logand redirect the logfiles to/var/log/httpd/php-errors.logand/var/log/httpd/www-php-errors.logaccordingly - Dont forget to create the logfiles and assign the correct permissions(same as apache logs)
- In both files, find the directive
Now repeat the steps we did earlier for www.<vm_name>.sa.cs.ut.ee.
Complete
-
Create a virtual host pointing at wordpress.
-
Create a CNAME for
wordpress.<vm_name>.sa.cs.ut.ee -
# systemctl reload httpd -
Also make sure to start the system service named
php-fpm
The final part of the WordPress setup is setting up the page, what we have done so far has been laying down the foundation, so to speak.
Complete
Go to wordpress.<vm_name>.sa.cs.ut.ee and perform the actual WordPress installation. Follow the instructions provided there and complete the installation. Again all the passwords and authentications you set there, you should remember or write down. Otherwise, it is a one-way trip to google.
5. Configuring Apache modules
While apache2 on its own is a very powerful tool, its functionality can be expanded by loading extra modules. Currently, we will be looking at loading some simple logging modules, but apache modules are used to security-harden your websites, add TLS support, rewrite URL paths, handle downloads, caching, etc.
Each of these modules usually starts with a prefix mod_ and we can see that we are already loading and using some modules, for example, our proxy website already uses a directive named ProxyPass that is loaded from /etc/httpd/conf.modules.d/00-proxy.conf. Using a modular structure like this allows developers and administrators to configure extra functionality without rebuilding whole environments.
5.1 Forensic logging
Default Apache2 logging is done by mod_log_config and we are already familiar with this by the usage of the ErrorLog and CustomLog directives we configured for all of our virtual hosts. Looking at our access logs defined in CustomLog we notice some pretty simple info - request origin IP, datetime of the request, and some basic information about the request and response. While this is fine in most cases when working with developers chasing an elusive bug they might require extra information about the nature of the request. This is where mod_log_forensic comes in, as forensic logs offer a substantial increase in the amount of information apache provides, mainly the ability to determine which requests are part of one session.
Complete
Fortunately, mod_log_forensic comes installed by default, so all we need to do is enable and configure it.
-
Firstly we need to load the module, to do this we will edit the main apache2 configuration file
httpd.confand add the lineLoadModule log_forensic_module modules/mod_log_forensic.so -
Now we need to configure each of our virtualhosts, and add a new logfile option
ForensicLog /var/log/httpd/<virtualhost>-forensic.log
Make sure to replace the <virtualhost> value appropriately for each site and to also create the empty file with the correct permissions for each site.
- Restart apache2
Verify
Now let's reload any of our preconfigured sites, lets take www as an example. We should now see similar log data in our forensic logfiles
+YDvAdxfNz6bRQrk@IWUKUQAAAMA|GET / HTTP/1.1|Host:localhost|User-Agent:Mozilla/5.0 (X11; Linux x86_64; rv%3a84.0) Gecko/20100101 Firefox/84.0|Accept:text/html,application/xhtml+xml,application/xml;q=0.9,image/webp,*/*;q=0.8|Accept-Language:en-US,en;q=0.5|Accept-Encoding:gzip, deflate|DNT:1|Connection:keep-alive|Cookie:utbslang=et|Upgrade-Insecure-Requests:1|Cache-Control:max-age=0
-YDvAdxfNz6bRQrk@IWUKUQAAAMA
A few takeaways from the logline - first it's meant to be machine-readable (instead of nice space-separated values the pipe character | is used). Also compared to the regular access log, we can see all of the HTTP request headers that the server received - this extra data might prove invaluable when debugging web service issues
5.2 Security-hardening our webserver using mod_security
While basic website security should come from the developers' side, system administrators have a few tricks to make sure malicious requests are filtered at the webserver level. For this mod_security is used in apache2 to filter requests that might not always inherently be malicious but can often be exploited.
ModSecurity is a Web Application Firewall (WAF) that is a list of rules that get matched against each HTTP request. These rules try to determine whether the request is malicious in nature, for example trying to access system files like /etc/shadow, and if they do, then the request gets blocked.
Not all websites are always able to work behind a WAF. For example courses.cs.ut.ee needed heavy WAF custom configuration, because every edit to a page seemed like a bunch of code for a WAF, and it denied all requests.
Complete
The apache2 security module does not come installed by default. First, use dnf search to search for the package and then install it.
- Now we will configure some custom local rules. In your apache config directory you should see a directory named
modsecurity.dand another subdirectory in it namedlocal_rules- Inside we will find a placeholder file named
modsecurity_localrules.confwhich we will open for editing - Now let's append the following rules
- Inside we will find a placeholder file named
# default action when matching rules
SecDefaultAction "phase:2,deny,log,status:406"

# [etc/passwd] is included in request URI
SecRule REQUEST_URI "etc/passwd" "id:'500001'"

# [../] is included in request URI
SecRule REQUEST_URI "\.\./" "id:'500002'"

# [<SCRIPT] is included in arguments
SecRule ARGS "<[Ss][Cc][Rr][Ii][Pp][Tt]" "id:'500003'"
Verify
We need to craft a request that matches our filters, let's look at a common attack of trying to access the Linux /etc/passwd file through the webserver.
-
Take one our your virtual hosts, we will use
wwwin this example- Try to query the file
/etc/passwdfrom your server by going to the URLwww.<vm_name>.sa.cs.ut.ee/etc/passwd - You should see a classic error
Not Foundwith the return code404in the site error log.
- Try to query the file
-
Now restart your web server if you haven't already
- After retrying the query, we should now instead get
Not Acceptablewith the HTML return code406 - We can also see an error line in our log containing
ModSecurity: Access denied with code 406 (phase 2). Pattern match "etc/passwd" at REQUEST_URI, we can now confirm that our custom rules are in place
- After retrying the query, we should now instead get
We can also test this from the command line, emulating an HTTP GET request
-
We will use the tool
netcatto manually write our requestFirst, let's craft the request itself, we will be using some printf magic to make sure it's correctly formatted. The request is similar to the one shown at the beginning of the lab guide
Notice the 2 extra empty lines at the end - these are necessary forGET / HTTP/1.1 User-Agent: nc/0.0.1 Host: www.<vmname>.sa.cs.ut.ee Accept: */*netcatto understand where the end of the request is.- Next we need to craft this into a format
printfcan understand, for this we will replace all of the line breaks with\r\n"GET / HTTP/1.1\r\nUser-Agent: nc/0.0.1\r\nHost: www.<vmname>.sa.cs.ut.ee\r\nAccept: */*\r\n\r\n"
Now we pass this string onto
printf, a command-line tool to format strings and pipe the output tonetcat-
printf "GET / HTTP/1.1\r\nUser-Agent: nc/0.0.1\r\nHost: www.<vmname>.sa.cs.ut.ee\r\nAccept: */*\r\n\r\n" | nc localhost 80- We should see a response from the server starting with
HTTP/1.1 200 OK, followed by the HTML content of our indexpage
- We should see a response from the server starting with
-
Now replace the query path
/with/etc/passwd- We now see that the webserver has rejected our request with the header
HTTP/1.1 406 Not Acceptable
- We now see that the webserver has rejected our request with the header
- Next we need to craft this into a format
Thankfully, with nowadays default webserver configuration, most of these kinds of attacks are impossible if you have not made a severe configuration error, but it is still good to have at least two layers of configuration to prevent these kinds of problems.
Complete
In reality, we would not use our own custom rules as we might miss potential attack vectors since we cannot account for every type of attack ourselves. Where could we find a preconfigured list of apache security rules?
6. Ansible tips
6.1 Tags
Previously, we have asked you to define your roles with tags like - role { role: <role name>, tags: <tag name> }. Tags are used for running specific parts of your playbook, instead of the whole thing.
For example, you have edited some zone files under your DNS role and want to apply them. Running ansible-playbook playbook.yml will run all of the roles that you have set up there, this will get cumbersome if you have tens of huge roles that will be executed. Running these extra roles won't break anything if your playbook is well written, but in some cases, it will take a lot of time to run a whole playbook for a single configuration change. In this instance, it can be avoided by using ansible-playbook --tags=dns playbook.yml, which will run only the roles that have a DNS tag. The main purpose is to avoid the hassle of creating multiple playbooks for singular roles, editing the main playbook to comment something out, and all-in-all making using Ansible a better experience. More information about tags can be found at the Ansible documentation tags page
6.2 Ansible modules
Ansible modules are discreet sets of code that give ansible the functionality that it has. You have already used a few modules in your playbook tasks, like user: for user management, file: for creating files and modifying their permissions dnf: for installing packages, templates, etc. Ansible has a lot of modules built in that can greatly improve your playbook execution.
Verify
For this lab look up the following modules:
-
pip
-
seboolean
-
copy
-
mysql_user
-
mysql_db
-
unarchive
-
sefcontext
and see how they could be used to automate lab 5.
Ansible documentation always shows specific examples on every module usage, most of them even match with what we are trying to do in this lab. For example, we can take them from seboolean and sefcontext to get:
- name: Seboolean | this equates to 'setsebool -P httpd_can_network_connect=1'
  seboolean:
    name: httpd_can_network_connect
    state: yes
    persistent: yes

- name: Sefcontext | this equates to 'chcon -t httpd_sys_rw_content_t /var/www/html/wordpress -R'
  sefcontext:
    target: '/var/www/html/wordpress(/.*)?'
    setype: httpd_sys_rw_content_t
    state: present
6.3 Handlers
Ansible tasks have three main states of completion:
-
ok- task ran successfully and nothing was changed -
changed- task ran successfully and something was changed -
failed- executing the task failed
There are some tasks that you may only want to run when a change is made. Mostly this is used to restart services only when a configuration file has been updated, not on every run. Just as it was said in the guide above, you want to avoid unnecessary restarts to apache as much as you can.
Handlers have their own subdirectory roles/<rolename>/handlers/main.yml
An example use of a handler in a task declaration
- name: Template | website config
  template:
    src: vhost.conf.j2
    dest: /etc/httpd/conf.d/www.{{ hostname }}.conf
    notify:
       - restart httpd
An example of an httpd handler in handlers/main.yml:
- name: restart httpd
  systemd:
    daemon_reload: yes
    name: httpd
    state: restarted
    enabled: yes
The ansible documentation for handlers has many great examples on how to run handlers. Now when a handler is notified, it will run at the end of your playbook to flush all of the changes you have done all at one time.
7. Automating lab 5
Complete
- Create a new role directory for apache and declare it in your main playbook with
- { role: apache, tags: apache} - Update the templates under your DNS role for www, WordPress, etc
- Create the necessary subdirectories for
files,templatesandhandlersunder roles/apache - Utilize handlers and different modules for your playbook
- Use tags to speed up consecutive runs
- Don't be afraid to ask for help in slack
8. Keeping your Ansible repository safe in Gitlab
And as always push your stuff to our Gitlab.
Complete
- In your ansible home directory:
git add .git commit -m "Web lab"git push -u origin main
Verify
Go to your GitLab page in courses' gitlab to see if all of your latest pushes reached the git repository. If you play around with your repository and have made changes to the ansible that you wish to utilize also in the future, always remember to commit and push them.