Lab 4 - DNS
Welcome to the DNS lab. Here is the short action list we will do in this lab:
- Verifying previous lab tasks
- Installing updates
- Opening firewalls
- Installing Domain Name Server
- Configuring own local resolver server (allowing recursion and caching)
- Configuring own domain zone, understanding "world" and "local" resolvers
1. Make sure you finished all of the lab2.
Danger
Before continuing, please make sure you have completed all of the previous labs.
Verify
- You were granted access to ETAIS, and you can log in with your UT credentials.
- VM was created and is visible in the list of VMs in ETAIS
- VM is reachable on External IP (from UT eduroam Wi-Fi or UT VPN)
- VM has
SSHservice running, and you can log in into VM using SSH private key - VM has a scoring account created. Scoring can log in using his SSH private key.
- Everything on scoring.sa.cs.ut.ee is green
- You have set a
rootpassword for your VM.
Additionally - Securing your ssh server
One thing that makes the SSH server more secure is disabling password authentication. We disable it since we use our private key to log in, and we disable password login because people often use bad (easy to guess) passwords. We want to eliminate that risk, and since we use a key, we disable it.
Complete
- Open and edit the file
/etc/ssh/sshd_config- Change the value of
PasswordAuthenticationto no. - After modifying the configuration file, restart the
sshd.service. Restarting SSH will not terminate the existing SSH connections.
- Change the value of
2. Check for the updates using CentOS package manager
We have worked with package managers yum or dnf during Lab2.
Complete
- Check if any updates are available
dnf check-update
- Perform the upgrade if needed
dnf updateor you can usednf upgrade
- Reboot the VM in case Linux Kernel or Initial RAM-fs was upgraded
- This will be visible from the upgrade logs
- Alternatively, you can list the "/boot" directory to check if any files have been updated recently.
- Consider the
lscommand, please have a look at options-l,-t,-rand-h(those might be helpful to produce detailed, time-ordered output)
- Consider the
Verify
We can count the system up-to-date if the package manager suggests no more updates.
In case you performed a reboot, make sure the VM booted and is back online, and you can SSH into it.
After upgrading the system, it is wise to clean the left-overs, so they won't make space - for eaxmple the downloaded rpm packages. Moreover, it is wise to remove the packages that are not used anymore. They are two commands responsible for performing these actions:
# Uninstall the not used packages
dnf autoremove -y
dnf clean all
Complete
Perform the cleaning and remove not used packages
Extra reading material for DNF
3. Firewall - Open UDP and TCP port 53 for the lab
Computers and especially servers usually utilize their own firewalls for security reasons. This allows the most privileged user of the machine to dictate how the traffic should flow to/through/from the machine. The most usual use for this is opening ports for services, so they could be reached from the outside world.
Usually, to top it off, with any sensible cloud provider you have their extra (second) layer of firewall, which has to be configured from outside the machine. This is to make sure, that even if your machine becomes compromised, network security policies (firewall rules) could not be changed easily.
From this lab onward we need UDP and TCP port 53 to be open for our VMs so that we could build a working DNS solution. DNS usually uses port 53/UDP for everything, but with big enough queries it switches over to 53/TCP. We also need to open port 8301 both UDP+TCP for our scoring to be able to a service discovery tool called Consul pre-installed by us on your machines.
To do that for the cloud provider layer, follow these steps:
Complete
- Go to
ETAIS->Resources->Private clouds-> Your VPC (click on the name) ->Networking->Security Groups-> 'Create' ->Name: DNS(Description: allowing UDP and TCP port 53 for DNS) ->Submit. - For the newly created DNS security group->
Actions->Set rules->Add rule->Ethernet type: IPv4->Direction: Ingress->IP protocol: UDP->Destination port: 53->Remote CIDR: 0.0.0.0/0->Remote security group: None- Do the same for
TCP.
- Do the same for
- Press
Submit. - Go to
ETAIS->Resources->VMs->Actions->Update Security groups-> Add the newly created Security Group DNS to the list of Security Groups ->Submit
Now the security group has been created. Let's create another security group called consul for a service discovery.
Complete
- Now do the same for ports
8301/TCPand8301/UDPand name the security groupconsul.
Let's make sure the DNS and Consul services can also be accessed through the host firewall:
Complete
firewall-cmd --add-service=dns --permanentfirewall-cmd --add-port=8301/udp --permanent# This is a service that helps us find your machine in the network.firewall-cmd --add-port=8301/tcp --permanent# Being able to connect to it is not important, but practice makes perfect.firewall-cmd --reload
The output of previous commands should be a success.
Verify
Both firewall-cmd commands should report on a new line: success
Danger
Be aware, whenever the practical manual tells you to open a new port, it must be done in ETAIS and in the VM. This is not a one time thing - you'll need to do it every time you add a service to your VM.
Info
If you want to test whether a port is open on a host, then you need a port scanner. The nmap tool you used in lab 1 is a great tool for this.
For example, here we test whether google.com has ports 53 and 80 (only TCP, you cannot port scan UDP. Why?) open:
$ sudo nmap -sS google.com -p 53,80
Password:
Starting Nmap 7.93 ( https://nmap.org ) at 2024-03-05 19:03 EET
Nmap scan report for google.com (216.58.210.174)
Host is up (0.011s latency).
rDNS record for 216.58.210.174: mad06s10-in-f174.1e100.net

PORT   STATE    SERVICE
53/tcp filtered domain
80/tcp open     http

Nmap done: 1 IP address (1 host up) scanned in 1.37 seconds
There are several different states possible:
open- the port is open, and a connection was established.closed- the port is closed, and aconnection refusedmessage was sent as a response to our query.filtered- this state is slightly more complicated. It means we were unable to determine the state of the port, because the connection was silently dropped, without a response. This usually means there was a firewall which dropped the connection, but not always.
4. Disable IPv6
The ETAIS cloud does not hand out virtual machines with IPv6 addresses for the internal network segments, therefore it is pointless to keep the IPv6 stack up in our VMs. It might also cause problems in some particular instances, for example when configuring services which may listen on them automatically. In this section, we will disable the IPv6 stack by alternating kernel runtime parameters.
System-wide configuration variables are managed using sysctl utility. Example:
To print the whole list of system settings, use:
     # sysctl -A
To see specific variable value:
     # sysctl variableName
To set a specific variable to a new value use:
     # sysctl <variable>=<value>
However, this will change only running system settings and reset default values after a system reboot. To alter the default values put the corresponding variables at the end of /etc/sysctl.conf file, for example, the content of /etc/sysctl.conf (only lines shown):
 # My default value of aa.bb.cc_var1 variable
 # NB! This is an example, do not use this!
 `aa.bb.cc_var1=1`
We do not configure any service to rely on IPv6; hence we do not need the system-wide IPv6 stack. Let's disable it using well studied sysctl utility.
Complete
- Disable the use of IPv6:
- Check the value of the following variables:
net.ipv6.conf.default.disable_ipv6net.ipv6.conf.all.disable_ipv6
- Change current system config using
sysctlcommand, set the value of both variables to1 - To make the changes persistent after reboot(s) create the
/etc/sysctl.d/70-ipv6.conffile, add the abovementioned variables. Save and close the file file. - Afterwards enter
sysctl --load /etc/sysctl.conf
Now, if you check your network interfaces using the ip addr l command, there should be no inet6 prefixed lines.
Verify
ip addr l- And if you still see
inet6lines in the output (as shown below), you may have missed something in the previous manual. Here is an example ofinet6output line:inet6 fe80::f816:3eff:fe8d:753e/64 scope link valid_lft forever preferred_lft forever
5. Domain Name System (DNS) using BIND software
Domain name services translate names meaningful to humans into numerical addresses (and vice versa, with ARPA). Practically every internet-connected system relies on a working domain name service. The domain name service does not have to be set up in-house; the Internet Service Provider (ISP) often provides it.
Extra materials
Domain Hierarchy for System Administration Labs
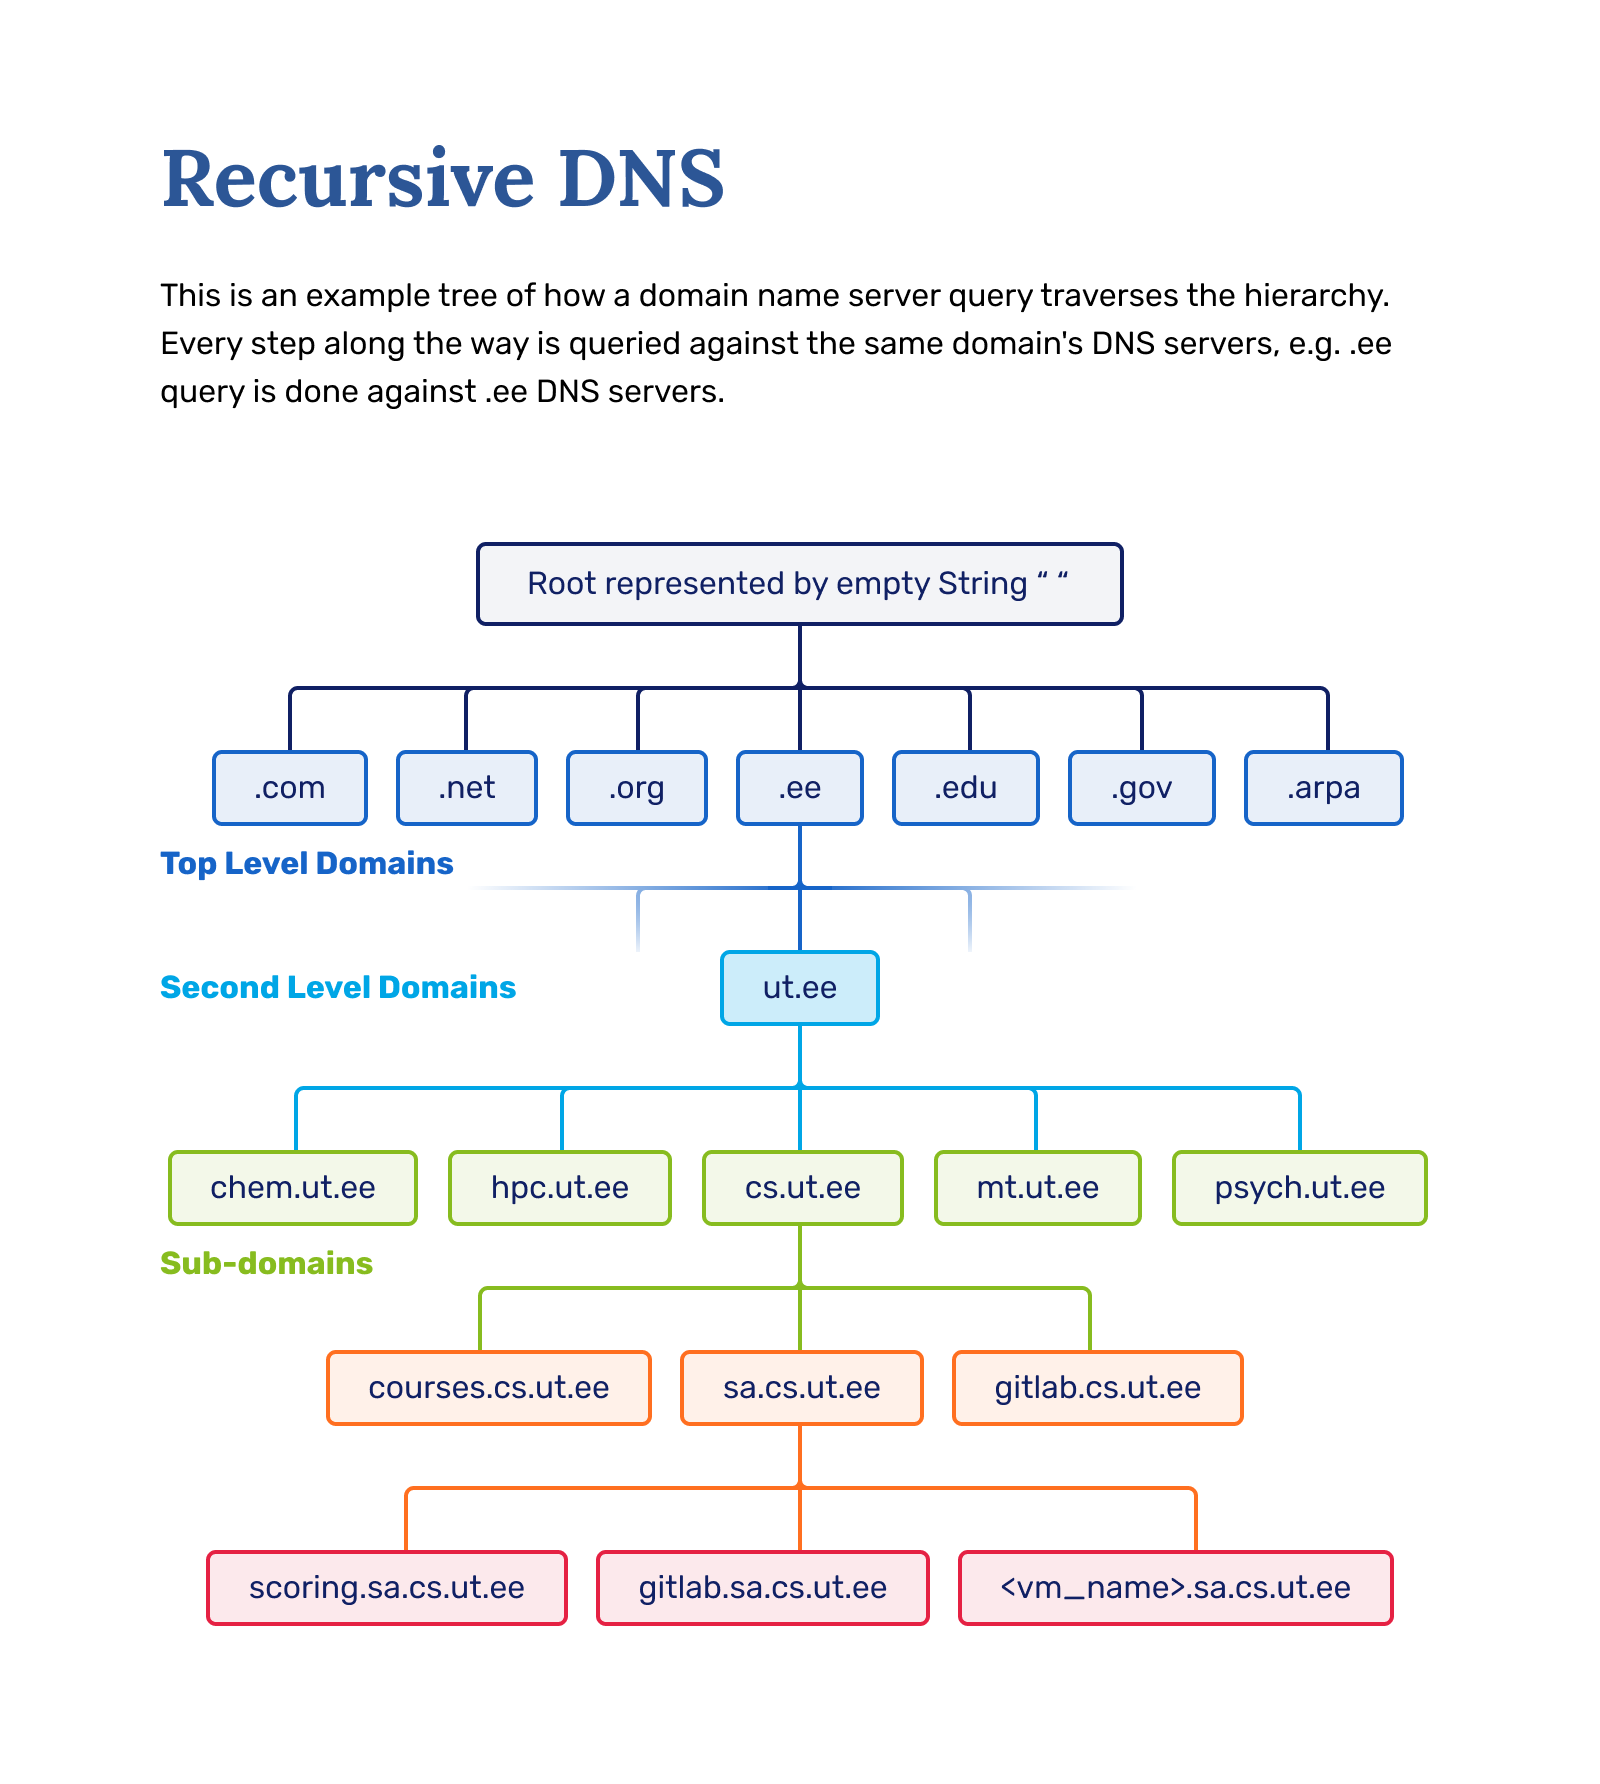
In our labs, use the same hierarchy as the internet, where root level domain name servers delegate domains to TLD name servers (.ee), those to University name servers (ut.ee), and University name servers are configured to delegate to the system administration name servers (sa.cs.ut.ee). From here onwards, the domains get delegated to different student's VMs.
-
Every participant/system will have authority over a subdomain
<vm_name>.sa.cs.ut.ee, under which one or more names may be defined.vm_namerefers to the name to the machine you've set inside minu.etais.ee. You will need to define a name for all the services you set up during the labs. -
The general form for these names is
<service>.vm_name.sa.cs.ut.eeHere<service>refers to any services we will be setting up in the future. The guides will specify which names to use.
For example:
- If student John decided to name his machine
jdoeinminu.etais.ee, they will have a machine with hostnamejdoe. In their DNS server, they will need to configure a zone forjdoe.sa.cs.ut.ee, and in the future they will be adding more services under<service>.jdoe.sa.cs.ut.ee.- You will have a different machine name, but the idea is the same.
- The domain part,
sa.cs.ut.ee, will stay the same for everyone during the labs. - During the exam, both the machine name and domain part might be different.
Changing hostname
By default, all VM instances created in this course are given a hostname of <vm_name>.novalocal by ETAIS during the initial setup. During this lab we are going to set up a personal DNS server (serving personal domain <vm_name>.sa.cs.ut.ee). Therefore we have to prepare the VM by changing its hostname from the ETAIS' default notation to full qualified domain notation, for example, for jdoe in jdoe.sa.cs.ut.ee domain:
short notation: jdoe
fqdn notation: jdoe.sa.cs.ut.ee
Verify
- To check your current hostname, use the
hostnamecommand.hostname
- Which will return your VM's default hostname (set by ETAIS).
The hostname is held in file /etc/hostname. By altering the single line, you will change the name of your host. In addition, there is a /etc/hosts file, which provides fixed host name to ip address mappings, and has the following content (only the line we are interested in is shown):
127.0.0.1   localhost localhost.localdomain localhost4 localhost4.localdomain4
...
The line shown above allows resolving hostname localhost to a local IP address 127.0.0.1 (without any requests to external services like DNS). This is especially useful when testing your services locally, if you consider the simple command, like:
Verify
$ ping localhost
$ ping localhost
PING localhost (127.0.0.1) 56(84) bytes of data.
64 bytes from localhost (127.0.0.1): icmp_seq=1 ttl=64 time=0.052 ms
64 bytes from localhost (127.0.0.1): icmp_seq=2 ttl=64 time=0.060 ms
...
We need to add another line in /etc/hosts associating your current hostname to 127.0.1.1. In case we change our domain, we need to modify this line. Example:
- my short host name is
<vm_name>, and my new domain is.sa.cs.ut.ee, so the full domain name<vm_name>.sa.cs.ut.ee - the line to be added should look something like this:
127.0.1.1 <vm_name>.sa.cs.ut.ee <vm_name>
Complete
- Now change your host name as described above, using pattern
<vm_name>.sa.cs.ut.eefor the new value. - Edit
/etc/hostname - Change the default hostname to your full hostname
<vm_name>.sa.cs.ut.ee<vm_name>- your current hostname in short notation ( a result ofhostnamecommand)
- Edit
/etc/hosts- Add the line
127.0.1.1 <vm_name>.sa.cs.ut.ee <vm_name>
- Add the line
- To reiterate
<vm_name>is a placeholder for student's virtual machine name in ETAIS self-service portal. - NOW reboot your instance to apply changes!
Verify
- The logon screen must display the same hostname
- When logged in, use the following command to display the hostname:
$ hostname --long- It should report you hostname in FQDN
<vm_name>.sa.cs.ut.ee
- It should report you hostname in FQDN
- Try to ping yourself using your new hostname
6. Configuring the BIND Name Server
First, install the Bind 9 DNS server-related packages.
Complete
Install the following packages:
bindbind-utils
Solving issues will require comprehensive logs, so first set up the folders and permissions where those logs will be written to later in the lab.
Complete
- Create directory
loginto/var/named.- Change the owner (user and group) of the directory to
named.
- Change the owner (user and group) of the directory to
- Create file
defaultinto/var/named/log.- Change its owner (user and group) to
named.
- Change its owner (user and group) to
- Create file
auth_serversinto/var/named/log.- Change its owner (user and group) to
named.
- Change its owner (user and group) to
- Create file
zone_transfersinto/var/named/log.- Change its owner (user and group) to
named.
- Change its owner (user and group) to
- Create file
client_securityinto/var/named/log.- Change its owner (user and group) to
named.
- Change its owner (user and group) to
- Create file
queriesinto/var/named/log.- Change its owner (user and group) to
named.
- Change its owner (user and group) to
- Create file
query-errorsinto/var/named/log.- Change its owner (user and group) to
named.
- Change its owner (user and group) to
As the BIND name server runs with the rights of the root user and group named (not root), you should always ensure that the main configuration file and zone files have the correct permissions and group ownership. Every file to be read by the BIND DNS server must be readable by the named group. If you get {+ "permission denied "+} errors, use the following commands to set the owner or group ownership, for example:
# chown root:named /etc/targetConfFile.conf
and following commands to set the correct permissions: Read up on unix permissions
# chmod 640 /etc/targetConfFile.conf- Will set rights rw- r-- ---
# chmod g+r /etc/targetConfFile.conf- Will just set read right for the group
Use chown to change owner/group. Use ls -la to check permissions/owner/group.
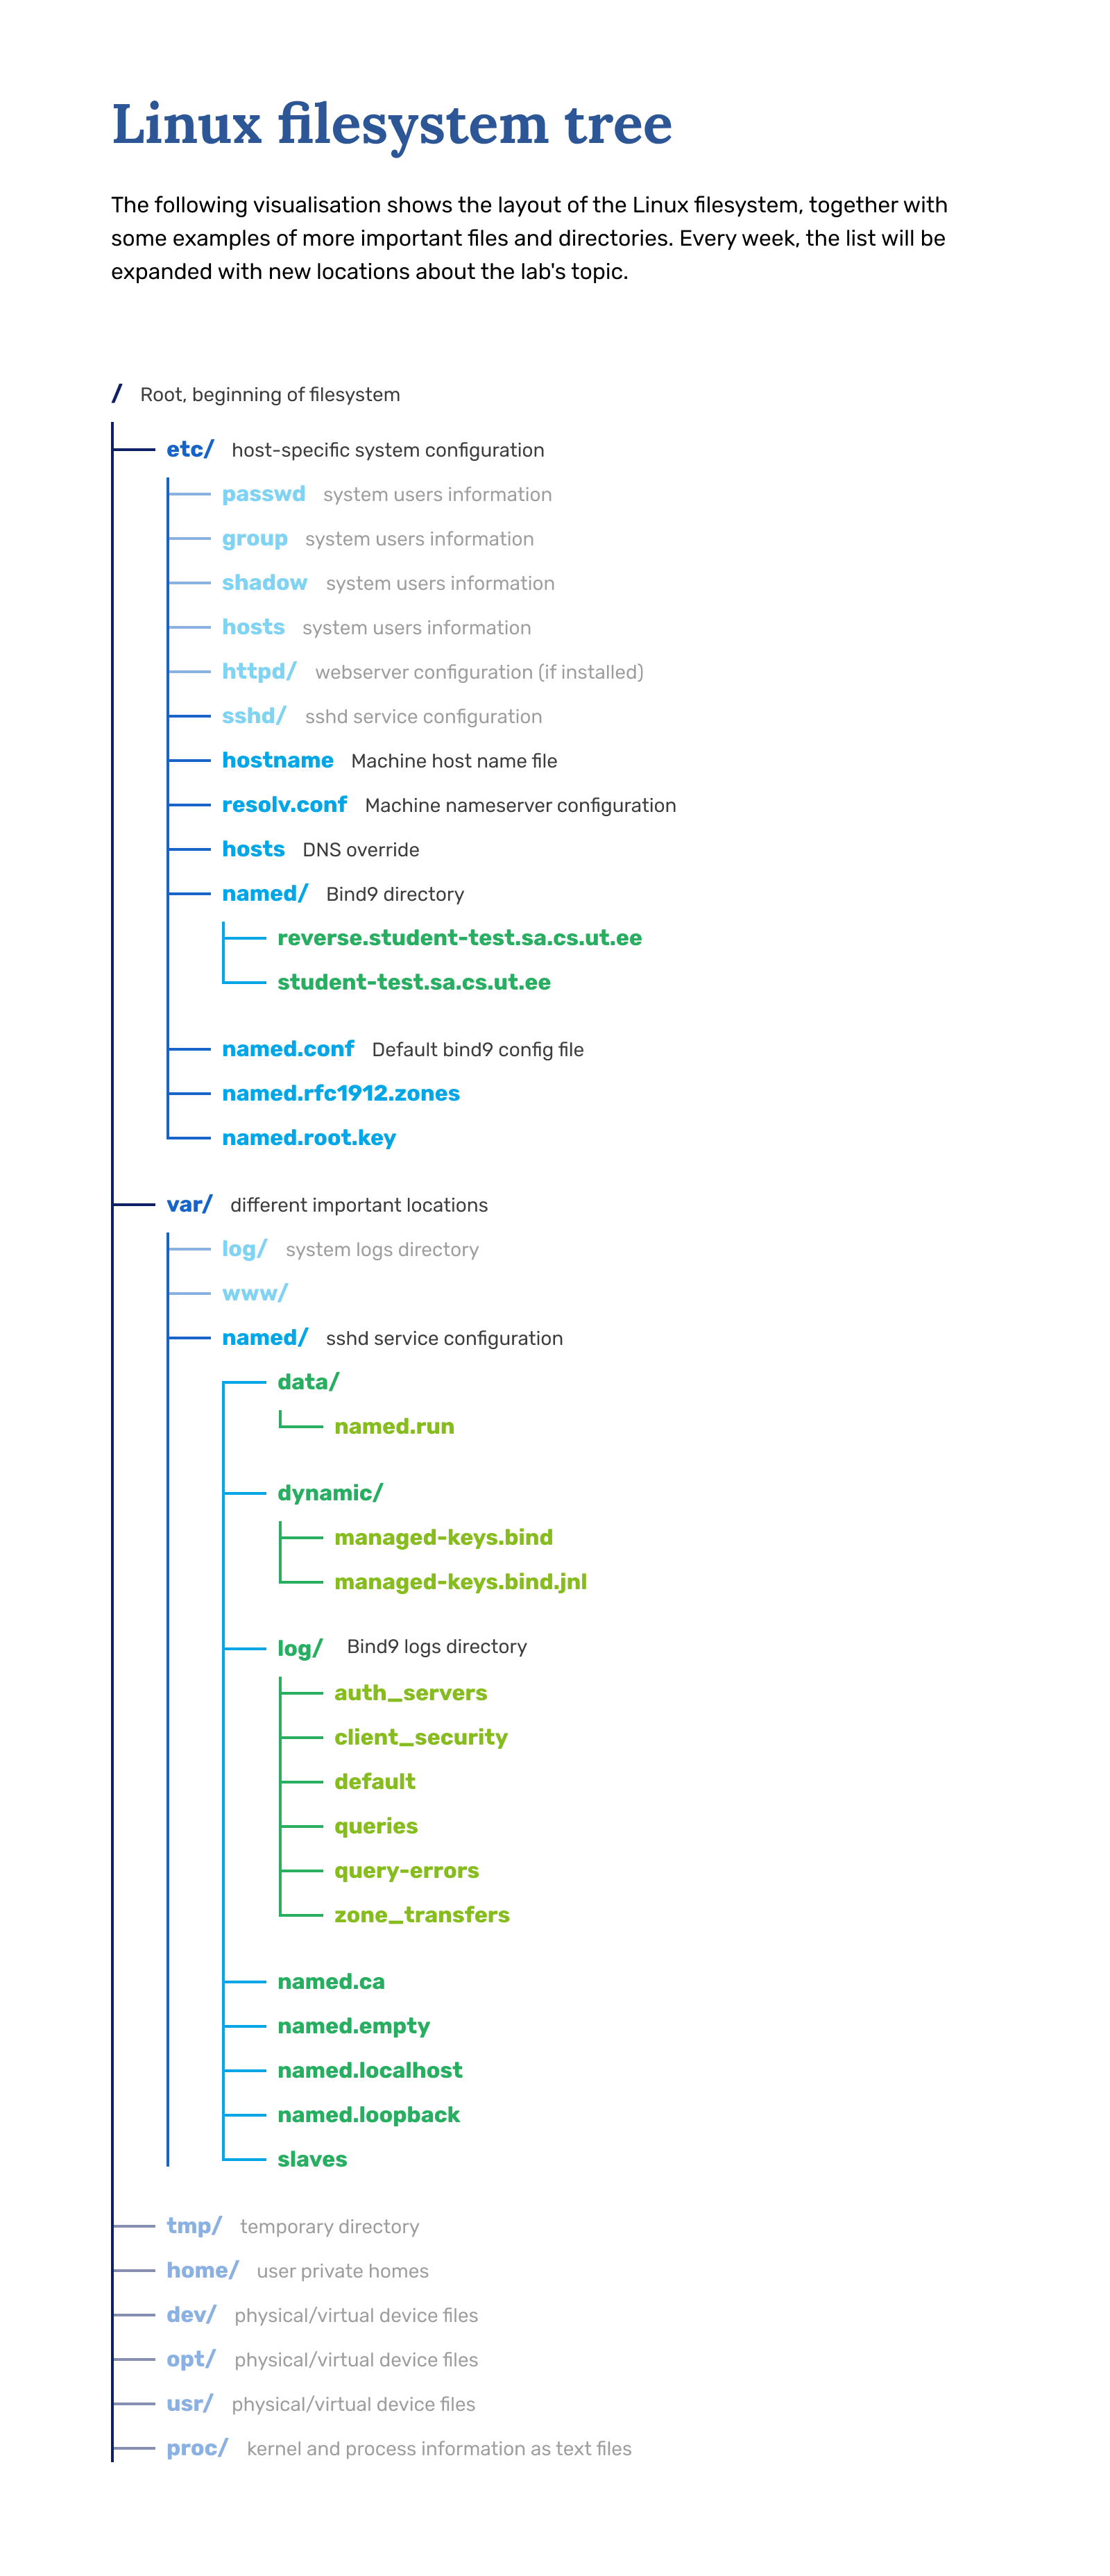
The main configuration file for BIND is /etc/named.conf which contains bind options, logging options and zones.
This configuration could be split into smaller segments if necessary, but that means you would have to specify the segments with an include statement in the main configuration file.
Complete
Let's start configuring the DNS server by adding proper logging configuration. Replace the default logging options in the named.conf with the following:
logging {
     channel default_log {
          file "/var/named/log/default" versions 3 size 20m;
          print-time yes;
          print-category yes;
          print-severity yes;
          severity info;
     };
     channel auth_servers_log {
          file "/var/named/log/auth_servers" versions 100 size 20m;
          print-time yes;
          print-category yes;
          print-severity yes;
          severity info;
     };
     channel zone_transfers_log {
          file "/var/named/log/zone_transfers" versions 3 size 20m;
          print-time yes;
          print-category yes;
          print-severity yes;
          severity info;
     };
     channel client_security_log {
          file "/var/named/log/client_security" versions 3 size 20m;
          print-time yes;
          print-category yes;
          print-severity yes;
          severity info;
     };
//
// If you have the category 'queries' defined, and you don't want query logging
// by default, make sure you add option 'query log no;' - then you can toggle
// query logging on (and off again) using command' rndc querylog'
//
     channel queries_log {
          file "/var/named/log/queries" versions 600 size 20m;
          print-time yes;
          print-category yes;
          print-severity yes;
          severity info;
     };
//
// This channel is dynamic so that when the debug level is increased using
// rndc while the server is running, extra information will be logged about
// failing queries. Other debug information for other categories will be
// sent to the channel default_debug (which is also dynamic), but without
// affecting the regular logging.
//
     channel query-errors_log {
          file "/var/named/log/query-errors" versions 5 size 20m;
          print-time yes;
          print-category yes;
          print-severity yes;
          severity dynamic;
     };
//
// This is the default Syslog channel, defined here for clarity. You don't
// have to use it if you prefer to log to your own channels.
// It sends to syslog daemon facility and sends only logged messages
// of priority info and higher.
// (The options to print time, category, and severity are non-default.)
//
     channel default_syslog {
          print-time yes;
          print-category yes;
          print-severity yes;
          syslog daemon;
          severity info;
     };
//
// This is the default debug output channel, defined here for clarity. You
// might want to redefine the output destination if it doesn't fit with your
// local system administration plans for logging. It is also a special
// channel that only produces output if the debug level is non-zero.
//
     channel default_debug {
          print-time yes;
          print-category yes;
          print-severity yes;
          file "named.run";
          severity dynamic;
     };
//
// Log routine stuff to Syslog and default log:
//
     category default { default_syslog; default_debug; default_log; };
     category config { default_syslog; default_debug; default_log; };
     category dispatch { default_syslog; default_debug; default_log; };
     category network { default_syslog; default_debug; default_log; };
     category general { default_syslog; default_debug; default_log; };
//
// Log messages relating to what we got back from authoritative servers during
// recursion (if lame-servers and edns-disabled are obscuring other messages
// they can be sent to their own channel or to null). Sometimes these log
// messages will be useful to research why some domains don't resolve or
//don't resolve reliably
//
     category resolver { auth_servers_log; default_debug; };
     category cname { auth_servers_log; default_debug; };
     category delegation-only { auth_servers_log; default_debug; };
//
// Log together all messages relating to authoritative zone propagation
//
     category notify { zone_transfers_log; default_debug; };
     category xfer-in { zone_transfers_log; default_debug; };
     category xfer-out { zone_transfers_log; default_debug; };
//
// Log together all messages relating to client access and security.
// (There is an additional category 'unmatched' that is by default sent to
// null but which can be added here if you want more than the one-line
// summary that is logged for failures to match a view).
//
     category client{ client_security_log; default_debug; };
     category security { client_security_log; default_debug; };
//
// If you have the category 'queries' defined, and you don't want query logging
// by default, make sure you add option 'query log no;' - then you can toggle
// query logging on (and off again) using command' rndc querylog'
//
     category queries { queries_log; };
//
// This logging category will only emit messages at debug levels of 1 or
// higher - it can be useful to troubleshoot problems where queries are
// resulting in a SERVFAIL response.
//
     category query-errors {query-errors_log; };
};
Now that you have logging in place, you can configure the BIND name server to run as a recursive name server inside your machine.
Complete
Edit the DNS configuration file named.conf. Find the options { ... } declaration in the options file and make sure the following lines are there:
listen-on port 53 { any; };
listen-on-v6 port 53 { none; };
...
allow-query     { any; };
...
recursion yes;
...
dnssec-validation no;
minimal-responses no;
Do not change any lines that weren't mentioned.
In the configuration, we declare that anyone should be allowed to send resolve queries to our bind server by having allow-query { any; }; defined. Secondly, we disable queries from IPv6, which we have disabled previously in section 5. We also make sure the BIND server listens for public traffic by setting bind to listen to traffic on all interfaces, on port 53 with listen-on port 53 { any; }; Then we enable recursion and finally turn off dnssec. We turn off dnssec because enabling this would require us to use only DNSSEC signed zones, which a complicated beast, and ut.ee has not turned this functionality on.
The recursion is needed to let bind act as a standard caching recursive resolver (like those assigned by DHCP or put manually in /etc/resolv.conf), which will then allow the clients to resolve addresses from any public zone in the world.
- Example query "where is courses.cs.ut.ee" is then resolved as follows:
where is .eewhere is ut.eewhere is cs.ut.eewhere is courses.cs.ut.ee
- The frequent queries are cached and answered explicitly.
Now you can check your configuration using the named-checkconf utility
Verify
# named-checkconf
No output means configuration is OK.
Complete
- Start the name server (service
named):# systemctl start named(usesystemctl stop namedif you already started it before).
Now query the service status and if needed, check the log files (those we have created in the beginning)
Verify
# service named status# systemctl status named# journalctl -xn
If everything works fine and no error is reported, you may check how your local resolver is performing:
Verify
$ dig @127.0.0.1 courses.cs.ut.ee$ dig @127.0.0.1 www.google.com
If you have an error related to permissions to /var/named/log/default, please run the following command:
Complete
restorecon -Rv /var/named- Also make sure the file/folder permissions are correct.
This command relabels the mandatory access control labels of that folder, allowing BIND to write there. Now systemctl start named should work properly.
The query should answer with a list of IP addresses for courses.cs.ut.ee like this:
; <<>> DiG 9.11.4-P2-RedHat-9.11.4-26.P2.el8 <<>> @127.0.0.1 courses.cs.ut.ee
; (1 server found)
;; global options: +cmd
;; Got answer:
;; ->>HEADER<<- opcode: QUERY, status: NOERROR, id: 53403
;; flags: qr rd ra; QUERY: 1, ANSWER: 3, AUTHORITY: 2, ADDITIONAL: 4

;; OPT PSEUDOSECTION:
; EDNS: version: 0, flags:; udp: 4096
; COOKIE: 4d3b69aaf5aa48ca539139635e63c827c5801f3d6572b073 (good)
;; QUESTION SECTION:
;courses.cs.ut.ee.      IN  A

;; ANSWER SECTION:
courses.cs.ut.ee.   4320    IN  CNAME   web.cs.ut.ee.
web.cs.ut.ee.       4320    IN  A   193.40.36.57
web.cs.ut.ee.       4320    IN  A   193.40.36.55

;; AUTHORITY SECTION:
cs.ut.ee.       4320    IN  NS  ns2.ut.ee.
cs.ut.ee.       4320    IN  NS  ns.ut.ee.

;; ADDITIONAL SECTION:
ns2.ut.ee.      10800   IN  A   193.40.5.76
ns.ut.ee.       10800   IN  A   193.40.5.99
ns2.ut.ee.      10800   IN  AAAA    2001:bb8:2002:500::76

;; Query time: 23 msec
;; SERVER: 127.0.0.1#53(127.0.0.1)
;; WHEN: Sat Mar 07 18:13:27 EET 2020
;; MSG SIZE  rcvd: 218
The local resolver is working as intended if you get a similar answer for courses.cs.ut.ee. Make sure the SERVER is specified to be 127.0.0.1 in the answer, otherwise you might be using a different name server.
You may want to enable the DNS service auto-start at the boot time:
Complete
- Enable auto-starting the
nameddaemon on boot:$ systemctl enable named
Now, the thing left to do, is to configure your virtual machine to also use this DNS server by default. Doing this requires you to change the /etc/resolv.conf file, which generally is managed by the DHCP client. If you override it, it no longer will be managed automatically, and your value will be used.
Complete
Configure your virtual machine to use the local DNS server for all queries.
- Edit
/etc/resolv.conf- Change
nameserveroption to127.0.0.1- in case you have multiple - you should leave just one
- Change
searchoption to your personal domain<vm_name>.sa.cs.ut.ee
- Change
- Reboot the VM. After rebooting make sure the
/etc/resolv.confis not modified (you should see your configuration there and nothing should be changed).
Now your local resolver is used system-wide, so you can test it by querying some hosts by name, but this time do not specify a name server.
Verify
Run: $ dig www.google.com
You should receive a similar answer as before, with appropriate SERVER line.
Creating a Personal Domain for named
Danger
PS! Before continuing please make sure you have completed all of the previous steps, as otherwise it won't work.
Verify
- Your Virtual Machine is in System Administration course cluster and accessible over SSH and VPN connection.
/etc/hostnamefile has your hostname in FQDN format<vm_name>.sa.cs.ut.ee<vm_name>refers to the hostname of your VM that was chosen chosen during VM setup.
- You can access your Virtual Machine over
SSHwithPuttyor any other SSH client. - You can access your Virtual Machine with an SSH key over SSH
- Service
bindis running and enabledsystemctl status named.service -l - Local DNS resolver is capable of resolving world addresses
dig @127.0.0.1 www.ut.eedig @127.0.0.1 www.google.com
/etc/resolv.confhas a linenameserver 127.0.0.1/etc/resolv.confis not getting rewritten on reboots
- The OS can use the local DNS resolver to resolve any DNS host name
nslookup www.ut.eenslookup www.google.com
Adding zone definition to the local resolver
Creating a new zone is a two-step process:
- First, the records for the zone must be entered into the zone file
- Second, the zone must be described/declared in the
/etc/named.conffile.
Tip
Understanding the zone record files:
- Typical DNS
one file contains information about associations between hostnames and IP addresses within the domain of responsibility. The records inside theone file can be of different types:SOA- Start of Authority. Defines the zone name, email contact, and various time and refresh values applicable to the zone.A- IPv4 Address record. An IPv4 address for a domain name.AAAA- IPv6 Address record. An IPv6 address for a domain name. Current IETF recommendation for IPv6 forward-mapped zones.NS- Name Server. This record defines the authoritative name server(s) for the domain (defined by the SOA record) or the sub-domain. This is used for delegation of zones from one name server or authority to other.MX- Mail Exchange. Specifies the hostname for a mail server/exchange that will service this zone. RFC 974 defines valid names. This applies for incoming email only.PTR- IP address (IPv4 or IPv6) to domain name record. This is used to find a domain name from an IP address (so in-reverse to usual records).CNAME- Canonical Name. An alias name for a domain name.
More details about record types can be found here.
Example Zone file content looks as follows:
Example
; Zone file for domain-example.org
$ORIGIN domain-example.org.  ; Zone starting point in the name-space tree
                    ; (if skipped - the origin is inferred by the DNS server based on
                    ; zone declaration in name.conf.local file
$TTL 15M             ; Default expiration time for all resources
@ IN SOA ns.domain-example.org. root.domain-example.org.(
     2012020101       ; Serial
     15M       ; Refresh (15 minutes)
     5M        ; Retry (5 minutes)
     604800    ; Expire (7 days in seconds)
     600 )     ; Negative Cache TTL
@       IN      NS      ns            ; name server for domain-example.org
@       IN      A       172.17.6.1    ; IPv4 address for domain-example.org
ns      IN      A       172.17.6.1    ; IPv4 address for ns.domain-example.org
@       IN      MX  10  mail          ; mail server for domain-example.org
myhost  IN      A       172.17.6.5    ; IPv4 address for myhost.domain-example.org
mail    IN      A       172.17.6.6    ; IPv4 address for mail.domain-example.org
myhost2 IN      A       172.17.6.7    ; IPv4 address for myhost2.domain-example.org
www     IN      CNAME   myhost        ; www is an alias for myhost in domain-example.org
ftp     IN      CNAME   myhost        ; ftp is an alias for myhost in domain-example.org
www.other-domain.org. IN A 192.168.1.11 ;  www.other-domain.org. is outside of domain-example.org
                                   ; and therefore needs to be declared using FQDN
Info
;- Comment, disabled line$ORIGIN- The zone's starting point in the namespace tree, (if skipped - the origin is inferred by the DNS server based on zone declaration inname.conf.localfile$TTL- Default expiration time for all records (cache time, specified in seconds)- (alternatively M, H might be appended to denote minutes or hours)
@ IN SOA ns.domain-example.org. root.domain-example.org.( 2012020101 15M 5M 604800 600):@- Will be expanded to $ORIGIN if specified or assigned by DNS server- (in current example to domain-example.org)
IN- Protocol family:- IN - Internet protocol (IP)
SOA- Zone authority info:ns.domain-example.org- Address of name-serverroot.domain-example.org- Will be expanded to root@domain-example.org and will correspond to the email address of DNS master in the domain-example.org2012020101- Serial Number (as specified here:- Unsigned 32 bit value in range 1 to 4294967295 with a maximum increment of 2147483647. In BIND implementations, this is defined to be a ten-digit field. This value MUST be incremented when any resource record in the zone file is updated. A slave (Secondary) DNS server will read the master DNS SOA record periodically, either on expiry of refresh (defined below) or when it receives a NOTIFY and compares, arithmetically, its current value of the serial number with that received from the master. If the serial number value from the master is arithmetically HIGHER than that currently stored by the slave, then a zone transfer (AXFR/IXFR) is initiated by the slave. If the value of serial number from the master DNS SOA is the same or LOWER, then no zone transfer is initiated.
- This, functionally, means that when you make changes, and do not increment the serial number, the other servers will not pick up changes until the TTL is reached.
- The convention is to use a date-based sn value to simplify the task of incrementing the sn - the most popular convention being
yyyymmddsswhereyyyy = year,mm = month,dd = dayandss = a sequence number in case you update it more than once in the day.
- Unsigned 32 bit value in range 1 to 4294967295 with a maximum increment of 2147483647. In BIND implementations, this is defined to be a ten-digit field. This value MUST be incremented when any resource record in the zone file is updated. A slave (Secondary) DNS server will read the master DNS SOA record periodically, either on expiry of refresh (defined below) or when it receives a NOTIFY and compares, arithmetically, its current value of the serial number with that received from the master. If the serial number value from the master is arithmetically HIGHER than that currently stored by the slave, then a zone transfer (AXFR/IXFR) is initiated by the slave. If the value of serial number from the master DNS SOA is the same or LOWER, then no zone transfer is initiated.
As you can see after declaring SOA Zone authority, the actual Zone related data is added:
Info
<name> <ttl> <class> <type> <data>namerecord namettltime to live in seconds, how long cache lives, if skipped$TTLvariable is used.classrecord class, the protocol family (in modern world onlyINremains)typerecord typedatatype related value of the record
Record name can be one of three:
Info
- Short hostname (inside the current domain), like
nsormail, which will be then automatically extended tons.domain-example.organdmail.domain-example.orgby appending the$ORIGIN. - FQDN (Fully-Qualified Domain Name), like
www.otherd-domain.org.- In this case, we have to terminate FQDN with
.to avoid auto-expansion towww.other-domain.org.domain-example.org
- In this case, we have to terminate FQDN with
@sign which will be expanded todomain-example.orgdenoting the domain itself.
Create your zone file
You need to create the zone file in /etc/named/, but first, let's make sure you know your domain:
Info
Personal student domain is a sub-domain of sa.cs.ut.ee zone and has your VM's name as the domain name; therefore, if my VM's name is <vm_name>, then my domain would be <vm_name>.sa.cs.ut.ee - from this point onward the FQDN format of your domain shall be reffered to as <your_domain>.
Here we assume you got your domain name correct, and we proceed with zone file creation:
Complete
- Create the file
<vm_name>.sa.cs.ut.eein the/etc/nameddirectory - When you set up the
namedservice, it should have automatically made an/etc/namedfolder which is owned bynamedgroup. If not, please make sure you assign the appropriate ownership and permissions to the/etc/nameddirectory (root:namedownership,750permissions`.
If the file was created properly, you may edit the zone and add the bare minimum amount of zone records to your zone file.
Complete
Edit the zone file you have just created add the following:
- Default time-to-live value of 15 minutes
- SOA Authority record of your domain
- having
ns1.<your_domain>.as the name server - having
root.<your_domain>.as the email of DNS master - having the serial specified properly
- having refresh interval of 15 minutes
- having retry interval of 5 minutes
- having expiry interval 2 hours
- having negative cache TTL 600 seconds
- having
- NS record of your domain pointing to host
ns1in your domain - A records:
- root of the domain (
@) pointing to yourExternal IPaddress ns1pointing to yourExternal IPaddress<your_short_domain>pointing to yourExternal IPaddress
- root of the domain (
Example file of ours /etc/named/student-test.sa.cs.ut.ee, domain student-test.sa.cs.ut.ee and IP 172.17.64.a:
;
; BIND data file for local zone student-test.sa.cs.ut.ee;
$TTL    15M
@       IN      SOA     ns1.student-test.sa.cs.ut.ee. root.student-test.sa.cs.ut.ee. (
                     2012020201         ; Serial
                            15M         ; Refresh
                             5M         ; Retry
                           120M         ; Expire
                            600 )       ; Negative Cache TTL

@              IN      NS      ns1
@              IN      A       172.17.64.a
ns1            IN      A       172.17.64.a
student-test   IN      A       172.17.64.a
Verify
The following command can be used to test if the zone file is syntactically valid:
# named-checkzone <your_domain> /etc/named/<your_domain>.sa.cs.ut.ee- here
is your personal domain name
- here
- If command reports no errors, the Zone file is correct
If the zone file is correct, we may add the defined zone into the Bind configuration.
Complete
- Edit the named configuration
/etc/named.conf. - Don't delete anything that isn't explicitly stated.
- Underneath the
zone "." INdeclaration add a newzoneclause- having zone name set to your personal domain
- pointing to the previously created zone file
- having type master
In our examples, we made it as follows:
...
zone "student-test.sa.cs.ut.ee" IN {
        type master;
        file "/etc/named/student-test.sa.cs.ut.ee";
        allow-update { none; };
};
Verify
After editing the configuration, do not forget to check if it is valid, using the named-checkconf command
If the configuration is OK:
Complete
- Restart the named service
- Make sure it did load the new zone (check the named log file)
/var/named/log/default
The log has to have a line like:
...
08-Mar-2020 16:35:58.841 general: info: zone student-test.sa.cs.ut.ee/IN: loaded serial 2020030804
08-Mar-2020 16:35:58.841 general: notice: all zones loaded
08-Mar-2020 16:35:58.841 general: notice: running...
...
Afterwards you should be able to use dig or nslookup commands for testing:
Verify
$ dig @127.0.0.1 <your_domain>$ dig @127.0.0.1 ns1.<your_domain>$ dig @127.0.0.1 <your_domain> NS
Some of the queries might return ANSWER: 0? Can you explain that?
Complete
- Add
notify explicit;to your personal zone statement in the DNS server configuration file.- This makes sure all the slave servers are explicitly notified on zone info change by master.
- Add
also-notify { 172.17.66.134; };to theconfigurationfile underoptions.- This makes sure our scoring server is notified on zone info change.
- Increment your zone's serial by one.
- Restart your named service.
Rerun the queries:
Verify
$ dig @127.0.0.1 <your_domain>$ dig @127.0.0.1 ns1.<your_domain>$ dig @127.0.0.1 <your_domain> NS
The dig should show result properly:
The change we made was to make sure the scoring server - slave server for your zone - got updated with new names as well.
If there's any issues, here's an example query to compare against:
dig @127.0.0.1 student-test.sa.cs.ut.ee
; <<>> DiG 9.11.4-P2-RedHat-9.11.4-26.P2.el8 <<>> @127.0.0.1 student-test.sa.cs.ut.ee
; (1 server found)
;; global options: +cmd
;; Got answer:
;; ->>HEADER<<- opcode: QUERY, status: NOERROR, id: 64197
;; flags: qr aa rd ra; QUERY: 1, ANSWER: 1, AUTHORITY: 1, ADDITIONAL: 2

;; OPT PSEUDOSECTION:
; EDNS: version: 0, flags:; udp: 4096
; COOKIE: 5b6c2462c45d2d8c86684aec5e65045a42fab1a5ec27af6a (good)
;; QUESTION SECTION:
;student-test.sa.cs.ut.ee.      IN  A

;; ANSWER SECTION:
student-test.sa.cs.ut.ee.   900 IN  A   172.17.65.65

;; AUTHORITY SECTION:
student-test.sa.cs.ut.ee.   900 IN  NS  ns1.student-test.sa.cs.ut.ee.

;; ADDITIONAL SECTION:
ns1.student-test.sa.cs.ut.ee.   900 IN  A   172.17.65.65

;; Query time: 2 msec
;; SERVER: 127.0.0.1#53(127.0.0.1)
;; WHEN: Sun Mar 08 16:42:34 EET 2020
;; MSG SIZE  rcvd: 125
Understanding reverse mapping Zone files
An interesting fact about records in Zone file configurations:
- all the associations are unidirectional which means if we have
ns1.example.org. A IN 10.10.10.5
- it is equivalent to the link
ns1.example.org. -> 10.10.10.5
- and not opposite way around:
10.10.10.5 -> ns1.example.org.
This is because there might be several domain names pointed to the same IP address.
The record to point IP to the hostname has to be added by introducing the PTR records. PTR records are organized and collected in a separate Zone file called Reverse Mapped Zone.
Question
Why can't we just put PTRs in the same Zone file we created in previous tasks?
You already know the DNS namespace is organized in a hierarchical structure:

The whole domain name space is first addressed from root(.) which is the root of the whole DNS tree, then it's divided across number of TLDs, like .com, .org, .net etc. You can check the full list of TLDs here. Next, each TLD has several sub-domains, and for us, we did introduce additional TLD <name>.sa.cs.ut.ee with sub-domains for each student. Following the divide and conquer idea, each of the sub-domains can further be divided into sub-domains (each student can potentially create an infinite amount of sub-domains).
Considering the TLDs, there is one specific: .arpa which currently isn't serving any of the domains but is holding routing and addressing parameters and is therefore called Infrastructure TLD.
- The DNS architecture was designed by US Advanced Research Project Agency ARPA
.arpawas originally the domain name of the ARPA agency, and it was the first domain to be introduced in the DNS namespace.- as it turned to be an infra-TLD, the
.arpais referred to as Addressing and Routing Parameter Area.
The idea behind .arpa Infra-TLD is to provide reverse mappings (from IP to hostname) and is mainly used by humans for such things as tracking where a website visitor came from or where an email message originated.
However, reverse DNS is important for one particular application. Many email servers on the Internet are configured to reject incoming emails from any IP address which does not have reverse DNS. This is a feature to combat spam, making sure that the owner of the mail server follows all best practices. So if you run your own email server, reverse DNS must exist for the IP address that the outgoing email is sent from. Reverse DNS mappings are also an important part of keeping the trust-based DNS working. A simple check any service provider can run is looking for mismatches in PTR and A type records, and usually, if these don't match, data is marked as spam.
The IPv4 address space is, of course, not infinite, but the idea of hierarchy is followable if we consider how the IPv4 space is divided into subnets. Each organization is assigned with a big subnet (A class or B class dependent on the size of the organization). Dependent on the inner structure of the organization, the big subnet can be divided again and again till there are free unused IPv4 addresses.
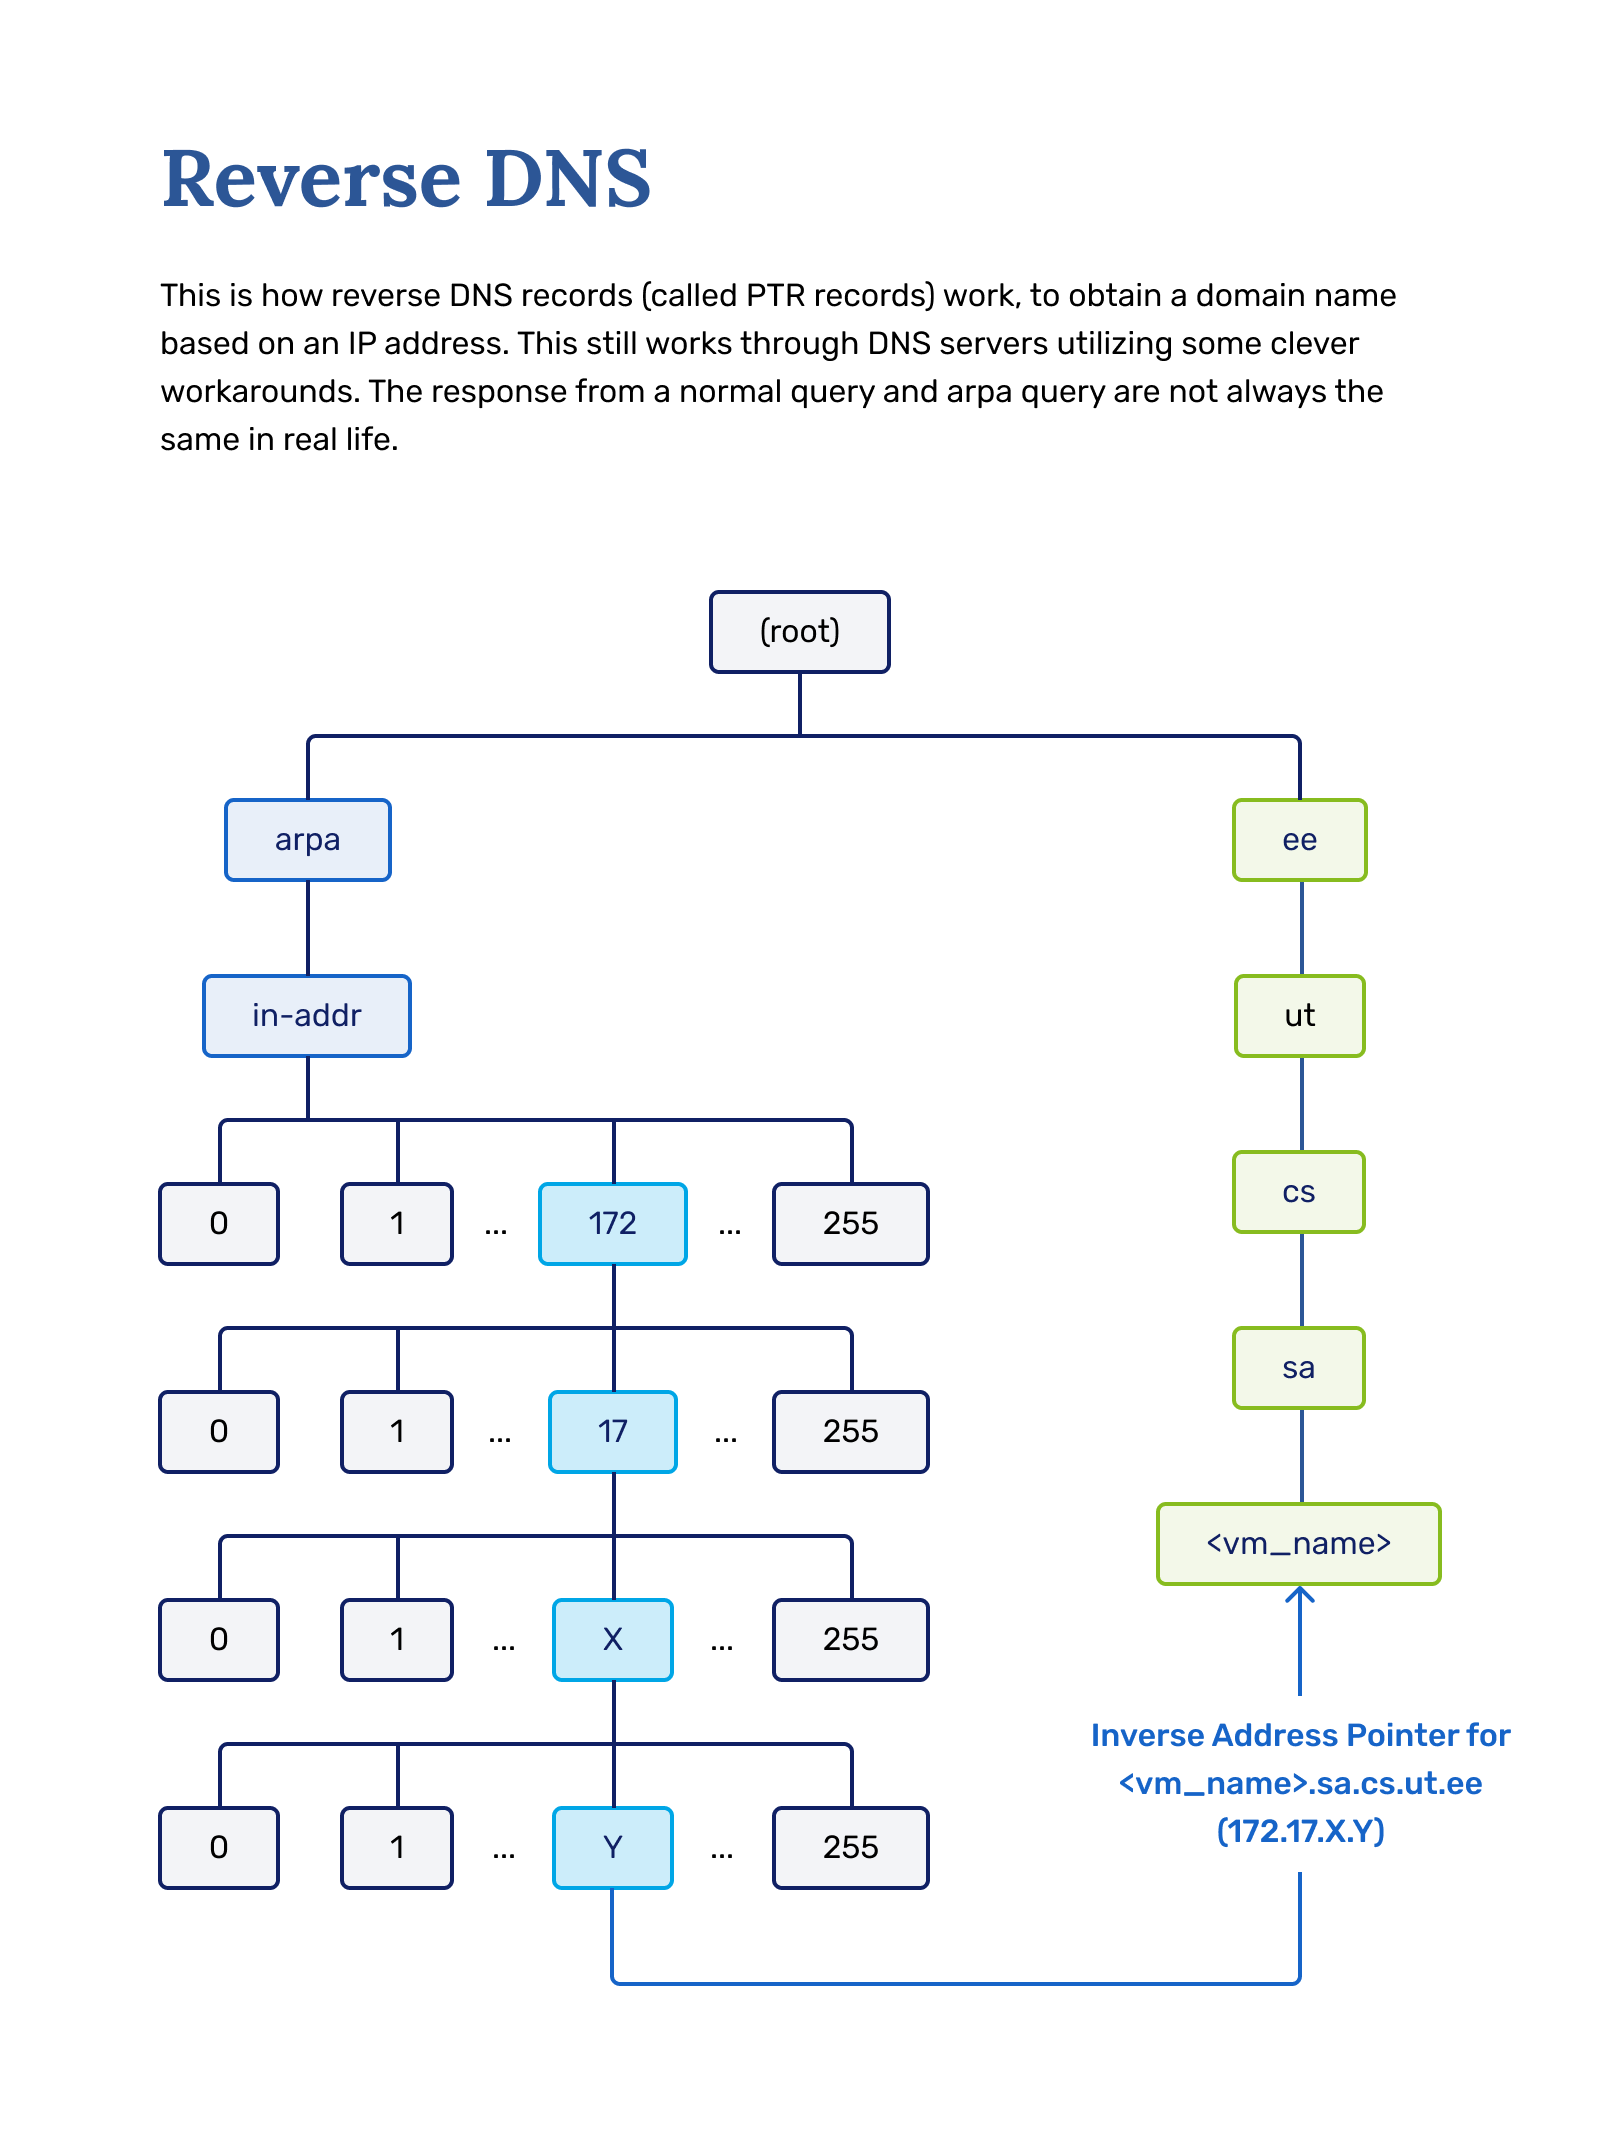
As you can see, the bigger subnets can still be broken into smaller ones; the simple example is explained here (if you struggle understanding concepts of IP addressing, you may first read the IP Basics. Now, taking this into account, all of the IP address space was structured and reduced into reverse mapping Zones under the .arpa TLD. Therefore the .arpa is broken into sub-domains as follows:
in-addr.ARPAdomain contains all the reverse mappings for IPv4 address space ("in-addr" stands for Internet Address)in-ip6.ARPAdomain contains all the reverse mappings for IPv6 address space Now each of them is broken down into sub-domains denoting subnets of IPv4 or IPv6. The domain name for the subnet is then constructed as follows:- For the IPv4 subnet:
- Consider your subnet (for example, you have 172.17.6.0/24)
- The non-changeable part is 172.17.6. (by subnet 172.17.6.0) and only the last octet can change (by netmask 255.255.255.0)
- Non-changeable part is then reversed (so we get 6.17.172)
in-addr.arpais appended to the reversed subnet (we get 6.17.172.in-addr.arpa)6.17.172.in-addr.arpais then our domain for reverse mapping:- This will be the
$ORIGINfor the reverse mapping Zone file
- This will be the
Now the reverse mapping Zone files are similar to regular Zone files. Here is an example:
$ORIGIN 6.17.172.in-addr.arpa.   ; Zone starting point in the name-space tree
                     ; (if skipped - the origin is inferred by the DNS server based on
                     ; zone declaration in name.conf.local file
$TTL 15M             ; Default expiration time for all resources
@ IN SOA ns.domain-example.org. root.domain-example.org.(
     2012020101       ; Serial
        15M       ; Refresh (15 minutes)
        5M        ; Retry (5 minutes)
        604800    ; Expire (7 days in seconds)
        600 )     ; Negative Cache TTL
@              IN      NS      ns.domain-example.org.       ; Name Server for domain-example.org
1             IN      PTR     ns.domain-example.org.       ; 172.17.6.1 has name ns.domain-example.org
5             IN      PTR     myhost.domain-example.org.   ; 172.17.6.5 has name myhost.domain-example.org
6             IN      PTR     mail.domain-example.org.     ; 172.17.6.6 has name mail.domain-example.org
7             IN      PTR     myhost2.domain-example.org.  ; 172.17.6.7 has name myhost2.domain-example.org
As you can see, there is not much change in the headers:
$ORIGIN- pointing toXX.17.172.in-addr.arpa- we can omit specifying origin, leaving it for
bind9to specify it (inferringnamed.conf.localconfigurations
- we can omit specifying origin, leaving it for
TTLandSOArecords remain the same as in the regular Zone file (we are still in domain-example.org)NSrecord is the same (we are still having DNS server's FDQN: ns.domain-example.org.)- Next, we have the PTR record for each A or AAAA type of record from the regular Zone file of our domain
- Each hostname -> IP association should have a reverse association IP -> hostname.
Please note that it is possible to specify multiple A or AAAA types of records pointing to the same IP address, however in reverse mapping, only one of the hostnames may be pointed by the PTR type of record. For example, in the regular Zone file, we have:
@       IN      A       172.17.6.1    ; IPv4 address for domain-example.org
ns      IN      A       172.17.6.1    ; IPv4 address for ns.domain-example.org
Both domain-example.org and ns.domain-example.org have the A type of record pointing to the same IP of 172.17.6.1. In the reverse mappings, however, we have only one record:
1 IN PTR ns.domain-example.org.
... saying 172.17.6.1 has name ns.domain-example.org Please keep in mind this is an example. For you, it needs to be a different IP address.
The content of the reverse mapping Zone file is then stored similar to the regular zone:
- Zone
example-domain.orgwas stored in fileexample-domain.org.zone - Zone
6.17.172.in-addr.arpashould be stored in file6.17.172.in-addr.arpa.zone
The filename convention is not important to follow (you can use other names if you wish). The idea of this convention is to keep named.conf.local configuration file more clear and followable.
The last thing to understand is how the reverse mapping Zone file is embedded into the existing bind9 configuration, and this is fact 1-to-1 similar to how we declared the regular zone in bind9 configuration (we have to add another zone clause in the configuration file):
Complete
- We cannot reuse existing zone clause
domain-example.orgfor the reversed one6.17.172.in-addr.arpa - Can you now explain why? If you struggle with an answer, think about the following:
- What is the
$ORIGINvariable? How is it assigned? How is it related to the domain name? - What does the DNS namespace look like? What is TLD? What is Infrastructure TLD?
- Which part of the DNS namespace is responsible for direct lookup queries?
- Which part of the DNS namespace is responsible for reverse lookup queries?
Verify
After answering those questions, it should be clear - the reverse mappings we can only specify under .arpa infrastructure TLD; which separate branch of DNS namespace (not overlapping with .org TLD). Therefore the $ORIGIN is different too and has to be declared separately.
Declaring the zone clause for reverse mapping zone would look like:
zone "65.17.172.in-addr.arpa" IN {
        type master;
        file "/etc/named/reverse.student-test.sa.cs.ut.ee";
        allow-update { none; };
};
Complete
Why is it important to specify?
allow-update { none; };
After the reverse mapping Zone file is included in bind configuration, the standard check-routines should follow:
- Checking the reverse mapping Zone file:
named-checkzone 65.17.172.in-addr.arpa <path to reverse.student-test.sa.cs.ut.ee file>
- Checking named configuration using
named-checkconfcommand
Now we are ready to add the reverse mapping Zone to our bind9 configuration for our network and to populate it with PTR records.
Complete
- Create the reverse mapping Zone file for 172.17.X.X/24:
- use the same
$TTLand$SOAas in the regular zone file you created for your domain - add the required
PTRrecords- if you do not know what to add, please refer to the Understanding reverse mapping Zone files
- save the reverse mapping file
- into the same directory as the regular zone file, which you created for your domain
- select the proper file name, try to follow the conventions we have explained
- make sure the Zone file has proper ownership and permissions
Verify
- check the Zone file using
named-checkzonecommand- the example was given before
If the reverse mapping Zone is OK, construct the reverse mapping domain name:
Complete
- The example of how to get a reverse domain name from IPv4 subnet was given before
If you have calculated the reverse mapping name for your subnet:
Complete
- Edit the bind9
local configurationfile: - find the proper place to add a new
zoneclause - add new
zoneclause having:- zone name properly assigned with the reverse mapping domain name you have calculated
- file - assigned with the absolute path of the corresponding file containing reverse mappings
- type - assigned to ''master''
- save the configuration file
Verify
Check the configuration using the corresponding command.
If the configuration is OK:
Complete
Restart the DNS service
Verify
- Check if the reverse mapping is working properly using the following command:
host <your external-IP address>nslookup <your external-IP address>- It should give you back the FQDN you assigned to the IP address
7. Ansible - automating the above
The focal point of the DNS lab for Ansible is mostly getting comfortable with template module. There is also the copy module, but as the template module allows you to substitute variables inside files before setting them in place (considering we need to set hostname and IP address as variables), the template module is much more powerful.
You are not obliged to use templating if the copy module suits you more but read this article from Anthony Critelli at redhat.com to give you a proper distinction between the two.
Tip
TL;DR version:- Copy module copies files from the local host to a remote host that you want to manage.
- Template module also copies files from the local host to remote host but allows you to dynamically change the template's content through variables, Jinja2 is the magic behind the template module.
Let's start by making sure the structure is there:
Complete
- Create a new role called
dnsin yourrolesdirectory. - Into the newly created
dnscreate two directoriestasksandtemplates- We will start putting all of the template files into the
templatesdirectory. This is the first place Ansible searches for files when the template module is used.
- We will start putting all of the template files into the
- Finally, create
main.ymlinto thetasksdirectory.
The structure should look something like this:
|
|- playbook.yml
|- roles/
|    |- dns
|    |   |- templates
|    |   |- tasks
|    |        |- main.yml
...
You should now start populating the roles/DNS/tasks/main.yml file. The following example is written for you based on the above lab manual. The general idea is that once you know how to manually disable IPv6 in the lab VM, you should also write it into your playbook. The following example has been purposefully left halfway done; it is here to get you started.
Complete
Add this to your main.yml file under roles/dns/tasks/:
---
- name: DNS | Autoremove unneeded packages installed as dependencies
  dnf:
    autoremove: yes

- name: Disable IPv6
  copy:
    src: 70-ipv6.conf
    dest: /etc/sysctl.d/70-ipv6.conf
    owner: root
    group: root
    mode: '0644'

- name: Change net.ipv6.conf.default.disable_ipv6 to 1.
  sysctl:
    name: net.ipv6.conf.default.disable_ipv6
    value: '1'
    sysctl_file: /etc/sysctl.d/70-ipv6.conf
    reload: yes

- name: Change net.ipv6.conf.all.disable_ipv6 to 1.
  sysctl:
    name: net.ipv6.conf.all.disable_ipv6
    value: '1'
    sysctl_file: /etc/sysctl.d/70-ipv6.conf
    reload: yes

- name: Inserts into hostname
  template:
    src: hostname.j2
    dest: /etc/hostname
    owner: root
    group: root
    mode: '0644'

- name: Inserts into hosts
  template:
    src: hosts.j2
    dest: /etc/hosts
    owner: root
    group: root
    mode: '0644'
If you run this, Ansible will fail when it gets to processing the template modules. This is because we have not made the template files that it needs to use to create the files on the server.
The template module searches files from the template/ folder, and similarly, the copy module searches files from the files folder.
If you are running the modules in a role, then first the role's template and files folders are checked. If nothing is found there, then the whole Ansible repository's files and folders are checked. If nothing is found there either, then the folders in /etc/ansible/templates and /etc/ansible/files are searched. This is called precedence and is important for grouping information. You would want to have files related to the DNS service in the DNS role's directory, while files specific for a whole group/environment would probably make sense to be in the Ansible repository's files/folders.
|- templates
|- playbook.yml
|- roles/
|    |- dns
|    |   |- templates
|    |   |    |- hostname.j2
|    |   |    |- hosts.j2
|    |   |
|    |   |- files
|    |   |    |- 70-ipv6.conf
|    |   |
|    |   |- tasks
|    |        |- main.yml
|    |   |- files
...
Let's add the templates files, but by utilizing some of the intelligence Ansible allows us to apply. In the following part, you will notice we are using variables. Having {{ hostname }} and {{ domain_name }} as variables is useful for the lifecycle of this playbook, as during the exam, these variables could change, and then instead of having to change all the files, you can only edit one place.
Complete
- Create an empty file
70-ipv6.confunder thefilesdirectory. - Create empty files
hostname.j2andhosts.j2under thetemplatesdirectory. - Edit the
70-ipv6.conffile and copy the following into it:net.ipv6.conf.default.disable_ipv6=1 net.ipv6.conf.all.disable_ipv6=1 - Edit the
hosts.j2file and change its content to match the following:127.0.0.1 localhost localhost.localdomain localhost4 localhost4.localdomain4 127.0.1.1 {{ hostname }}.{{ domain_name }} {{ hostname }} ::1 localhost localhost.localdomain localhost6 localhost6.localdomain6 - Edit the
hostname.j2and replace its content with this:{{ hostname }}.{{ domain_name }}
The only thing left to do is to also add the variable definitions.
Complete
- Add variables hostname and domain_name to your playbook.
- Add the
dnsrole declaration to your playbook.
---
- hosts: localhost
user: centos
become: yes
vars:
  hostname: jdoe
  domain_name: sa.cs.ut.ee

roles:
- { role: etais, tags: etais }
- { role: dns, tags: dns }
- Run your playbook
Verify
- Make sure the playbook has done everything as you have declared/described in YAML format.
- It is a good idea to check if every permission, owner, and file are where they should be after the first run of the playbook.
The role we wrote so far does not cover the whole lab. The point of this section was to get you introduced to all the tools.
From this point onward, you should use the template or copy modules for these files:
<your_domain>, reverse.<your_domain> , resolv.conf, named.conf. You should use the systemd module to restart named.
Another thing to take into consideration with our virtual machines is that you cannot see the machine's public IP address (172.17.XX.XXX) inside the machine. This is because of how the cloud infrastructure is set up.
You can solve this by either using a self-defined static variable for the IP address or by doing some bit more complicated logic. OpenStack has something called a metadata server, that answers with information about the host. We can use this inside the Ansible to receive the IP address.
  - name: Get OpenStack metadata
    uri:
      url: http://169.254.169.254/latest/meta-data/public-ipv4
      method: GET
      status_code: 200
      return_content: yes
    register: cloud_metadata

  - name: Print IP address
    debug: var=cloud_metadata.content
8. Keeping your Ansible repository safe in our Gitlab
And as always, push your stuff to our Gitlab.
Complete
- In your ansible home directory:
git add .git commit -m "DNS lab"git push -u origin main
Verify
Go to your GitLab page to see all of your latest pushes reached the git repository. If you play around with your repository and have made changes to the Ansible that you wish to utilize also in the future, always remember to commit and push them.