Lab 3 - Ansible
Welcome to the Ansible lab. Here is a shortlist of topics we will cover during this lab:
- Configuration Management and IT automation
- Installing and testing Ansible
- Introduction to Ansible
- First playbook
- Solving Cloud lab tasks with Ansible
- Ansible modules
- Ansible roles
- Ansible variables
- Git
Verify
Before continuing, please make sure you have completed the previous labs.
Important
This lab is strongly recommended but not mandatory. It will help you think in a more transactional manner about managing systems. The Ansible playbook can be used during an exam, either for using it as documentation or even solving the exam if you have written it well enough.
There are no scoring tests because it is impossible to check if you have solved it by hand or using Ansible.
Configuration Management and IT automation
The field of Systems Administration gets truly interesting when operations start to be done at scale. This applies both to physical systems, as well as the cloud (AWS, GCS, Azure).
"At scale" means that instead of working on a single or a few servers, system administrators usually work with tens, hundreds or even thousands of servers at a time. This is necessary for availability, integrity and performance reasons, but as you'll find out in this course, even working on one machine is highly time-consuming.
Here's where configuration management comes to help. Instead of manually working on every machine/system/software, we can define a state where we want things to be and then let intelligent tools determine the difference between the current state and the required state.
This state (software, configuration files, secrets, settings) difference is passed to IT automation, which applies necessary steps to bridge the gap between these states.
Think of it as code for servers or infrastructure. As you will soon see, it is in some cases very similar to writing code, with functions, variables and conditional sentences. This is called IaC (Infrastructure as Code), but there's much-much more information about virtual cloud based systems, than there is of physical ones.
Utilizing well-developed, documented, and tested automation allows system administrators to automatically manage large systems clusters. This kind of methodology provides system administrators with a way to automate parts of their job, allowing them to focus on development and infrastructure changes instead of small everyday tasks by conforming to the popular DRY(Don't Repeat Yourself) principle.
Using this kind of automation is deceptively simple. There is a tricky part, an annoying part and an easy part.
Learning the language, in our case, Ansible, is the tricky part. You need to know the tools you use to create an effective automation solution. You also need to know the shortcomings, often before you start writing the code, as otherwise you will waste a lot of time trying to do something that might not be possible with the language.
The annoying part is understanding and learning the steps which the automation should take. You can only write automation for setting up a web server if you know how to do it yourself. Learning these steps is the main focus of the course and why we work on one server at a time.
The easy part is writing the automation for a singular service or server. Implementing this for the automation tool is trivial when you break the automation into well-defined steps beforehand. Often enough, best practices that apply to developing software, also apply to infrastructure as code.
Having the different parts of automation work together, allowing a single tool to manage various services, servers, clusters and either tightly or loosely connected infrastructure reliably, is the main difficulty of the whole system administration. Still, we will not focus on this part in this course because we only have 16 weeks. Please check out the DevOps, Cloud Computing and Kubernetes courses as continuations to this course, which go much more in-depth.
Ansible
Installing and testing Ansible
We will use Ansible as the configuration management and IT automation tool during this course. Ansible is a prevalent configuration tool because it is relatively easy to start out with, has first-class support for CentOS, and allows operations across different infrastructure like VMs, servers, containers, network devices, etc. It also uses the same trust scheme as other system administration tools (either passwords or SSH keys) and requires no clustering.
There are two main ways to run Ansible.
- Installing Ansible inside our lab machine and running against the same device, e.g. localhost
- Installing Ansible on your personal machine (not lab machine) and running it against the lab machine in a remote fashion. (Recommended)
The second method is highly recommended and is the primary way Ansible is used in the industry, but we will describe the first method since Ansible might have problems running on Windows machines. You are welcome to adapt the guide to the second method.
First, install Ansible on your personal machine.
Complete
It depends on the OS which method you need to use to install Ansible. CentOS uses yum package manager, Ubuntu uses apt, Mac would require brew.
For Ubuntu:
$ sudo apt update
$ sudo apt install software-properties-common
$ sudo add-apt-repository --yes --update ppa:ansible/ansible
$ sudo apt install ansible
For CentOS:
$ sudo yum install ansible
$ ansible --version
You can be sure it works if you get an output with the version and different configuration option definitions.
We can also test whether Ansible works:
$ ansible -m ping localhost # Use the Ansible ping module to verify a connection to localhost
You should receive the following success message:
[centos@test ~]# ansible -m ping localhost
localhost | SUCCESS => {
    "changed": false,
    "ping": "pong"
}
First, let's install Ansible on our virtual machines:
Complete
Let's use yum to install Ansible, and then check whether the installed binary works as intended.
$ sudo yum install ansible
$ ansible --version
You can be sure it works if you get an output with the version and different configuration option definitions.
We can also test whether we can connect to our VM using Ansible:
$ ansible -m ping localhost # Use the Ansible ping module to verify a connection to localhost
You should receive the following success message:
[centos@test ~]# ansible -m ping localhost
localhost | SUCCESS => {
    "changed": false,
    "ping": "pong"
}
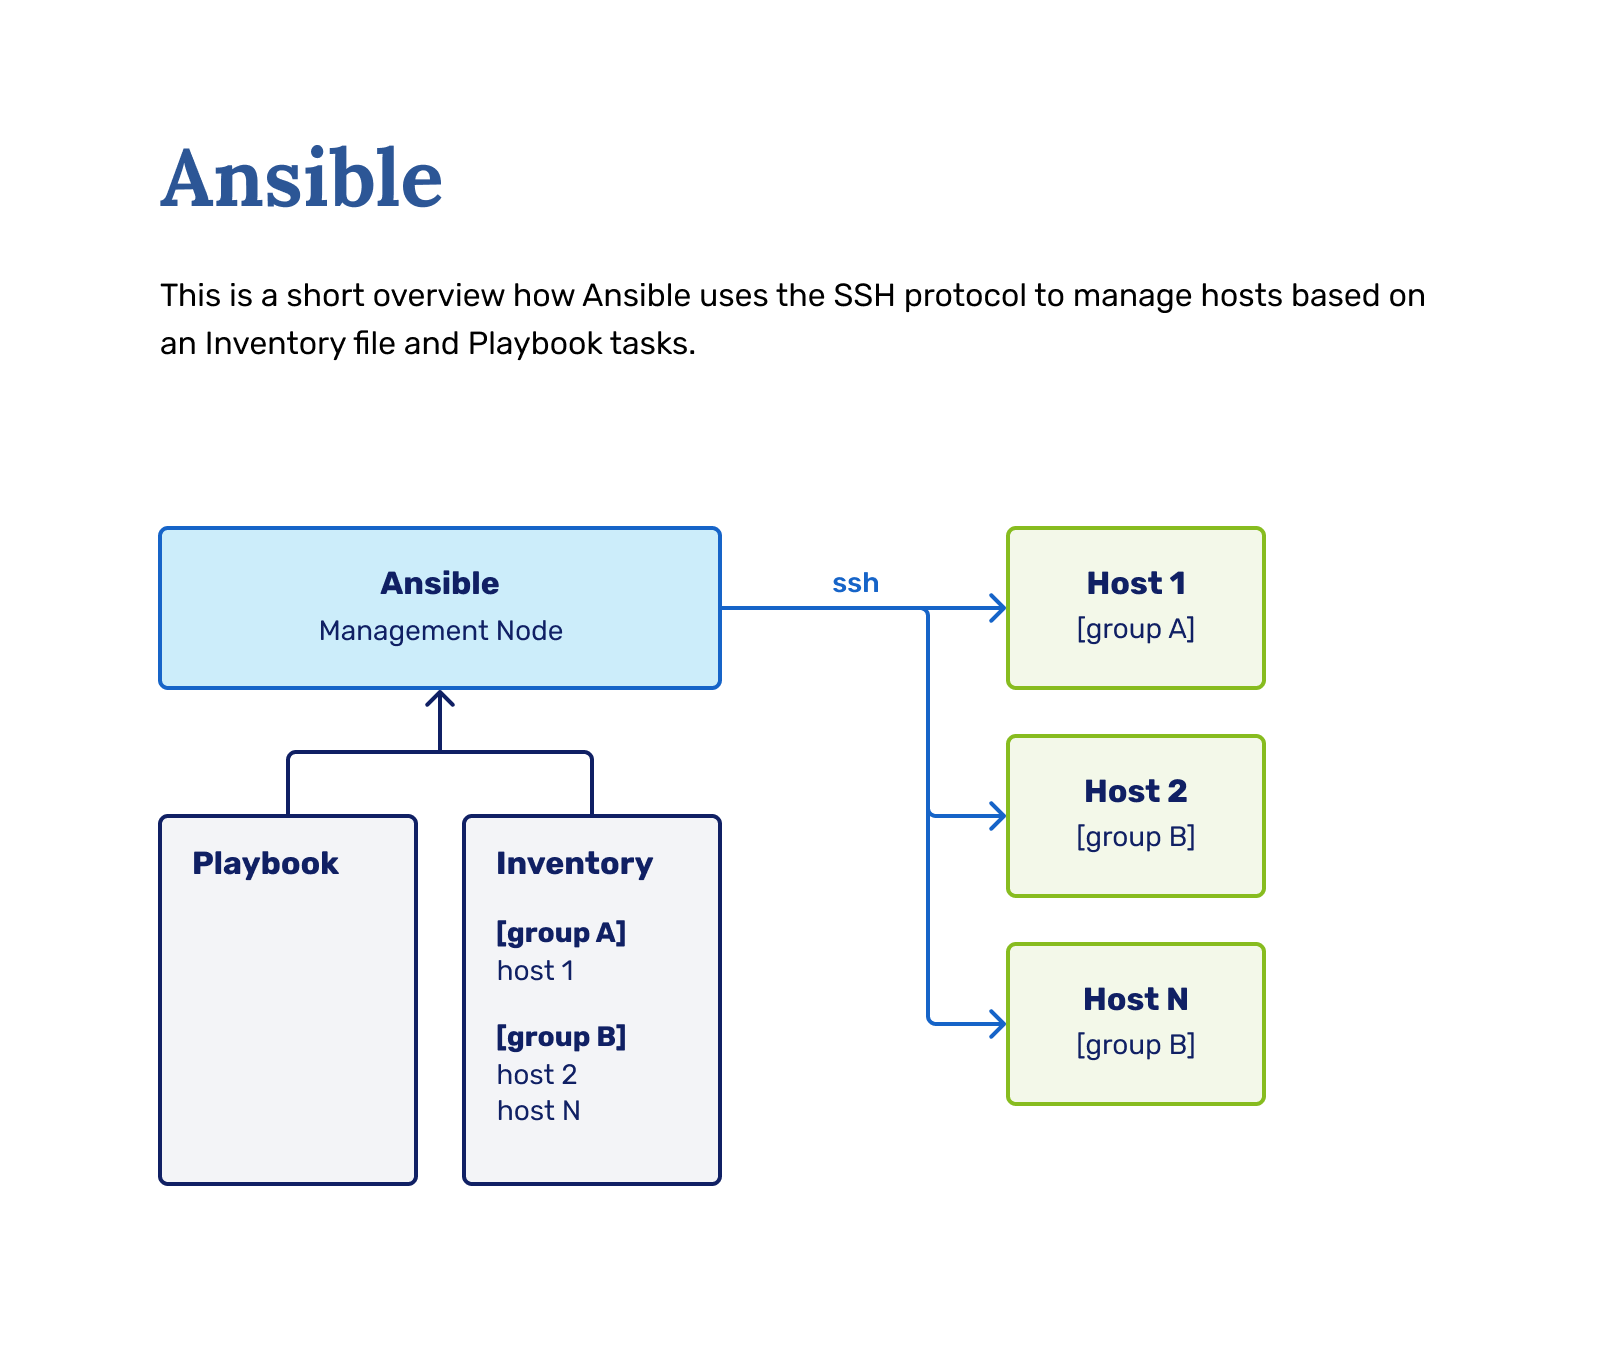
Introduction to Ansible
Ansible expects a particular folder structure to work as intended.
As a starter, you need to make the following folder structure:
[centos@test ~]# tree ansible
ansible
├── inventory/ # folder
│   └── hosts # file
└── playbook.yml # file
You also need to specify some information in the two files we created. The hosts file is an inventory of hosts you'll be managing with Ansible. For us, it's only our localhost or VM machine IP address currently.
The format of the hosts file looks like this:
[group1]

<ip> # OR
<hostname>

[group2]

google.com
8.8.8.8
Note
When substituting, please substitute the whole <ip> or <hostname> part with the actual value.
In the end, the hosts file should have either the IP address or hostname on the line, only.
But as we only have one host, we should have it like this:
[vm]

<vm_name_or_ip>
And this will allow us to run the playbook with having our VM as the target as we're running in the Ansible recommended mode, by connecting to the VM over the network from our machine during execution.
[localhost]

localhost
And this will allow us to run the playbook with having our VM - localhost - as the target because we're running Ansible from inside the VM itself.
Now we only have to give Ansible something to do. There are two ways to do that:
- Ad-hoc commands
- Playbooks
Ansible ad-hoc commands are singular commands that do something on the server, either execute a command or process a module. For example, the ping command we used was an ad-hoc command:
ansible -m ping localhost
ansible -m <module> <target>
But this methodology is mainly used to test out things or fix simple mistakes made by playbooks.
An Ansible playbook is a blueprint of automation tasks - which are actions executed with no human involvement. The tasks are run one after another, without the operator (you) having any way to influence the process after execution has started.
First playbook
As we want to manage our machine with Ansible in entirety, let's start by using playbooks. Playbooks are a so-called manifest of the state of the machine, which can be a list of commands or roles (basically functions) to be executed in top-down order.
The playbook file is called playbook.yml, but you can name it anything you would like. You just need to specify the correct playbook to be run during Ansible execution.
A playbook looks like this:
- hosts: all
  user: centos
  become: yes
  become_user: root

  tasks:
  - name: Testing this out
    debug: msg="Hello from server!"
As this is YAML, indentation is significant. If you get syntax errors, please make sure indentation is fine.
Running the above playbook is done by running:
ansible-playbook playbook.yml -i inventory/hosts
If you run the Ansible from your own machine, then it should succeed with green output. You do not need to generate a new key like you'd have to, when you run Ansbile from inside the VM.
Once you run this playbook, it will process for a bit and then fail in red text. Because we told it to run as user centos and against the host localhost, it will now try to login into the machine, which fails, because we have not set up a key.
First, generate a key inside your VM's centos user with the ssh-keygen command (it will walk you through key generation). You should leave everything, especially the key path as the default, otherwise the key will not be used automatically and you have to figure it out yourself. Afterwards, copy the generated public key to the authorized_keys file.
cat /home/centos/.ssh/id_rsa.pub >> /home/centos/.ssh/authorized_keys
And then try re-running the playbook. This time, you should get green output.
Ansible modules
The most important part of the whole playbook is the tasks, which defines which actions are to be taken by the playbook upon execution.
The tasks declaration is processed top-down, meaning the first task is executed first.
Every task consists of a name, module and arguments, in the format of:
- name: something
  module:
    argument: "value"
or the short form of:
- name: something
  module: argument="value"
In our previous testing example, we used the debug module, which you can use to debug parts of your playbook. Documentation here .
Every action you want to do with Ansible needs to use an appropriate module. The list of modules is massive .
We will be helping you out with which modules are, in our opinion, correct ones to use for particular tasks in future labs.
Solving Cloud lab tasks with Ansible
As an introduction to Ansible, we will be solving the tasks we had in the Cloud/ETAIS lab by writing a playbook.
We will be using the following modules for this:
There are four different problems we need to solve:
- Making a
scoringuser. - Creating the .ssh directory for the
scoringuser - Copying the
scoring.sa.cs.ut.eepublic certificate to scoring user'sauthorized_keysfile. - Adding
scoringas a sudoer user.
Let's go task by task, adding parts to the Ansible playbook and running the playbook after every addition.
First, making the user is done using the user module, like this:
- name: Add user scoring as Linux user
  user:
    name: scoring
After adding this part, the playbook should output a green "ok" task. The green output indicates that the system is already in the state defined in Ansible, which is because we already did the necessary change by hand in Lab 3.
Note
An important concept to understand is "idempotency", which means that no new actions are to be made when a state is already reached on a machine. In its' simplest form, your tasks should be in the "Changed" state only once and only return "Ok" on every subsequent run.
To best utilize this, you must think about Ansible differently than a scripting language. In the scripting world, you write step-by-step instructions on what you want to do. In Ansible land, you instead declare what state you want your target to be in and let Ansible handle the rest.
Idempotency allows you to run Ansible on several targets of different states and have them arrive at one particular state in the end. You can also keep re-running the Ansible, and it will only change what's needed.
The second part we need to add is making the .ssh folder. For this, we use the file module.
- name: Create .ssh directory
  file:
    path: /home/scoring/.ssh
    state: directory
    owner: scoring
    group: scoring
    mode: '0700'
We also make sure the owner, group and permissions (mode) are correct. The state: directory implies making a directory instead of a file.
The third part is adding the scoring.sa.cs.ut.ee public key to the authorized_keys file. We can do a bit of magic here, where the key is downloaded automatically with the get_url module:
- name: Download user scoring public key
  get_url:
    url: https://scoring.sa.cs.ut.ee/files/id_rsa.pub
    dest: /home/scoring/.ssh/authorized_keys
    owner: scoring
    group: scoring
    mode: '0600'
This module will download the file from the website defined as the url parameter's value and put it into dest. Again, we limit the file's user, group, and permissions.
The last part is making the sudoers file modification. While we could use the lineinfile module to make appropriate changes inside the sudoers file itself, we are better off using a solution provided by the Linux distribution authors - the configuration directories.
Some software and configuration files also include all the settings from a separate folder, just for situations where we want to modify the system utilising configuration management. Editing a file with configuration management is more complex than just adding the correct file into a folder to specify only the settings we want to change.
For achieving this, we will still use the lineinfile module to create a file in /etc/sudoers.d/scoring, but we won't have to write regex:
- name: Create the /etc/sudoers.d/scoring file
  lineinfile:
    dest: /etc/sudoers.d/scoring
    line: "scoring ALL=(ALL) NOPASSWD: ALL"
    state: present
    create: yes
create: yes allows for creating the file if it does not exist.
After adding this part, the playbook should output a yellow changed task. The yellow output indicates that Ansible has made a change in the system. You will see the changed status only once.
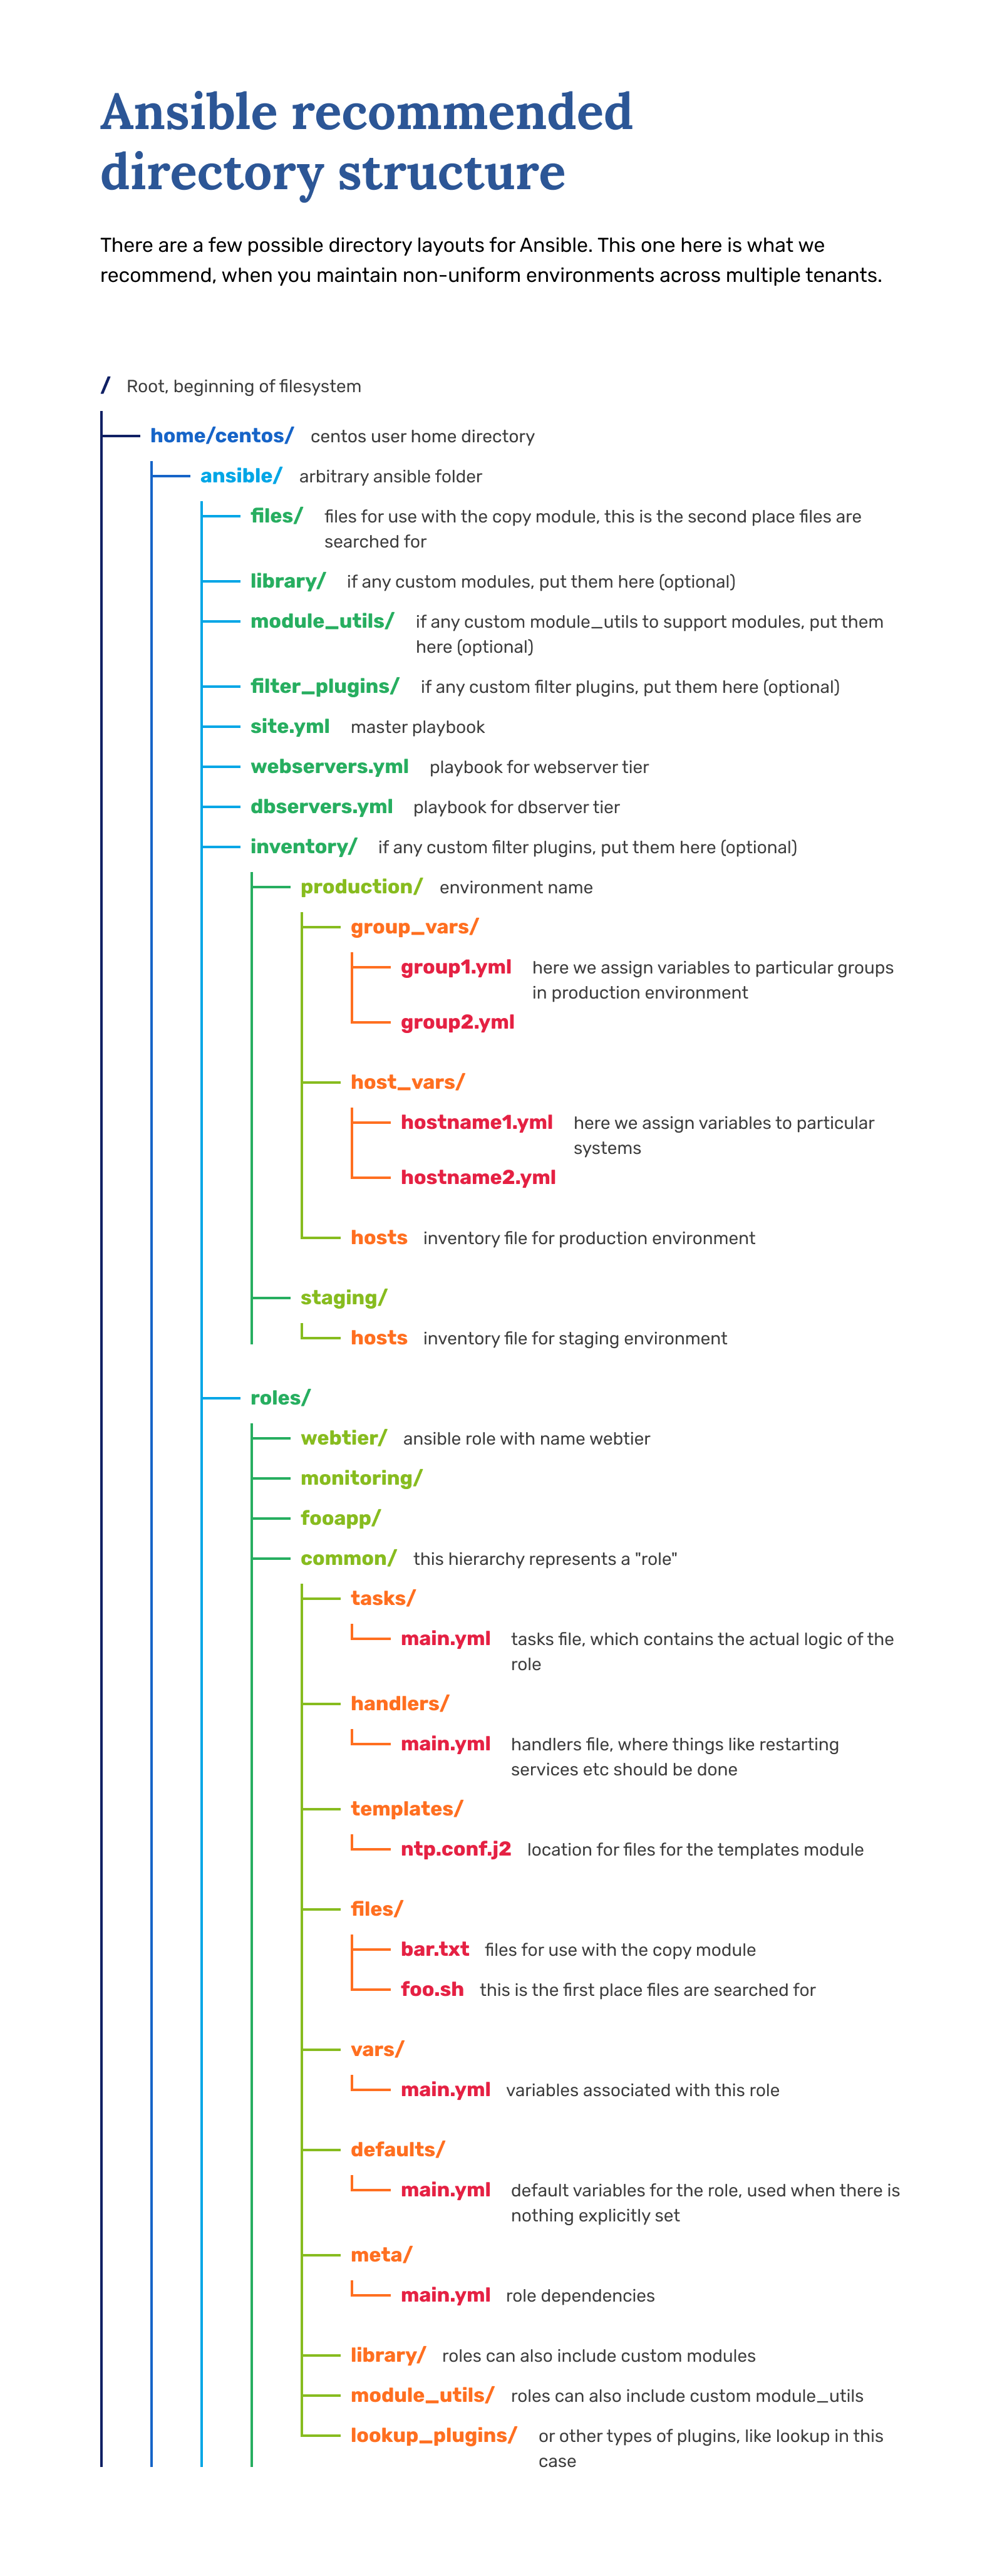
Ansible roles
As our goal is to eventually have all of the labs written down as Ansible, it will become challenging to manage the hundreds of tasks later on.
Mitigating this issue requires us to use something called "Ansible roles". Think of these as functions in code - they are packaged subsets of Ansible playbooks, usually meant for solving one issue at a time. For example a role for setting up the webserver, a role for setting up the firewall, etc.
This kind of isolation allows you to select which roles you want to include when running Ansible, without going through a hundred tasks every time.
This requires setting up the roles folder appropriately, moving our tasks from the playbook into the role folder, and including the role in the playbook.
First, make an appropriate roles structure:
[centos@test ansible]# pwd
/home/centos/ansible
[centos@test ansible]# tree roles
roles
└── etais
    └── tasks
        └── main.yml
Then move the four tasks for solving the Cloud/ETAIS lab into the roles/etais/tasks/main.yml file, so it looks like this:
- name: Add user scoring
  user:
    name: scoring

- name: Create .ssh directory
  file:
    path: /home/scoring/.ssh
    state: directory
    owner: scoring
    group: scoring
    mode: '0700'

- name: Download user scoring public key
  get_url:
    url: https://scoring.sa.cs.ut.ee/files/id_rsa.pub
    dest: /home/scoring/.ssh/authorized_keys
    owner: scoring
    group: scoring
    mode: '0600'

- name: Create the /etc/sudoers.d/scoring file
  lineinfile:
    dest: /etc/sudoers.d/scoring
    line: "scoring ALL=(ALL) NOPASSWD: ALL"
    state: present
    create: yes
The main.yml file is the default file that gets included when referring to a role. In a functional role, the main.yml has to exist.
And now let's add the definition of the role to our main playbook, so it looks like this:
- hosts: all
  user: centos
  become: yes
  become_user: root

  roles:
  - etais

  tasks:
  - name: Testing this out
    debug: msg="Hello from server!"
Once you run this, all the tasks should still be green, but if you noticed, then the order of execution changed. That's because roles are always processed before tasks.
Now, when you start making another lab's playbook, you can just create a new role in the roles folder, include it, and conveniently split tasks.
Roles definitions allow you also to use only parts of the written playbook during the exam.
Ansible variables
Ansible is only moderately useful if we expect the environments to be always the same. This problem can be solved by writing some intelligence into our playbooks.
In Ansible, there are two main ways to add intelligence - variables and conditionals. We will cover conditionals in a later lab when we have an excellent use case.
Variables, on the other hand, are helpful from the beginning.
When you run Ansible on your host, it first gathers information about your environment. Ansible documentation calls this information "facts".
You can check which facts Ansible has about your host by running: ansible -m setup localhost. The output is a massive index of facts, including the machine's IP address, SSH keys used, hypervisors run on etc.
You can also define your variables using the hosts file, group_vars and host_vars folders, set_facts module and more.
We will go more in-depth with variables once we need them, but just as an example, let's create a task that prints out some information with variables.
- name: Testing this out
  debug: msg="Hello from user {{ ansible_user_id }} on server {{ ansible_hostname }}!"
Using Git to store files
The Ansible playbook we wrote works as our documentation, backup plan, exam helping tool and a future example. Making sure it does not disappear when we accidentally delete our machine is an essential part of it.
Let's upload our playbook to some version management system to solve this problem. Git is a version control system you should already be familiar with from previous courses. While GitHub is a free public repository host, we will be using a private Gitlab instance created especially for the Computer Science Institute.
As the first step, log in to our GitLab at https://gitlab.cs.ut.ee. For the authentication method, choose LDAP instead of Standard.
Complete
Login to https://gitlab.cs.ut.ee. Create a blank project
Give it a name of your choosing or just your matrix number Select your username from the group/namespace selection Project slug value is autogenerated, and you don't have to change that
For the Visibility level, keep it Private
And finally, skip Initialize repository with a README since we will be using our Ansible repo root as the initialiser.
Once the project has been made, we can upload our playbook.
First, initialise your global git configuration. You can also copy-paste these commands from the git repo setup instructions.
Complete
git config --global user.name "your username"
git config --global user.email "your_email"
Now we are ready to push our repository into the course GitLab. You should already be in the Ansible repository root directory, but if you are not, change your directory to that of the Ansible.
Complete
cd <ansible repository>
git init to initialise the directory as a git repo.
git remote add origin https://gitlab.cs.ut.ee/<username>/<repository name>.git Make sure to replace the username and repository name values accordingly
git add .
git commit -m "First commit"
git push -u origin master If this gives an error that refspec master does not match use main instead of master
And you should be done. Refresh the page in gitlab to see all of your files nicely stored in the git repository. Also from here on now, don't forget to regularly commit your changes to the repository, atleast after each lab. This is to prevent losing your progress when something gets broken or deleted accidentally inside the VM.