Lab 2 - ETAIS
Welcome to the 2nd lab. Here is a short action list that we will do during this lab:
- Accessing ETAIS
- Creating a public/private key pair
- Creating a new CentOS 9 virtual machine in Cloud
- Configuring VPN Client
- Accessing Server over SSH
- Adding
scoringaccount and its public key with no password for '''sudo''' commands - Update dnf configuration
Verify
- Following validations have to be passed for this lab to be completed:
- Your machine must ping from the scoring server.
- Scoring user must be able to log into your VM using our key.
- Scoring user must have passwordless sudo access.
- Scoring user must not have a password set.
1. How to login to ETAIS:
For the rest of the labs, we use a cloud service called ETAIS. ETAIS’s main aim is to serve Estonian students and researchers. For access, you have been sent an email with instructions on how to log in. You have also been invited into the System Administration organization, and have a private project in that organization.
Complete
- Log into ETAIS system
- Go to the page: minu.etais.ee
- And login by clicking
Sign in with MyAccessID - After that search for your institution (University of Tartu) and enter your (UT) username and personal password.
- PS! If you prefer other options might work also ID card, Mobile ID, or another institution's username and password, and so on, but it is up to you to get them working.
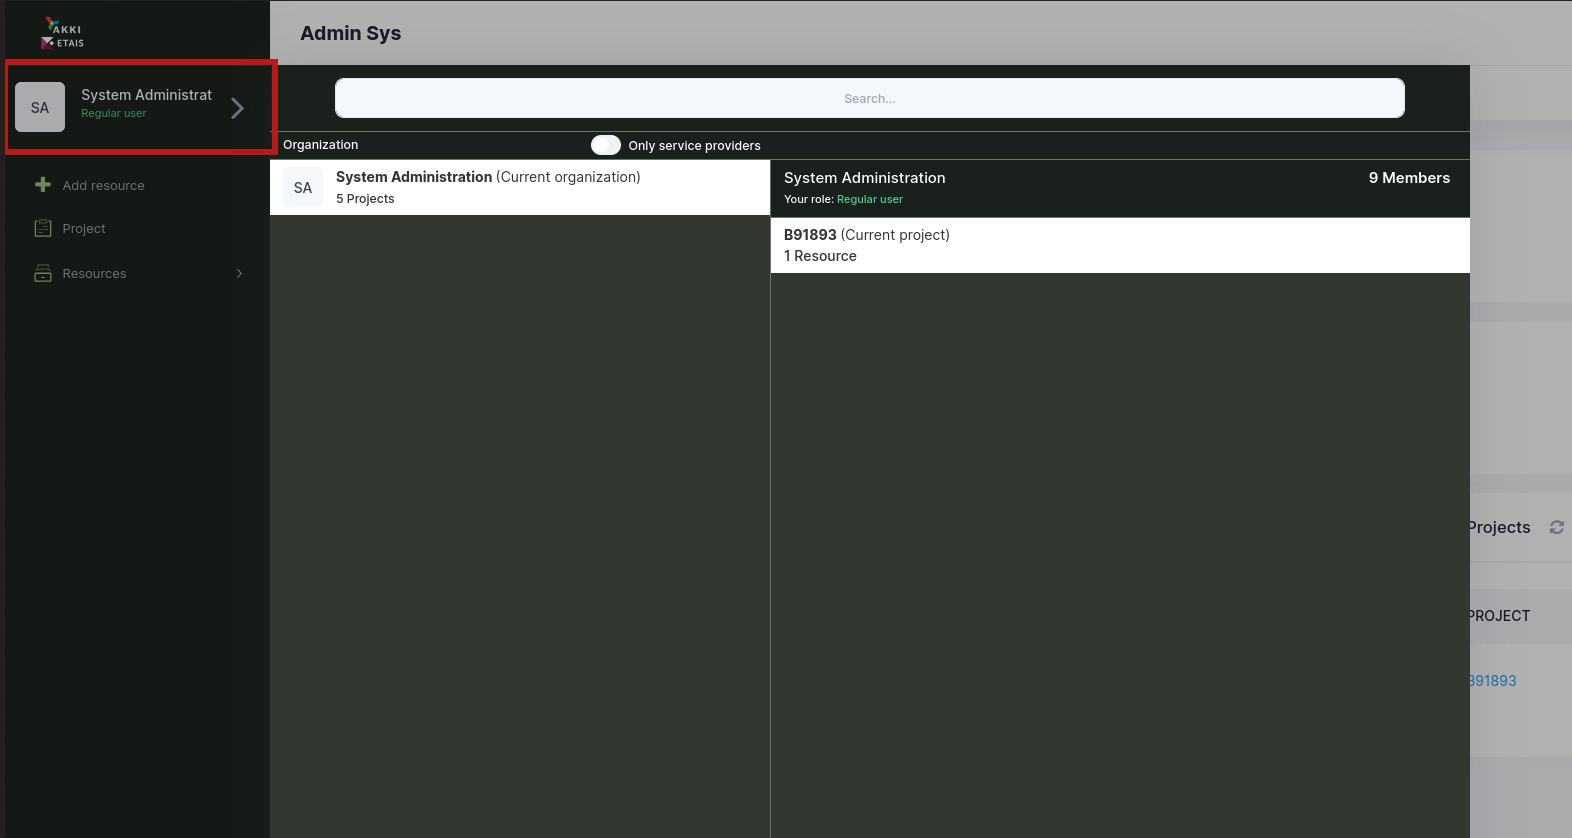
- Make sure you have
System Administrationas your organisation and that the project named the same as your study book number is selected. - If not available please go to the personal e-mail you provided to University as the primary contact e-mail and look for an e-mail from
selfservice@etais.eeand click on a linkthis pagein it. - If still having problems please contact your lab instructor or Sander Kuusemets
sander.kuusemets@ut.ee
2. Creating a public/private key pair
Before you continue we need to set up public / private key pair so you could use them to connect to the machine.
Public key cryptography, or asymmetrical cryptography, is any cryptographic system that uses pairs of keys: public keys which may be disseminated widely, and private keys which are known only to the owner. This accomplishes two functions: authentication, where the public key verifies a holder of the paired private key sent the message, and encryption, where only the paired private key holder can decrypt the message encrypted with the public key.
In a public-key encryption system, any person can encrypt a message using the receiver's public key. That encrypted message can only be decrypted with the receiver's private key. To be practical, the generation of public and private key pairs must be computationally economical. More on that here.
Danger
- Make sure you do not lose this key, once Your VM has been created the only way to change the key is from inside the VM.
- If you lose your copy and are locked out of the VM, you will have to create a new virtual machine!
Generating key pair and uploading the public key to the SSH server
Attention
To be done on personal PC/Laptop
- Open command line
- Use
ssh-keygencommand to generate the 4096 bit long RSA key (try to figure out the proper command options you want to use.- When asked where to store the key use the default location of:
${HOME}/.ssh/id_rsa - When asked about a password you may consider protecting the private key using a passphrase for stronger security, but it is also OK to leave it empty (in this case the private key has to be kept really secret).
- Now two files should be added into
.ssh/directory of your home folder:id_rsawhich is a private key and should be kept secret (by the way what are the proper permissions assigned to the file ?)id_rsa.pubwhich is a public key and may be shared (by the way what are the proper permissions assigned to file ?)
- Once the key pair is generated we may set up the SSH server to use public-key authentication:
- Copy public-key to memory and then continue with Manual on where to paste it in ETAIS:
$ cat ~/.ssh/id_rsa.pub
- When asked where to store the key use the default location of:
- Open PowerShell or CMD
- Use
ssh-keygencommand to generate the 4096 bit long RSA key (try to figure out the proper command options you want to use.- If asked where to store the key use the default location of:
C:\Users\<your username>/.ssh/id_rsa - If asked about a password you may consider protecting the private key using a passphrase for stronger security, but it is also OK to leave it empty (in this case the private key has to be kept really secret).
- Now two files should be added into
.ssh/directory of your home folder:id_rsawhich is a private key and should be kept secret (by the way what are the proper permissions assigned to the file ?)id_rsa.pubwhich is a public key and may be shared (by the way what are the proper permissions assigned to file ?)
- Once the key pair is generated we may set up the SSH server to use public-key authentication:
- Copy public-key to memory and then continue with Manual on where to paste it in ETAIS:
$ cat C:\Users\<your username>\.ssh\id_rsa.pub
- If asked where to store the key use the default location of:
- Use Puttygen application to generate the key pair:
- Download Puttygen
- Set the password for the private key and save it to your computer.
- Copy the puttygen
(public key) outputand paste it to theETAIS(next part in manual). -
NB! Do not save the public key into a file and copy it to the server, it will not work, it has a different format.
- Puttygen info
Copy the public key to ETAIS.
Complete
- Log Into ETAIS
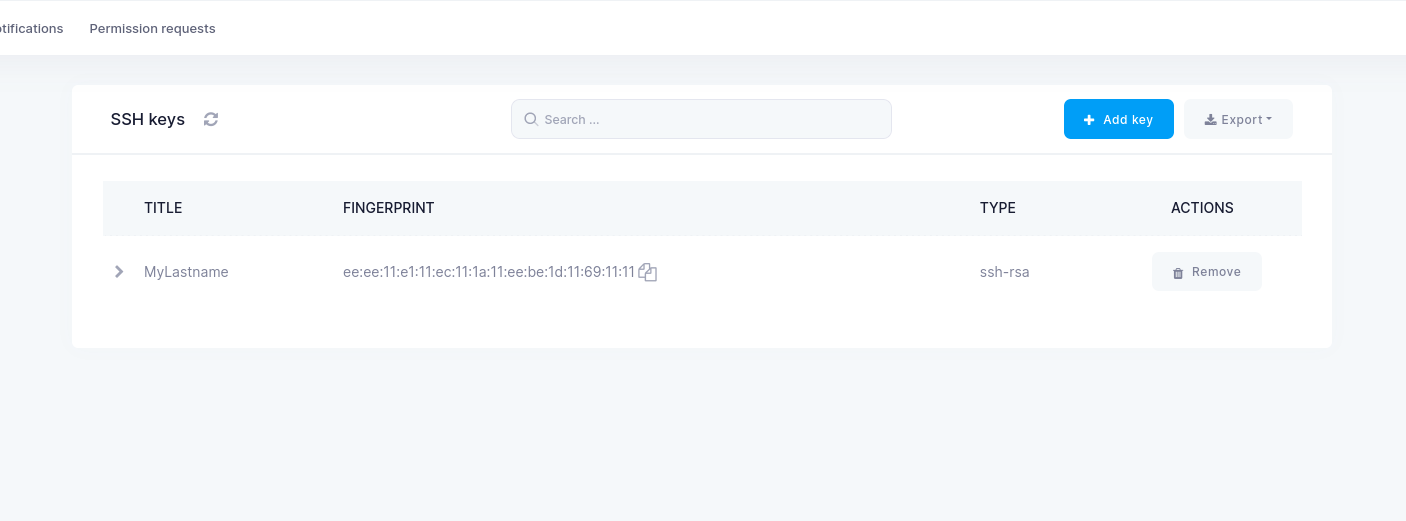
- At the top right of the screen click on your name ->
Credentials->SSH keys
- Look for
Add key - Add a name to your SSH key that should contain your
Last name Paste your public keyand clickImport key
Once the public key is successfully added, you should be able to see it in the list of SSH Keys in the left-side menu in ETAIS:
3. Creating a new Virtual Machine (VM)
Danger
Your VM name will be visible to all course participants, best not to put any sensitive information in the name. Also, if there are multiple VM-s with the same name the automatic checks won't work and You will not be able to track progress in scoring. You should check scoring that the name hasn't already been taken, however in the case of a naming clash the first claimant can keep it and any further VMs must be recreated.
Complete
- Log Into ETAIS
-
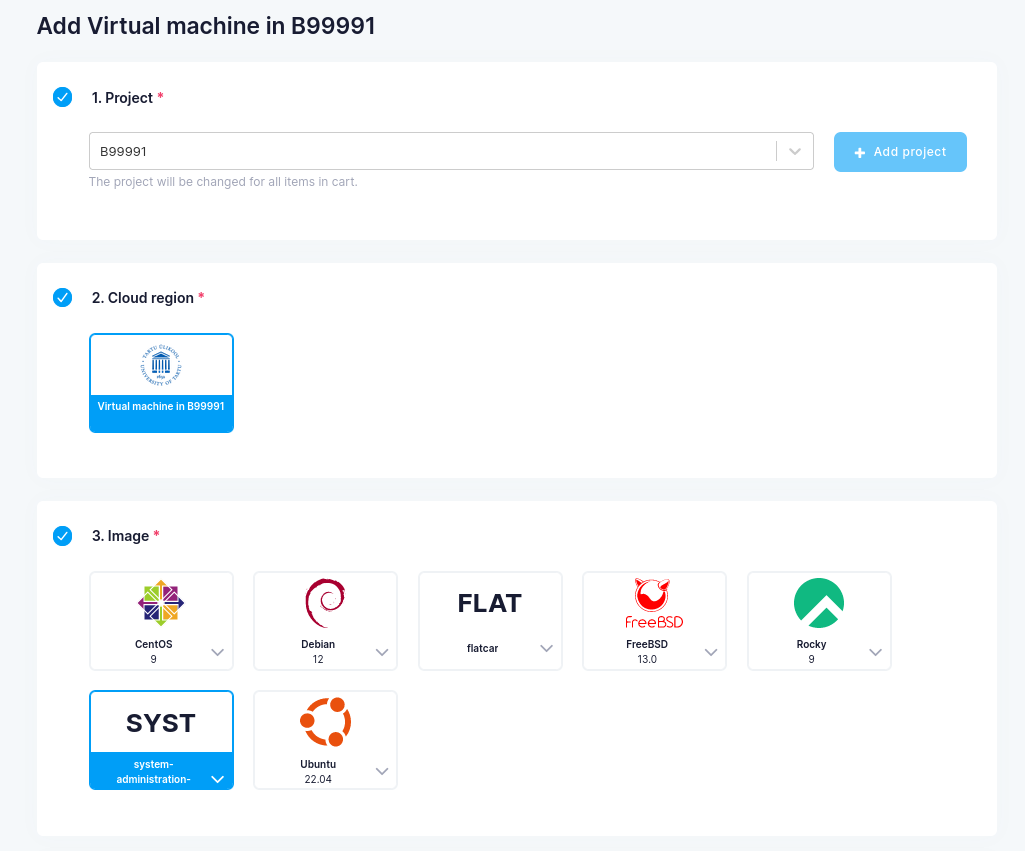
On the left menu click on
Add resource->VMs->Virtual machine in <study book number>Project=Your university study book number (matriklinumber)-
Cloud Region=Virtual machine in <study book number> -
Image=system-administration-2024 -
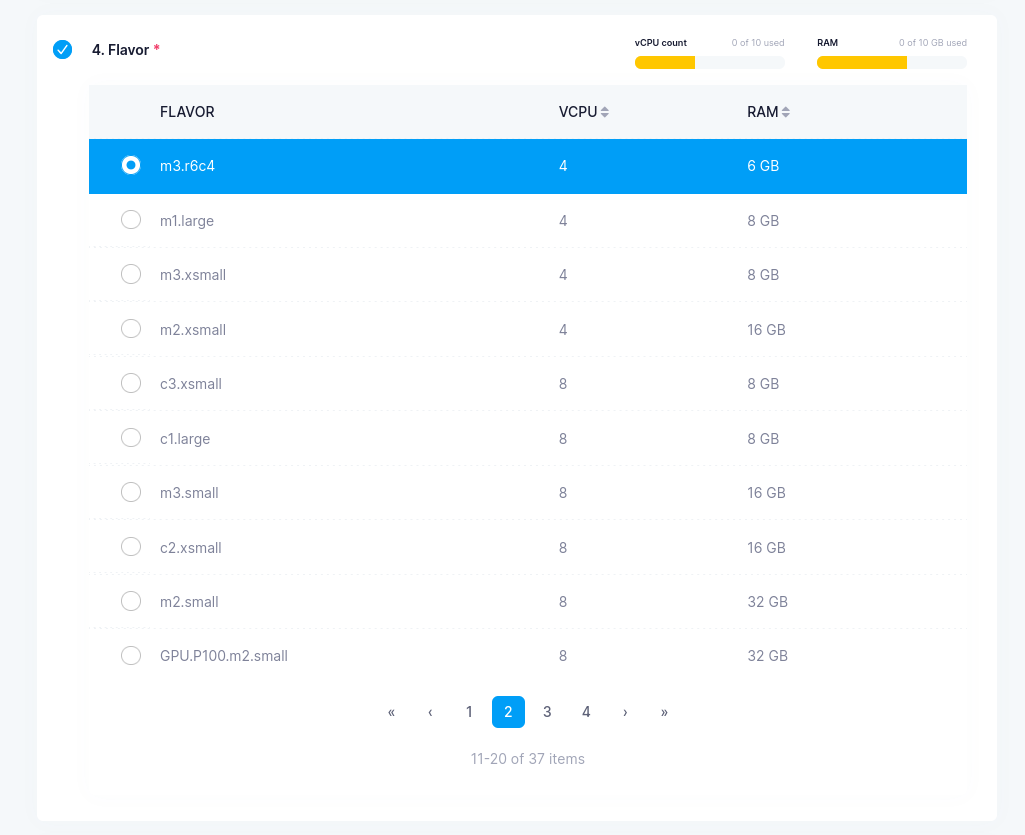
Flavor=m3.r6c4 -
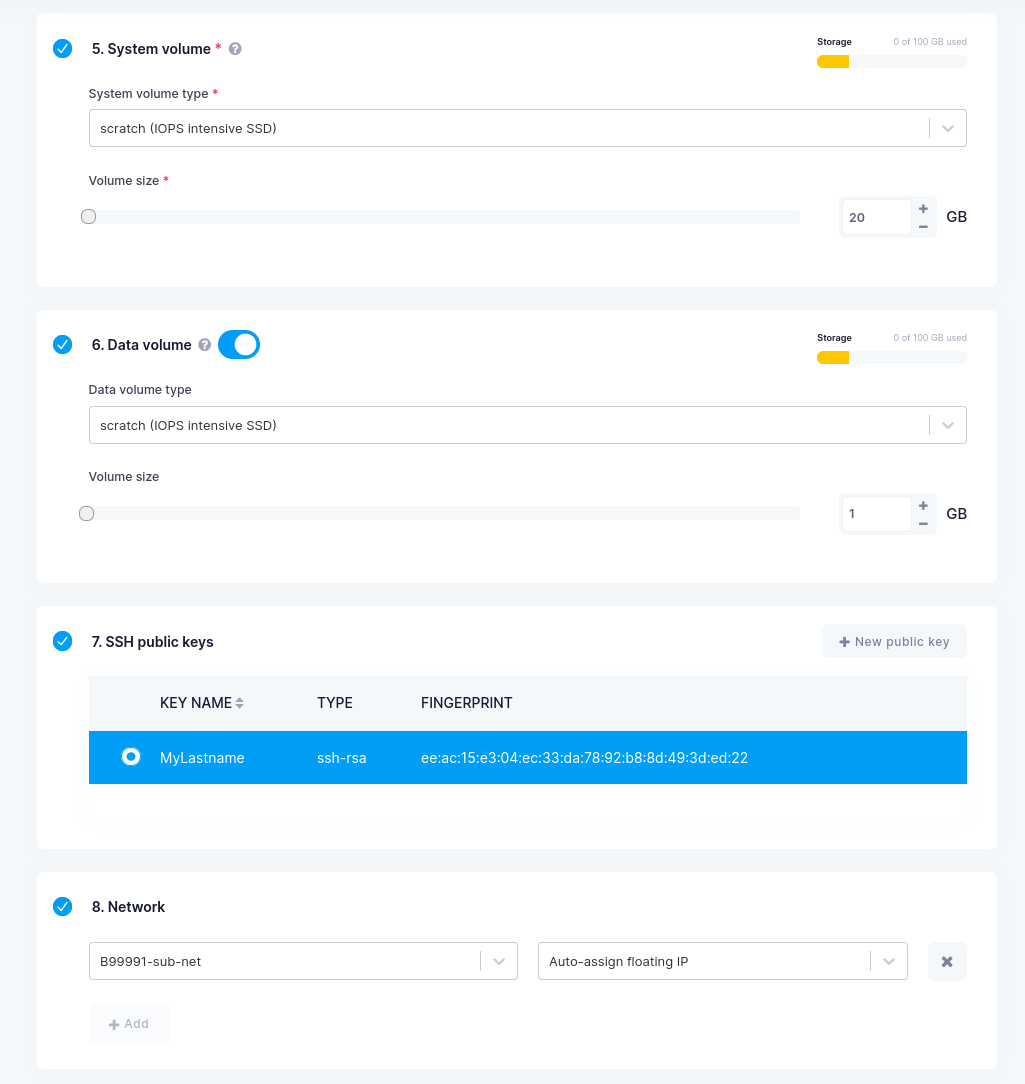
System Volume Type=scratch (IOPS intensive SSD) -
System Volume Size= 20 GB -
Data Volume Type=scratch (IOPS intensive SSD) -
Data Volume Size= 1GB -
SSH public key=Your public key that you added before -
Networks=<study book number>-sub-netAuto-assign Floating IP -
Security Groups= addsshandping -
VM name=Choose a name that you will remember (Can only contain lowercase latters from a-z and numbers 0-9. Cannot contain special characters for example: õäöü). ) -
Description=Add your Full name, matrix number and course name (System Administration 2024)
-
Check everything twice and press
Add to cart. - Finish the VM creation by pressing
Purchase.
Verify
Example VM configuration will look as follows:

Verify
Once the VM is successfully created it should be visible in the list of VMs in ETAIS (Resources -> VM in the left-most menu) and External IP should be visible. 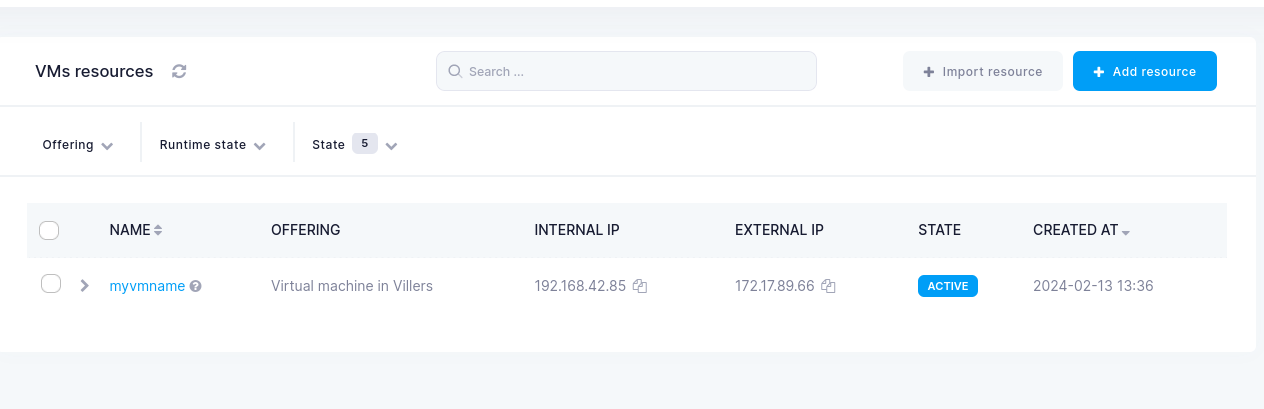
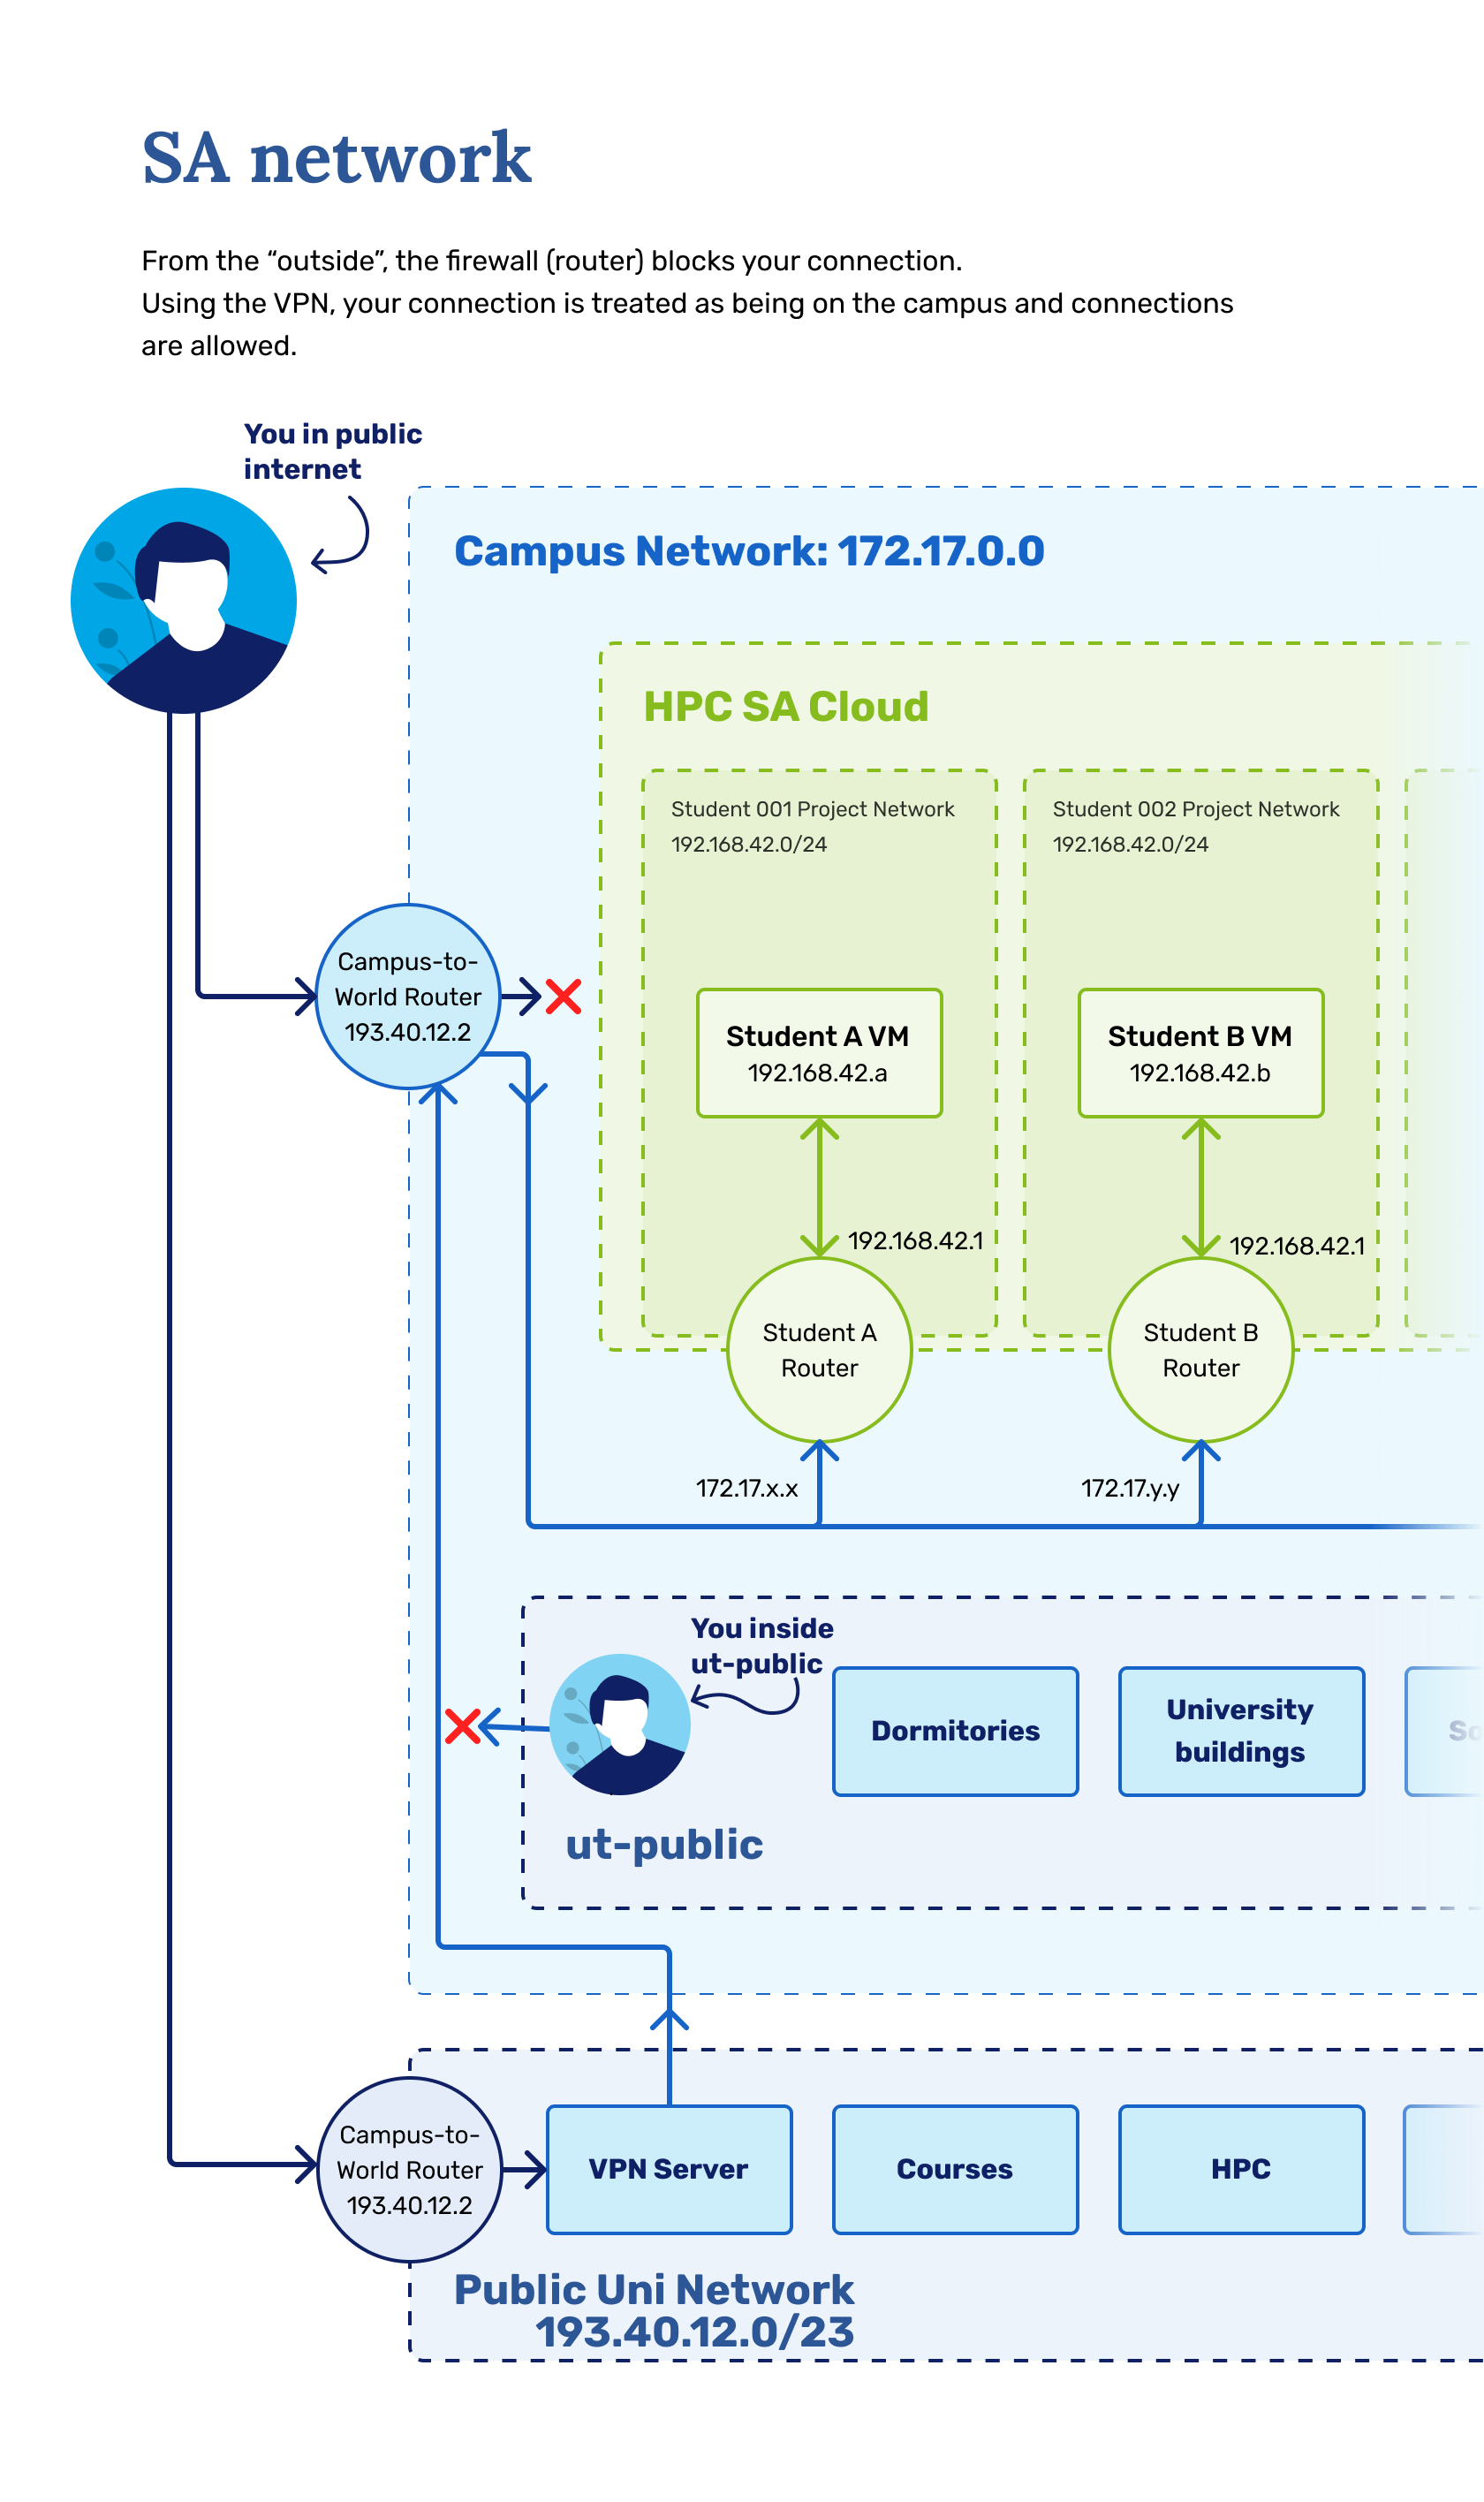
General Network Topology
Normally each virtual machine has a Internal and External IP listed in ETAIS. Upon creating a project's virtual private cloud (done for you in this course), a virtual router is set up for your project. This router possesses and internal and external IP address.
Internal IP
Internal IP is obtained from a pool of private network address space - 192.168.42.0/24. When your VM only has this address it operates behind the virtual router as any home/small-office router - your private network is behind a source network address translation (Source NAT). While your VM's internal IP is taken from the address space of 192.168.42.0/24, your virtual router gets an address of 192.168.42.1/24. Upon sending data to the world (making a request for some sort of data e.g. requesting a google.com in your browser) from an IP of 192.168.42.X, your packets first hit your router's internal IP (192.168.42.1), then the source NAT is applied and the traffic exiting your router has an address of 172.17.X.X. When data is retrieved from the internet based on your initial request the data initially hits the external IP of 172.17.X.X and then gets translated back to 192.168.64.X. This only allows traffic in when it is initiated from the private network. If you would like to initiate connection with your VM (e.g. ssh, web request) with only Internal IP then it would not be possible due to Source NAT - same applies for home/small-office setups.
Info
To recap: Only having Internal IP allows to initiate connections from the VM to the world and get data back but not the other way around. You can not access your VM from the world/VPN/Eduroam with only Internal IP applied.
External IP
An External IP is obtained from a pool University Campus network address space - 172.17.0.0/24. When an External IP is applied to your VM, your project's virtual router becomes invisible. This means your machine becomes visible from inside the University of Tartu's internal network. You can initiate communications with your VM from your laptop and elsewhere from the UT's internal network. This is like an public IP address but only in the sense that it works in the university's internal network - keep in mind, that when trying to connect to the External IP from home you need to have the university VPN running or you need to be in university's Eduroam network.
Info
To recap: VM that has an External IP can be accessed from the outside world, in this course's case from within UT's internal network - VPN/Eduroam.
Network topology diagram
Complete
Question: What will happen if there are 2 VMs instead of 1 inside a private network 192.168.42.0/24
4. Configuring the VPN Client
To access your newly created Virtual machine you need to be inside of University of Tartu network. In the classroom or inside the University of Tartu eduroam network it is possible to access your machine without a VPN, but we do recommend setting up a VPN for remote access outside the University network. You can skip this step if you have already configured a UT VPN.
A virtual private network (VPN) extends a private network across a public network and enables users to send and receive data across shared or public networks as if their computing devices were directly connected to the private network. Applications running across the VPN may therefore benefit from the functionality, security, and management of the private network. VPNs may allow employees to securely access a corporate intranet while located outside the office. They are used to securely connect geographically separated offices of an organization, creating one cohesive network. More about that here.
Complete
Please refer to the University of Tartu official manual on how to set up VPN in your personal machine if you have not done this already.
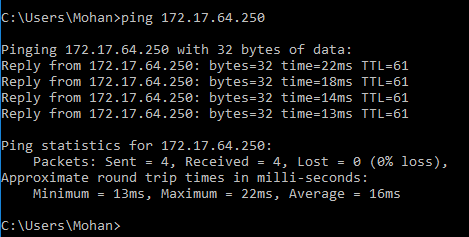
Verify
Once the VPN connection is established, check the connection with your newly created Virtual machine. Use ping command with the External IP of your VM: $ ping <external ip>
5. Access machine over SSH
Secure Shell (SSH) is a cryptographic network protocol for operating network services securely over a network. The best-known example application is for remote login to computer systems by users.
SSH provides a secure channel over an unsecured network in a client-server architecture, connecting an SSH client application with an SSH server. Common applications include remote command-line login and remote command execution, but any network service can be secured with SSH. More on that here.
Connecting to Cloud resources (VM-s) over SSH is preferred. Therefore SSH is installed in your system by default, as the cloud infrastructure takes care of bootstrapping and installing your CentOS 9 OS. The other option is to use the slow network console from minu.etais.ee, but usually this is reserved for emergency purposes.
Info
This is basically the same step we did in the last lab, only with your own personal VM.
In macOS and Linux hosts the ssh client is by default installed and accessible in the command line. Starting with Windows 10, a Linux subsystem was created (WSL) that runs a pseudo-VM in Windows, which also has ssh installed by default. For example to access the remote shell of the example.com host and user test the following command should be provided:
$ ssh test@example.com
Verify
- Try accessing the remote shell of your VM using the
External IP addressof your machine. Your default username iscentos. You do not need a password since we are using key-based authentication. If all is good, your login should work, if you generated a new key or the key does not authenticate properly, you must re-create your VM with the correct keys, as the key is modified only during VM creation. ssh <user>@<external ip>- The SSH server should not ask for password anymore in case you did not provide additional pass phrase on your private key
id_rsa. - If needed use
-iparameter to specify key file.
The most recent versions of both Windows 10 and Windows 11 include a native SSH server and client, utilizing the OpenSSH framework, which facilitates remote sign-ins using the SSH protocol.
To SSH into a remote server, use the ssh command followed by your username and server's IP address. For example to access the remote shell of the example.com host and user test the following command should be provided:
$ ssh test@example.com
Verify
- Try accessing the remote shell of your VM using the
External IP addressof your machine. Your default username iscentos. You do not need a password since we are using key-based authentication. If all is good, your login should work, if you generated a new key or the key does not authenticate properly, you must re-create your VM with the correct keys, as the key is modified only during VM creation. ssh <user>@<external ip>- The SSH server should not ask for password anymore in case you did not provide additional pass phrase on your private key
id_rsa. - If needed use
-iparameter to specify key file.
Download Putty. Putty is a portable executable, so just open Putty.exe.
Testing the public key authentication
First of all, make sure you know the External IP address of your newly created VM. It will be something like 172.17.XXX.XXX
Instead of username and password let's use the key we generated earlier. Now you should be able to login to your VM over SSH using the private key:
Complete
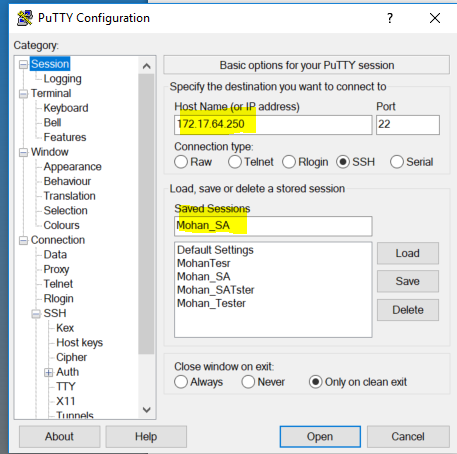
- Use
Puttyand set up a new saved session:- On the putty startup screen write your
External IPaddress172.17.64.Xinto tohost namefield - this will be the session name (so you can reuse it later). - Click on the
Connection(in the left vertical panel) then chooseData.- Write the
loginof yournormal user(the default one iscentos).
- Write the
- On the putty startup screen write your
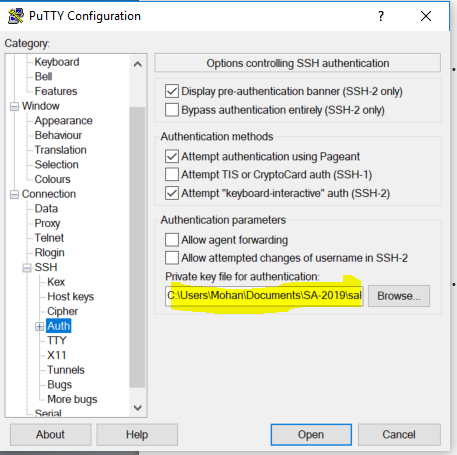
- Under
Connection->SSH->AUTH, browse for theprivate keyyou generated with thePuttygen. - Go back to the
Sessionsubmenu, add aSA-172.17.64.Xname inSaved Sessionsbox and clickSave.

Now the saved session can be used:
Verify
- Use the
Putty:- On the putty startup screen, in the
Saved Sessionsbox select your saved session, then clickLoad - Click
Openon the main window.
- On the putty startup screen, in the
- The SSH server should not ask for a password anymore in case you did not provide an additional passphrase on your private key.
6. Adding root password
VMs in ETAIS by default come without passwords. Meaning you can only gain access to the VM with the correct public keypair. In this course, the root user should have a password, as it allows for disaster recovery in case something happens to your key/VM through the web console. In general system administration, root passwords are usually not used, or only for disaster recovery purposes. Having a password with full control of your services/server is a security risk.
Complete
Become root user: * $ sudo su - As a root user set the password for the root account: * # passwd root You will be prompted to enter the password twice, don't be alarmed when you can't see your password being typed on the screen. It's a security feature of Linux as to not give away the length of your password. Also make sure you remember or write down the password, in case you need it.
Verify
Go to ETAIS next to your VM's name choose Actions and from the drop-down menu choose Open console. This will cause a pop-up to open a new tab. You might need to allow pop-ups for ETAIS in your browser (you will be prompted to do so). Click inside the black console box to force it into focus and try to log in with user root and the password you just set.
7. Adding scoring account
Now we will add a scoring user which will be used by our lab instructors and an automatic scoring service to log in and check your machine.
Complete
- Add new user called
scoring(DO NOT give it a password) $ sudo adduser scoring
Now let's give our lab instructors and automated scoring system access to your VM over SSH using a scoring account. The public key for the scoring user is available for download here, and it works exactly like your own public-private keypair for ssh. Download scoring user's public key.
Complete
- Now in your VM please log in to
scoringaccount you have just created, or just switch to it usingsu - scoringcommand. (If you get a permission denied error, think a bit - you need elevated permissions to log to a new user without confirming a password(which we don't have)!) - Now download the scoring server's public key in your VM, use the
wget(you might need to install it) command for that: scoring@host:~$ wget https://scoring.sa.cs.ut.ee/files/id_rsa.pub- Alternatively, you can put the URL into your browser and copy it from there.
Verify
If the file was downloaded properly you can check the content of the file scoring@host:~$ cat id_rsa.pub
Now let's add the downloaded public key to the list of authorized keys for scoring account:
Complete
-
If directory
.sshdoes not exist in scoring's home, please create it.scoring@host:~$ mkdir .ssh
-
Make sure the directory is owned by scoring user and '''only''' it can read-write-execute in it
chown scoring:scoring .sshandchmod 700 .ssh
-
Copy the contents of
id_rsa.pubinto.ssh/authorized_keysscoring@host:~$ cat id_rsa.pub >> .ssh/authorized_keys
-
Make sure the files are in appropriate permissions
.sshfolder in Read-Write-Execute only permissions forscoringuser only (no permissions for others)authorized_keysin Read-Write permissions '''only for thescoringuser'''
What we did was add the scoring server's public key into a special file named authorized_keys, the contents of which are checked by the SSH service in the VM for each login to assess authentication methods for that particular user. This process is identical to the VM setup scripts adding your key under the authorized_keys file under the centos user(you are encouraged to check the contents of /home/centos/.ssh/authorized_keys). The format of the file allows for multiple keys as well, one per line. When manually adding new keys to any user, make sure the formatting is correct and that the key header ssh-rsa is attached to the key.
Verify
If everything was done properly the remote scoring can now log in using its private key. You, unfortunately, cannot test it manually, but you should see that in a few minutes from the scoring board.
The last thing to do is to give the scoring user rights to execute commands in root permissions. We need the scoring user to be able to run programs that need root access, but we are not going to give root privileges to the scoring backend (root password is unknown and root user cannot log in over SSH). To give a regular user the ability to execute a particular command in superuser rights there is a tool called sudo. sudo allows running programs with the security privileges of another user, which, by default is the root user. For more information on sudo read a short review on here.
Complete
Check that the package sudo is installed
- Remember what command we were using for installing packages?
- Rely on sudo documentation and make changes so that the scoring user can:
- Execute sudo command without asking for password
centos@mohan-test-vm:~$ sudo visudoand addscoring ALL=(ALL:ALL) NOPASSWD: ALL # under where users like root are specified
- Depending on your editor, you need to know how to save the file.
- Default is
vim.
Take care in not making syntax errors, as this can break system functionality.
Verify
Ideally, the following should just list files without any additional prompts:
scoring@host:~$ sudo ls -l /root
Note the user under which the command was run.
8. Perform backups
Whenever you are about to introduce some portion of changes to your system it might be wise to back up the current state first. Configuration mistakes might result in locking the network access. Once network access is lost - you can't control your VM over SSH anymore, and it might be useful to restore from backup (not always). There is a recovery console (Action button in ETAIS next to your VM has Open console option), but that only works if you have set a root user password.
ETAIS infrastructure does allow you to perform the snapshots of your VM image. By creating a snapshot you are saving the state of the whole hard drive, and once the snapshot is created you can proceed with dangerous actions knowing that you can always recover to the last snapshot's state in case you misconfigure something. But this should not happen often, and keeping multiple snapshots is not necessary. Another way of backing your VM state is to automate VM creating with Ansible, something we will be covering in the next lab. Ansible scripts allow you to automate the steps you do in this course, and in the case of VM corruption, easily re-setup your machine to the last state. Using Ansible is also encouraged during the exam and a properly configured Ansible can automate the whole exam, allowing easy pass of the course sometimes in minutes.
Complete
In ETAIS interface execute the snapshot of the hard-drive ETAIS -> Resources -> VMs -> Your VM Name -> Storage -> VM snapshots -> Create
Verify
Once you have checked that the snapshot creation worked, feel free to delete it. This is only a tool we introduce for you, but using it is not mandatory.
9. Security groups.
Computers and especially servers usually utilize their firewalls for security reasons. This allows the administrator of the machine to dictate how network connections can be made to or from the server. The most usual use-case for this is opening ports for services, so they could be reached from the outside world, but in the same mindset limiting service availability from different networks.
Usually, with any sensible cloud provider, you have their provided extra (second) layer of firewall, which has to be configured from outside the machine. This is to make sure, that even if your machine becomes compromised, network security policies (firewall rules) could not be changed easily.
From this lab onward we need to sometimes open ports for our VMs, to allow config of the different services we set up. Some of these security groups should be preconfigured in the course project already, but configuring the firewall of your VM is entirely up to You. Below is a small guide on how to configure firewall rules if the guides ask for them.
Complete
- Go to
ETAIS->Resources->VMs-> Your VM ->Networking->Security groups->Manage security groups->Create->Name: dummy, Description: Dummy port->Submit. - For the newly created security group look at ->
Actions->Set rules->Add rule->Ethernet type:IPv4->Direction:Ingress->IP protocol:TCP->Destination port:1000->Remote CIDR:0.0.0.0/0->Remote security group:None - Press Submit.
We have created a dummy security group for TPC port 1000. One last step is to actually attach it to the VM, as creating a group doesn't apply immediately to all VMS (Why? Most projects have more than one VM, you don't want to apply wide rules to all of your VMS).
Verify
- Go to
ETAIS->Resources->VMs->Actions(hover over your vm)->Update Security groups-> Add the newly created Security Group Dummy to the list of Security Groups ->Submit
Danger
When you open any other port, you also have to do it in the ETAIS interface. This is not a one-time thing and has to be done for each port/protocol/service we install into our machines. One security group can also have multiple ports/protocols in them.
10. Updating DNF:
DNF (Dandified YUM) is a new package manager for the CentOS platform. This can be used to install, update, remove software and handle dependencies.
Verify
Get updates and install them:
* sudo dnf update
* Use DNF to install your favorite text editor and a package named "sl"
11. Linking your VM to Matrix number
Due to the fact that we allowed you to use any VM name possible, we now have to make sure your machine belongs to who claims it belongs to. For this reason we ask you to do the following task:
Complete
Make a text file /etc/identity. Fill in the following template, and put it into /etc/identity:
VM name: <your_VM_name>
Matrix number: <your_matrix_number>
In this exact format, as we will be parsing this with scripts.
This lab is done.