Lab 11 - Kubernetes
0. Overview
Welcome to the 11th lab. This week's topic is an introduction to Kubernetes. We will look into how to deploy an application on Kubernetes, what components are used for it and how different resources are linked together.
This weeks tasks:
- Install Kubernetes and its tools.
- Create a pod.
- Create a namespace segregation in Kubernetes cluster.
- Write deployment templates to run containers.
- Create volumes to mount values and directories.
- Write service manifests to expose the containers.
- Create an ingress object.
1. Introduction to Kubernetes
What is Kubernetes?
Think of Kubernetes as a manager for your software applications. It helps you run, scale and manage your applications across a bunch of computers. It's like having a team of helpers that make sure your apps are always running smoothly, no matter how big or complicated they get.
In the containers lab we had a short introduction how to package software applications and all their dependencies into images, so they could be run across different computing environments. Kubernetes takes these containerized images and deploys them to a group of connected computers that work together as a single system - called a cluster. Using those previously mentioned computers, any application can be made highly available for all users. These machines are called nodes in Kubernetes' terms.
High availability in Kubernetes means that your applications are designed to stay up and running without interruption, even if parts of the system fail. Kubernetes achieves this by automatically detecting and responding to failures, such as when a machine goes down or an application crashes, and quickly shifting the workload to healthy machine. This ensures that your applications remain accessible and responsive to users, minimizing downtime and maintaining a reliable user experience.
When using a single machine to run your applications, like we have been doing so far, an application relies on only that one machine. Therefore, when that machine fails, the application will be down.
Terminology
As mentioned, Kubernetes is an orchestration system for deploying and managing containers in an efficient and scalable manner. Within the Kubernetes ecosystem, several key terms play pivotal roles in defining its functionality:
- Pods: These are objects consisting of one or more containers with the same IP and access to storage inside the same namespace. In a typical scenario, one container in a Pod runs an application while the other containers support the primary application.
- Nodes: Physical or virtual machines in a Kubernetes cluster where pods can run. Either runs in control plane mode or in worker mode. In the latter case a more limited set of components is run.
- Clusters: A set of nodes that Kubernetes manages.
- Namespaces: Think of namespaces as virtual compartments within Kubernetes. They help keep things organized by separating different parts of your applications. Each namespace acts like its own little world, where you can control who gets access to what. Some resources can be cluster-wide, while others are confined to a particular namespace. This segregation ensures that resources are used efficiently and allows for better management of multi-tenant environments.
- API Server: The API server in Kubernetes is like the main control center. It's the part of Kubernetes that receives instructions, or commands, from users or other parts of the system. It's responsible for managing and coordinating everything that happens in the cluster, like creating, updating, or deleting resources. So, you can think of the API server as the brain of Kubernetes, making sure everything runs smoothly according to the rules.
- Deployments: In Kubernetes, deployments are like the boss of your application. They decide how many copies of your application, called pods, should be running and how to handle changes or updates. Deployments make sure your application stays healthy by keeping an eye on the pods and adding, removing, or restarting them as needed. They use something called ReplicaSets to manage the pods, which is like a team of workers making sure everything runs smoothly. The given instructions are sent to a worker node. It talks to the container engine to get and set up what's needed. Then, it starts or stops containers until the status matches the instructions.
- Service: A Kubernetes resource object that defines a logical set of Pods and a policy to access them. Services help manage network connectivity and communication between Pods. Unlike a Pod, a Service has a static IP address across its lifetime. That means that even if the Pods get redeployed and their IP changes, the IP of the Service stays the same. If the Service is used in the NodePort mode, it can also be used to provide access from the external network.
- Load Balancer: A load balancer in Kubernetes is like a traffic director. It evenly distributes incoming requests or traffic among multiple pods, ensuring that no single pod gets overwhelmed. This helps maintain high availability and reliability for your applications by preventing any one pod from becoming a bottleneck.
Main benefits
Using Kubernetes provides several advantages over setting up applications independently on a single server:
- Scalability: Kubernetes allows you to easily scale your applications by adding or removing instances across multiple servers as needed. This ensures that your applications can handle increases in traffic or workload without relying solely on the resources of a single server.
- High Availability: Kubernetes automatically manages and distributes your applications across multiple nodes, so if one node fails, your applications can continue running on other healthy nodes without interruption.
- Resource Efficiency: Kubernetes optimizes resource utilization by efficiently packing multiple applications onto each node. This maximizes the use of your server resources and reduces wastage, leading to cost savings and better overall performance.
- Centralized Management: Kubernetes provides a centralized platform for deploying, managing, and monitoring your applications. This makes it easier to automate tasks, enforce consistency, and maintain a unified infrastructure compared to manually setting up and managing applications on individual servers.
Overall, Kubernetes offers a more robust, scalable, and efficient approach to deploying and managing applications compared to running them independently on a single server. Kubernetes is best used for managing containerized applications in dynamic and scalable environments.
Installing Kubernetes (K3s)
There are various tools to work with Kubernetes. We will install and use K3s, a lightweight Kubernetes packaged as a single binary in our labs. In K3s terminology:
- control plane (CP) is the k3s server;
- worker node is a k3s agent which is supposed to situate on another node;
However, in this lab, we will have only one k3s server, which will work as both a control plane and a worker node.
Complete
Before installing k3s, you have to make the path and create this file /var/lib/rancher/k3s/server/manifests/traefik-config.yaml
- add the following content to the file:
apiVersion: helm.cattle.io/v1
kind: HelmChartConfig
metadata:
  name: traefik
  namespace: kube-system
spec:
  valuesContent: |-
    ports:
      web:
        exposedPort: 8080
      websecure:
        exposedPort: 8443
This resource is necessary to move the default ingress controller ports 80 to 8080 and 443 to 8443, so your K3s can start up because the ports 80 and 443 are already taken by Apache.
- Create the file
/etc/rancher/k3s/config.yamland add the following:
write-kubeconfig-mode: "0644"
tls-san:
  - "<your vm external IP>"
cluster-init: true
- Install k3s on your VM. Make sure the k3s server is up and running under systemd.
curl -sfL https://get.k3s.io | sh -
Open the ports for Kubernetes 6443/tcp and 10250/tcp. Also make sure traefik ports (8080 and 8443) are opened. Port 6443/tcp is used by Kubernetes API server and for our Nagios monitoring. Port 10250/tcp is used by the kubelet component. This port exposes different kinds of information and provides a method for proxying services.
Verify
If the installation went smoothly, your VM should have the following:
k3ssystemd servicekubectlbinary (this command is installed to/usr/local/bin, which might not be in the default PATH)
K3s documentation can be found here
Architecture
Imagine you're organizing a big party with lots of guests. You want to make sure everyone has a good time, but there's a lot to manage - food, drinks, music, seating, and more. You decide to use Kubernetes to help you out.
- Containers as Food Trays:
- In Kubernetes, applications are packaged into containers, which are like individual food trays. Each tray holds everything needed for a specific dish - the ingredients, utensils, and instructions.
- Just like you arrange different dishes on trays, Kubernetes lets you package different parts of your application into separate containers. For example, one container might hold the front-end web app, while another holds the database.
- Nodes as Tables:
- Now, think of your party venue as a bunch of tables (nodes) where trays (containers) can be placed for guests (requests) to sit and enjoy their food.
- Kubernetes manages these tables (nodes), ensuring they're sturdy and have enough space for trays (containers) to sit comfortably.
- Control Plane as Party Planners:
- At the heart of Kubernetes is the control plane, which acts like a team of party planners. They oversee everything, from sending out invitations to managing the flow of guests (requests).
- These planners (control plane) monitor the health of the party (cluster), make sure trays (containers) are placed on tables (nodes) properly, and handle any issues that arise.
- Load Balancing as Waiters:
- Imagine your guests all want to eat at the same time. You need waiters (load balancers) to distribute guests (requests) evenly among the food trays (containers) on the tables (nodes).
- Load balancers make sure no table (node) or tray (container) gets overwhelmed with too many guests (requests) while others remain empty.
- Self-Healing as Cleanup Crew:
- Sometimes, accidents happen - a glass breaks or a dish spills. But you have a cleanup crew (self-healing mechanisms) ready to jump in and fix things.
- In Kubernetes, if a node goes down or a container crashes, the system automatically detects the issue and moves containers to other healthy nodes, ensuring your party (applications) keeps going smoothly.
Overall, Kubernetes works like a well-coordinated team of party planners, waiters, and cleanup crew, ensuring your applications run smoothly, even in the face of challenges, just like a successful party!
Kubernetes' approach is to manage many small servers (microservices) instead of large ones. This approach expects the application's server and client sides to be written with transient server deployment in mind. This means that one can run several web server instances across multiple Kubernetes hosts. Now we have many small replicas instead of having one big web server to answer queries. Since we can have N+1 nodes inside a Kubernetes cluster, it is much easier to scale the Kubernetes environment.
Transient microservice methodology replaces each aspect of a traditional application. In Kubernetes, we use a Service to do the network magic. A Service provides an IP address and a route to the deployed Pod. This IP address is automatically load-balanced if the Service has multiple replicas and automatically updates itself when the Service it points to scales up, down, re-deploys or changes.
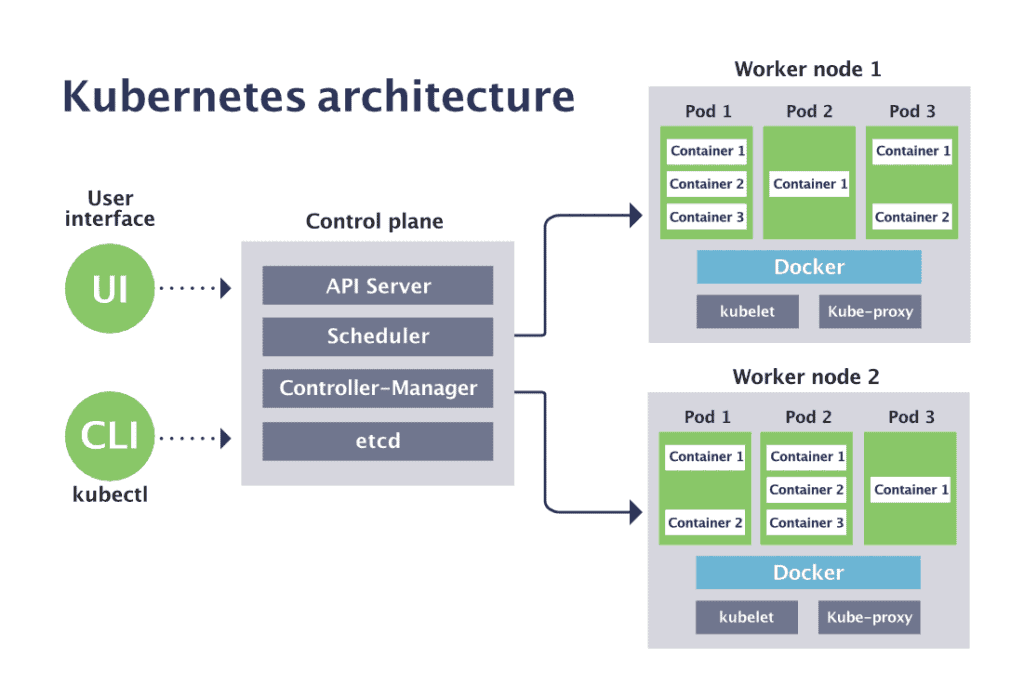
In its bare-bones form, Kubernetes consists of Control Plane Nodes (CP) and worker nodes (worker nodes). In production, Kubernetes should be run in a minimum three-node configuration (a single CP and two worker nodes), but it will be enough for this lab to run everything in a single node.
The CP runs an API server, a scheduler, various controllers and a storage system to keep the state of the cluster, container settings and the networking configuration.
The API server exposes a Kubernetes API, which you can communicate with by using a local client (kubectl) or writing a separate client utilising curl commands. The kube-scheduler finds an appropriate worker node to run containers and forwards the pod specs for the running containers coming to the API.
Each worker node runs a kubelet, a systemd process, and a kube-proxy.
- The kubelet receives requests to run the containers, manages any resources and works with the container engine to manage them on the local node. The local container engine could be Docker, Containerd, or any other supported one.
- The kube-proxy creates and manages networking rules to expose the container on the network to other containers or the outside world.
If you would like a more visual explanation there are great videos in youtoube like this one. Additional reading about Kubernetes here and here.
2. A stateless pod
Kubernetes primarily focuses on overseeing every phase of container's lifecycle. Rather than interacting with individual containers directly, Kubernetes operates at the level of Pods, which serve as its smallest unit. Kubernetes adheres to the design principle of having one process per container, with the flexibility to group multiple containers into a single Pod. This design enables simultaneous startup of containers within a Pod and facilitates comprehensive management of their entire lifecycle.
In production, a Pod often comprises a main application container and one or more supporting containers. The main container may require additional functionalities such as logging, a proxy, or specialized adapters. These tasks are managed by the supporting containers within the same Pod.
In a Pod, all containers share a single IP address and the ports made available for the Pod. This means that communication between containers within the Pod occurs through IPC (inter-process communication), the loopback interface, or a shared filesystem.
In the lab section, let us deploy the simplest Pod and view its behaviour. Let's look at an Nginx pod template in YAML format:
apiVersion: v1
kind: Pod
metadata:
    name: myfirstpod
spec:
    containers:
    - image: nginx
      name: user
Danger
In yaml type files indentation is VERY important, if you get odd errors, check that the errored line has the correct indetation. Also make sure there are no empty lines after the code. Yaml hates empty lines and won't work.
- apiVersion - which version of the Kubernetes API you're using to create this object
- kind - the type of object you want to create
- metadata has to include at least the name of the Pod
- spec - defines what containers to create and their parameters
Complete
Create your fist pod in k3s: kubectl create -f simple.yaml
Verify
Check the pod status with kubectl get pods. You can view the Pod's status change from ContainerCreating to Running.
Details of a running Pod
Once the Pod is in Running state, we can look around the object. Kubernetes automatically keeps quite a bit of information about the resource itself. See this information using the kubectl describe pod/myfirstpod command.
Name:             myfirstpod
Namespace:        default
Priority:         0
Service Account:  default
Node:             test.sa.cs.ut.ee/192.168.42.58
Start Time:       Sun, 28 Apr 2024 15:39:35 +0300
Labels:           <none>
Annotations:      <none>
Status:           Running
IP:               10.42.0.45
IPs:
  IP:  10.42.0.45
Containers:
  user:
    Container ID:   containerd://f23d3a2e62340abaefe3fe0534b86fed1973caaf1713d039a869be8768dc8612
    Image:          nginx
    Image ID:       docker.io/library/nginx@sha256:ed6d2c43c8fbcd3eaa44c9dab6d94cb346234476230dc1681227aa72d07181ee
    Port:           <none>
    Host Port:      <none>
    State:          Running
      Started:      Sun, 28 Apr 2024 15:39:42 +0300
    Ready:          True
    Restart Count:  0
    Environment:    <none>
    Mounts:
      /var/run/secrets/kubernetes.io/serviceaccount from kube-api-access-5spfn (ro)
Conditions:
  Type                        Status
  PodReadyToStartContainers   True
  Initialized                 True
  Ready                       True
  ContainersReady             True
  PodScheduled                True
Volumes:
  kube-api-access-5spfn:
    Type:                    Projected (a volume that contains injected data from multiple sources)
    TokenExpirationSeconds:  3607
    ConfigMapName:           kube-root-ca.crt
    ConfigMapOptional:       <nil>
    DownwardAPI:             true
QoS Class:                   BestEffort
Node-Selectors:              <none>
Tolerations:                 node.kubernetes.io/not-ready:NoExecute op=Exists for 300s
                             node.kubernetes.io/unreachable:NoExecute op=Exists for 300s
Events:
  Type    Reason     Age   From               Message
  ----    ------     ----  ----               -------
  Normal  Scheduled  13s   default-scheduler  Successfully assigned default/myfirstpod to wolfskin.sa.cs.ut.ee
  Normal  Pulling    13s   kubelet            Pulling image "nginx"
  Normal  Pulled     7s    kubelet            Successfully pulled image "nginx" in 6.25s (6.25s including waiting)
  Normal  Created    7s    kubelet            Created container user
  Normal  Started    7s    kubelet            Started container user
This output has a massive amount of information, beginning with just how and when a pod was run. Additionally, it includes data regarding the volumes it can access (in our scenario, solely the Kubernetes root CA certificate), its current state, internal IP address within the Kubernetes cluster, and relevant Events associated with it.
The Events table is crucial for debugging, as it provides insights into the various states a resource has gone through and highlights any errors encountered during its startup and lifecycle.
Since we're operating on the same machine where Kubernetes is running, we can directly reach the services it hosts via the virtual network layer. Give it a try by running curl <pod IP>. You should receive the default nginx webserver output.
3. Namespaces
The term namespace is referred to both the kernel feature and the segregation of API objects by Kubernetes. Both definitions mean keeping resources distinct.
Every API call, including every kubectl command and other communications in Kubernete is associated with a namespace. If no namespace is specified, the default namespace is used. When you deploy a vanilla Kubernetes cluster, four namespaces are automatically created: default, kube-node-lease, kube-public, and kube-system. While we won't focus on them in this course, it's important to be aware of their existence:
default- This namespace serves as the default destination for resources when no other namespace is specified.kube-node-lease- Responsible for keeping track of other K3S nodes.kube-public- Automatically generated namespace accessible to all users, including those not authenticated.kube-system- Reserved namespace utilized by control plane components; access should be restricted to Kubernetes administrators.
Lets explore commands for viewing, creating and deleting namespaces.
Complete
- Look what namespaces you have in your K3s with
kubectl get namespace. You can shorten it tokubectl get ns. - Now, let us create a namespace called
lab11withkubectl create ns <name of the namespace> - Having created a namespace, you can reference it in YAML template when creating an object. See the example below. Here's an example how to specify the namespace in the pod template.
apiVersion: v1
kind: Pod
metadata:
    name: <pod-name>
    namespace: <namespace-name>
...
- Now create a second pod with the previous pod template but specify the namespace to be used
lab11.
Verify
Check if the Pod is running and try to curl it. Helpful commands: kubectl get, kubectl describe.
You might have an issue now where kubectl get does not show you the container. You must specify a namespace with the kubectl commands to see the non-default namespaces. For example: kubectl get all -n lab11.
You can delete a namespace with kubectl delete ns/<namespace> if you want to keep things tidy.
Now you know how to create a simple namespace and pods.
Complete
- Create a namespace
lab11and - create a pod inside it.
4. Deployment
Now, let's consider Kubernetes' objective to manage container lifecycles efficiently and at scale. Does the observed behavior of the pod align with this goal?
You might have noticed that the manual intervention required to manage a pod's state isn't scalable. For instance, restarting a recently terminated container involves manual steps, which becomes cumbersome with multiple pods which might reach the hundreds. So, what's the solution?
In our terminology section, we mentioned Deployments as a tool for managing pod states through ReplicaSets. The Deployment controller ensures the continuous health monitoring of pods and worker nodes. It automatically replaces failed pods or redistributes them to healthy worker nodes, ensuring uninterrupted container availability.
Deployments are typically used for:
- Stateless web servers (like the previous Nginx example), where a fixed number of replicas is maintained autonomously.
- Automatically scalable number of replicas that respond as the workload increases, balancing incoming requests between them and creating new replicas when demand grows or terminating them when demand surges.
Deployments oversee ReplicaSets, which, in turn, ensure a specified number of pods are always running. They enable seamless rolling updates by starting a new version alongside the old one, scaling down the old version once the new one is running smoothly.
Deployment object
apiVersion: apps/v1
kind: Deployment
metadata:
  name: <deployment name>
  namespace: <assigned namespace>
spec:
  replicas: <number>
  selector:
    matchLabels:
      app: <Pod label name>
  template:
    metadata:
      labels:
        app: <Pod label name>
    spec:
      ...
         <Pod spec information>
The spec fields are more complicated for a Deployment than for a Pod. It consists of three main fields - replicas, selector and template.
replicas: This field specifies how many identical Pods should be running simultaneously in the cluster. You can easily adjust this number to increase or decrease the number of Pods as needed.selector: Here, you define how the Deployment identifies which Pods to manage. Typically, this involves selecting a label specified in the Pod template. However, you can create more complex rules for selecting Pods if necessary.template: This section contains settings for the Pods created by the Deployment. It includes:metadata.labels: Assigns a label to the Pods created by this Deployment, which helps the Deployment to identify and manage them.spec: Specifies the configuration settings for the Pods, similar to how you configure Pods in other contexts, like in a namespace task.
Complete
Create a deployment for the mariadb database image you used in the docker lab. Use the deployment template given above. Follow these instructions:
- Use the name
mysqlfor the name of the deployment. - Deploy it in the
lab11namespace. - Create 1 replica. This isn't ideal but enough for the example of this lab.
- Give the pod label
mysqland also select the same app for managing. - Under the deployment
spec.template.spec.containersgive the container information which needs to be created. Use the same image as in the DevOps labregistry.hpc.ut.ee/mirror/mariadb:latest.- Set the container port value to
3306. imagePullPolicyshould beIfNotPresentso that Kubernetes only pulls the image when there is no local copy.
- Set the container port value to
The container information template:
...
    containers:
      - name: mysql
        image: 'registry.hpc.ut.ee/mirror/mariadb:latest'
        imagePullPolicy: IfNotPresent
        ports:
          - containerPort: 3306
      env:
        - name: MYSQL_ROOT_PASSWORD
          value: "12345"
When the deployment manifest is ready, you can deploy it with kubectl apply -f deployment_database.yaml.
View it with kubectl get deployment -n <namespace>.
Use kubectl get -n <namespace> pods to find the Pod's full name. To get the logs of the container inside pod us kubectl logs pod/<full pod name> -n <namespace>. Try to delete a Pod with kubectl delete pod/<full pod name> -n <namespace> and view what happens to it? Is it still alive?
5. Volumes
When dealing with stateless containers, Kubernetes restarts them without saving any previous state. But what if we need to keep the container's data?
Another challenge arises when containers within the same Pod need to share files. Kubernetes handles this by simplifying how storage is managed.
Kubernetes supports different types of storage, and a Pod can use multiple types at once:
- Ephemeral volumes only exist while the Pod is running. Once the Pod stops, Kubernetes deletes these volumes.
- Persistent volumes last longer than the Pod's lifetime, ensuring data is preserved even if the container restarts.
A persistent volume acts like a directory or new filesystem (depending on the provider) capable of holding data, saved to an underlying storage system. In our lab, we'll utilize NFS and local-path providers, which work by mounting a folder on the underlying filesystem to the Pods.
All containers within a Pod can access a specific mounted volume. The provider and volume type determine how the volume is set up, what permissions it has, and how it stores data. You can learn more about volumes and types in the official Kubernetes docs.
This lab will demonstrate the use of configmap resources as ephemeral volumes and local-path volumes as persistent volumes.
Ephemeral volumes
Ephemeral storage suits applications that don't need data to stick around between pod restarts. Examples include:
- Caching services with limited memory
- Apps that read configuration from files
- Apps using temporary folders like
/tmp
There are different types of ephemeral volumes for specific needs:
- emptyDir: A folder created when a Pod starts and deleted when the Pod ends.
- configMap, downwardAPI, secrets: Resources in Kubernetes that can be mounted into Pods as read-only files, great for configuration files.
The complete list can be found in the official Kubernetes documentation.
ConfigMap
A ConfigMap is a tool in Kubernetes that holds non-sensitive data in key-value pairs. This data can be used as environment variables or configuration files within a Pod. Its main purpose is to separate environment-specific settings from container images, making applications more portable. However, it's essential to note that ConfigMaps don't encrypt the stored data. For sensitive information, like passwords or API keys, Kubernetes provides a separate tool called Secrets.
Complete
Lets create a ConfigMap to hold PostgreSQL database environment variables. For accessing the database five fields are needed: the database host name, port, database name and password. As password information is sensitive and usually held in the same place as user info, we'll use a Secret resource for those. Here is a template for ConfigMap resource:
apiVersion: v1
kind: ConfigMap
metadata:
  name: <name of the object>
  namespace: <namespace>
  labels:
    app: <app label name>
data:
  key: value
  key: value
...
- Give the ConfigMap a name eg
mysql-configmap. - Deploy it in the
lab11namespace. - Use the app label
mysql. - Set key value pairs:
- host: mysql
- port: "3306"
- database: motd_database
Deploy it with kubectl apply -f configmap_mysql.yaml. We'll use the variables later in the application deployment.
Secret
A Secret object in Kubernetes is a resource used to store sensitive information such as passwords, API keys, and certificates. It securely stores this data as base64-encoded values and provides a way to manage and access sensitive information within Pods without exposing it in plaintext.
Complete
Let's create a Secret in lab11 namespace containing the mariadb database user and password information. Here is the template:
apiVersion: v1
kind: Secret
metadata:
  name: <name of the secret>
  namespace: <namespace>
  labels:
    app: <app label>
type: Opaque
data:
  password: MTIzNDU= #base64 encoded '12345'
Fill in the missing values similarly to the ConfigMap. To get the base64 encoded value of a phrase you can use the command echo "<your-passwordphrase>" | base64. In our example use the password 12345, change this and then we'll use it in the database deployment to mount the MYSQL_ROOT_PASSWORD value.
Deploy the secret with kubectl apply -f secret_mysql.yaml in the lab11 namespace.
Now when the Secret is deployed, use it the previous deployment of the database. Change your deployment manifests spec.remplate.spec.containers.env section to use Secret password key. Delete the previous plain text value.
Complete
...
          env:
            - name: MYSQL_ROOT_PASSWORD
              valueFrom:
                secretKeyRef:
                  name: <secret resource name>
                  key: <key name>
...
Re-deploy the deployment after saving the file with kubectl apply -f deployment_database.yaml.
Persistent volumes
In Kubernetes, containers can access multiple storage sources. We've seen read-only options like ephemeral volumes and ConfigMaps, which only last as long as the Pod does. To handle storage that lasts beyond a Pod's lifetime, Kubernetes offers two important resources: PersistentVolume and PersistentVolumeClaim.
A PersistentVolume (PV) represents storage in the cluster. It can be set up manually by an administrator or dynamically requested by users using Storage Classes. PVs act like plugins for storage, similar to ephemeral volumes, but they're independent of any Pod's lifecycle. They store details about how the storage is implemented, like NFS.
A PersistentVolumeClaim (PVC) is a user's way of asking for storage. Unlike PersistentVolumes, which are not tied to namespaces and can't be managed by regular users, PVCs provide a user-friendly interface for requesting and managing storage.
Think of PVCs as similar to how Deployments manage ReplicaSets. When a user creates a PVC, it automatically creates a PV with the specified settings. While users can't directly access PV objects, they can control them through their PVCs.
Provisioning
There are two ways PVs can be provisioned: statically or dynamically.
Static PVs are created by a cluster administrator. They carry the details of the real storage, available for use and consumption by cluster users. Dynamic PVs automatically issued based on predefined Storage Class. In this lab, we will only touch Static PVs with NFS that we made in the seventh (filesystems) lab.
Complete
- Let's first create a persistent NFS volume.
- Create a directory
/shares/k8sinside your VM, which will be exported to Kubernetes.
- Create a directory
- Don't forget to edit the
/etc/exportsfile and give read-write permissions andno_root_squashoption. - After editing the
/etc/exportsfile runexportfs -a.
Verify
- Create a directory
/mnt/k8sthat you will mount to the exported filesystem usingmount -t nfs <vm_name>.sa.cs.ut.ee:/shares/k8s /mnt/k8s. - This is to test whether your export works properly, before we mount it in Kubernetes.
- You can normally read/write from the volume if everything works out. If you get any read-only or permissions errors, fix them before continuing with Kubernetes.
Complete
Create a file testfile.txt into your /mnt/k8s directory. The file should contain your virtual machine full name <vm-name>.sa.cs.ut.ee.
Now lets use the NFS volume in Kubernetes and create a PersistentVolume.
Complete
If everything works as needed, create and apply a pv_database.yaml manifest. NB! Kubernetes will only verify the syntax, an incorrect name or directory will not generate an error, but a Pod using the resource will not start.
apiVersion: v1
kind: PersistentVolume
metadata:
    name: mysql-pv
    labels:
      app: mysql
spec:
    capacity:
        storage: 200Mi
    accessModes:
        - ReadWriteOnce
    storageClassName: nfs
    persistentVolumeReclaimPolicy: Retain
    nfs:
        path: <export path>
        server: localhost
        readOnly: false
Now create a persistent volume claim and apply the pvc_database.yaml manifest.
Complete
Create a yaml manifest file for your pvc and use spec.resource.requests.storage of 200Mi.
apiVersion: v1
kind: PersistentVolumeClaim
metadata:
    name: mysql-pvc
    namespace: lab11
spec:
    accessModes:
    - ReadWriteOnce
    volumeName: <pv name you used>
    storageClassName: <the same storageClassName as pv>
    resources:
        requests:
            storage: 200Mi
Check with kubectl get pv and kubectl get pvc -n lab11 that PVC and PV are both Bound.
Now edit the mysql deployment so that it would use the created PVC.
Complete
Under the field spec.template.spec.containers.<containerName>.volumeMounts add:
volumeMounts:
  - mountPath: /var/lib/mysql
    name: mysqldata
And under spec.template.spec.volumes add the volume info:
volumes:
  - name: mysqldata
    persistentVolumeClaim:
      claimName: mysql-pvc
After making changes don't forget to redeploy the manifest.
If everything worked out you can use the persistent volume as data storage for your application. Even if there are restarts of the application crashes, data that has been written there, won't be lost.
6. Service
In Kubernetes, each part has its job, helping everything work smoothly. While containers run automatically, they still need a way to talk to each other and the outside world. That's where Services come in.
A Service creates a new network spot with its own address. It's like a mailbox for Pods. Even if you recreate a Service, its address usually stays the same.
The Service then connects to all the Pods with a specific label. If you have multiple copies of a Pod, the Service spreads out requests among them, kind of like a traffic cop directing cars to different lanes.
Now our database pods internally expose the port 3306. If you directly connect to it using the pods IP and the port, it will show port 3306 as open. But this is not a dynamic solution. Instead, lets creat a Service to expose the mysql application to the cluster. All connections to Service port 3306 get automatically routed to Pod (or container) port 3306.
Complete
Create a service called mysql.
apiVersion: v1
kind: Service
metadata:
  name: mysql
  namespace: lab11
  labels:
    app: mysql
spec:
  ports:
    - port: 3306
      targetPort: 3306
      name: tcp
  selector:
    app: mysql
Verify
You can verify with kubectl get services -n lab11 to view your Service and curl the Services IP and port. But as we use the mysql port 3306 as the entrypoint for the database, curl in this context gives us an empty responce.
Previously we defined in the mysql configmap database host value as mysql. Now lets see how another applications can connect to the database through the mysql service.
Complete
To make the application we used in the DevOps lab work in Kubernetes, we need to do small changes. Right now the database values are hardcoded, but we need them to be defined as variables. For this navigate to your DevOps lab folder and inside the folder where your server.py file is located. Open the file and find line 45 where the database url is set url = "mysql+mysqldb://root:%s@devops_lab_db:3306/motd_database"%(db_password). Change it to:
db_host = os.environ.get("DATABASE_HOST", "mysql")
db_name = os.environ.get("DATABASE_NAME", "motd_database")
db_port = os.environ.get("DATABASE_PORT", "3306")
url = "mysql+mysqldb://root:%s@%s:%s/%s"%(db_password, db_host, db_port, db_name)
Then build the image docker build -t k8s_lab .
Then upload the image to the registry with the name k8s_lab and tag latest.
If you created a Public registry then the image is available without credentials. But if you created a Private registry then create a Secret containing your user credentials:
kubectl create secret docker-registry registry-secret \
  --docker-server=https://registry.sa.cs.ut.ee/<your-repository-name> \
  --docker-username=<your-username> \
  --docker-password=<your-password> \
  --docker-email=<your-email> \
  --namespace=lab11
Complete
Create a deployment for a web application that lets you add the message of the day to the database. If you have a public repository, delete the imagePullSecrets part.
apiVersion: apps/v1
kind: Deployment
metadata:
  name: motdapp
  namespace: lab11
  labels:
    app: motdapp
spec:
  replicas: 2
  selector:
    matchLabels:
      app: motdapp
  template:
    metadata:
      labels:
        app: motdapp
    spec:
      imagePullSecrets:
        - name: registry-secret
      containers:
        - name: motdapp
          image: 'registry.sa.cs.ut.ee/<your-repository-name>/k8s_lab:latest'
          imagePullPolicy: Always
          ports:
            - containerPort: 5000
          env:
            - name: DATABASE_ROOT_PASSWORD
              valueFrom:
                secretKeyRef:
                  name: mysql-secret
                  key: password
            - name: DATABASE_HOST
              valueFrom:
                configMapKeyRef:
                  name: mysql-configmap
                  key: host
            - name: DATABASE_PORT
              valueFrom:
                configMapKeyRef:
                  name: mysql-configmap
                  key: port
            - name: DATABASE_NAME
              valueFrom:
                configMapKeyRef:
                  name: mysql-configmap
                  key: database
Verify
Make sure that your application is running by getting the IP address of the the motdapp pod with kubectl describe pod <pod name> -n lab11 | grep 'IP:' and then running curl <IP>:5000/motd. The inquiry must answer with a html output:
<h1>The message of the day is:</h1><br>kuues<br><br><br><a href='/new-motd'>Visit here</a> to add a new message of the day.
Service types
When you check the output of kubectl get services, you'll notice a section for the service type. Kubernetes offers different types of services, each serving specific purposes:
- ClusterIP: This type creates an IP address accessible only within the cluster. It's commonly used to assign static IP addresses and domain names to Pods. Every service in Kubernetes also gets an automatically resolving DNS name within the cluster in the format
<service_name>.<namespace_name>.svc. This is the default service type. - NodePort: NodePort assigns a static IP address and opens a specific port through the firewall on all Kubernetes nodes. If your Pod runs on one node but the request comes to another, Kubernetes automatically routes the traffic from the receiving node to the Pod's node.
- LoadBalancer: LoadBalancer instructs the cloud provider to create a route from a public IP address to your Kubernetes service. This type usually works only in cloud environments where the cloud provider can manage load balancers.
- ExternalName: ExternalName allows defining a Kubernetes-external resource as a DNS record inside the Kubernetes cluster. It's typically used to give a static DNS name to external services like databases, enabling connections from within the cluster.
While ClusterIP is suitable for internal cluster communication, exposing an application to the outside world typically requires using NodePort or LoadBalancer service types. Since LoadBalancer may not be available in all environments, NodePort is often used as an alternative.
Complete
- Create a NodePort Service to access the application from outside the cluster.
apiVersion: v1
kind: Service
metadata:
  name: motdapp-nodeport-service
  namespace: lab11
  labels:
    app: motdapp
spec:
  selector:
    app: motdapp
  type: NodePort
  ports:
    - protocol: TCP
      nodePort: 32210
      port: 5000
- Open port 32210 in ETAIS and your firewall.
Verify
If everything was successful the app is now accessable through your web browser at address <vm-name>.sa.cs.ut.ee:32210/motd.
7. Ingress
Even though we can now expose services to the network, doing so with HTTP-based services would mean each website lives on a different port. It would be insane to remember ports and access google.com via port 51234.
We used automatic, dynamic proxies in the last lab to solve a similar problem. Similar tools are available in the case of Kubernetes, but due to the ecosystem around them, they are much more powerful.
Ingress is a resource for configuring a cluster-wide IngressController (fancy word for a dynamic proxy). The methodology is similar to PV and PVC, where a user can create, modify and delete the Ingress resource objects but cannot touch the actual IngressController in any way.
IngressControllers listen to the Ingress objects and configure proxying depending on the configuration in the object. They expose (usually) two ports - one for HTTP traffic and one for HTTPS traffic, and route the requests to these ports to appropriate Services.
This methodology allows cluster administrators to centralise security, monitoring and auditing, making exposing web-based services easier for Kubernetes users.
Here is a simple block example of how Ingress manages traffic: 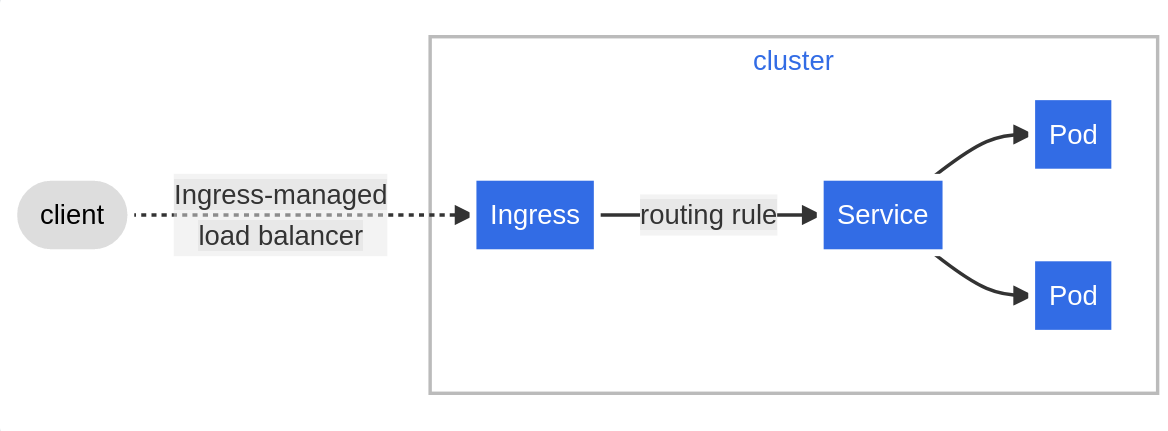 source: https://kubernetes.io/docs/concepts/services-networking/ingress/
An Ingress is usually configured to give Services externally-reachable URLs, load balance traffic, terminate SSL/TLS and provide virtual hosting.
For the Ingress to work, the cluster must have an IngressController running. Opposite to other types of controllers, which are part of the kube-controller-manager binary, Ingress controllers are not started automatically with a cluster. In a vanilla Kubernetes cluster, you would have to install an IngressController before using Ingress resource, but K3s distribution installs Traefik automatically as an IngressController.
Several different ingress controllers exist (Nginx, Traefik, Envoy and many others). As you can see, they are the same technologies you are familiar with - they have just been packaged in a Kubernetes-native way.
Complete
Before creating the ingress resource to access the motd application, create a ClusterIP service for the app. The manifest to be deployed:
apiVersion: v1
kind: Service
metadata:
  name: motdapp-service
  namespace: lab11
  labels:
    app: motdapp
spec:
  selector:
    app: motdapp
  ports:
    - port: 5000
      targetPort: 5000
      name: tcp
Ingress resource
An Ingress template requires these fields: apiVersion, kind, metadata and spec.
We can configure which Ingress class to use using the' annotations' field. In this lab, we will use Traefik, as this is the one that comes by default with K3s.
The Ingress spec contains all the information to configure a proxy server or a load balancer. It also can have a list of rules matched against all incoming requests to provide central configuration management. However, we are not going to touch these.
When a defaultBackend is set, an Ingress sends all traffic to a single default backend, which handles the request. We are instead going to pass the request to the previously set Service.
apiVersion: networking.k8s.io/v1
kind: Ingress
metadata:
  name: <ingress name>
  namespace: <namespace name>
spec:
  ingressClassName: "traefik"
  defaultBackend:
    service:
      name: <service name linked to the Pod>
      port:
        number: <port exposed internally to the cluster by the Service>
Complete
Ingress:
- Write an Ingress manifest with "traefik" as the Ingress class and fill in the blanks.
- utilise
lab11namespace
- utilise
- Apply your Ingress template
kubectl apply -f <ingress>.
Verify
Before testing, add the following to your firewall.
firewall-cmd --permanent --zone=trusted --add-source=10.42.0.0/16 # pods
firewall-cmd --permanent --zone=trusted --add-source=10.43.0.0/16 # services
firewall-cmd --reload
These rules allow the traefik IngressController to access all the Pods in Kubernetes.
Afterwards, you should be able to access the motd application at
Assemble all database resources into a manifest
Every task we have done in this lab should be combined to create a complete manifest that could be used to update and modify your application. Below you can see an example of the full manifest, where each part is separated by ---. The manifest structure falls under CI/CD principles, as updating requires changing a single thing and running kubectl apply -f <filename> to update the setup.
apiVersion: v1
kind: PersistentVolume
metadata:
    name: mysql-pv
    namespace: lab11
    labels:
      app: mysql
spec:
    capacity:
        storage: 200Mi
    accessModes:
        - ReadWriteOnce
    storageClassName: nfs
    persistentVolumeReclaimPolicy: Retain
    nfs:
        path: /shares/k8s
        server: localhost
        readOnly: false
---
apiVersion: v1
kind: PersistentVolumeClaim
metadata:
  name: mysql-pvc
  namespace: lab11
  labels:
    app: mysql
spec:
  storageClassName: nfs
  volumeName: mysql-pv
  accessModes:
    - ReadWriteOnce
  resources:
    requests:
      storage: 200Mi
---
apiVersion: v1
kind: Secret
metadata:
  name: mysql-secret
  namespace: lab11
  labels:
    app: mysql
type: Opaque
data:
  password: MTIzNDU= #base64 encoded '12345'
---
apiVersion: v1
kind: ConfigMap
metadata:
  name: mysql-configmap
  namespace: lab11
  labels:
    app: mysql
data:
  host: mysql
  port: "3306"
  database: motd_database
---
apiVersion: apps/v1
kind: Deployment
metadata:
  name: mysql
  namespace: lab11
spec:
  replicas: 1
  selector:
    matchLabels:
      app: mysql
  template:
    metadata:
      labels:
        app: mysql
    spec:
      containers:
        - name: mysql
          image: 'registry.hpc.ut.ee/mirror/mariadb:latest'
          imagePullPolicy: IfNotPresent
          ports:
            - containerPort: 3306
          env:
            - name: MYSQL_ROOT_PASSWORD
              valueFrom:
                secretKeyRef:
                  name: mysql-secret
                  key: password
          volumeMounts:
            - mountPath: /var/lib/mysql
              name: mysqldata
      volumes:
        - name: mysqldata
          persistentVolumeClaim:
            claimName: mysql-pvc
---
apiVersion: v1
kind: Service
metadata:
  name: mysql
  namespace: lab11
  labels:
    app: mysql
spec:
  ports:
    - port: 3306
      targetPort: 3306
      name: tcp
  selector:
    app: mysql
Do the same for the motd application Deployment, Services and Ingress.
Ansible and automation
Ansible is not the best tool for automating deploying Kubernetes manifests. If you want to learn how to automate the deployment steps look into IoC tool called Terraform.
In this lab you can use Ansible to implement the download steps in section 1.
You can use the two manifests you assembled for the database and motd application resources deploy all of the resources with just 2 commands. Just run kubectl apply -f <manifest>.yaml and enjoy your hard work.
Optional - Visualization
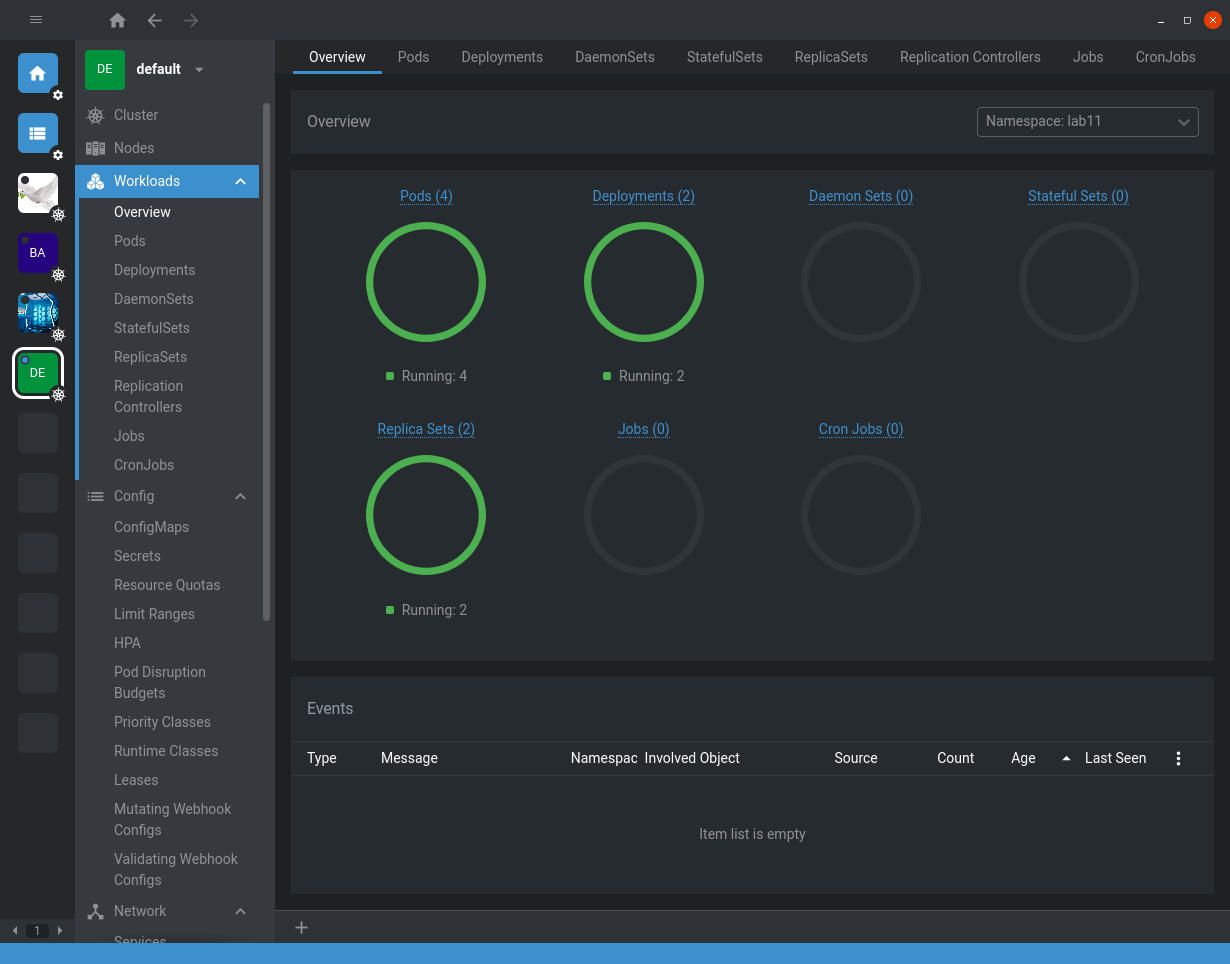
Suppose you are interested in a graphical visualisation of your cluster. In that case, you may want to look into OpenLens (Open-source version of Lens), which will show namespaces, Pods and their logs, Deployments and their status and many other details in a graphical manner.
You can get the kubeconfig for your Lens from /etc/rancher/k3s/k3s.yaml. To add it to OpenLens click the burger menu on the top left corner, choose File->Add Cluster. Now copy-paste the contents of the kubeconfig file. Change the clusters.cluster.server from https://127.0.0.1:6443 to https://<your vm-s external IP>:6443.
This gives you a nice visualization of your Kubernetes cluster:
Similarly, if you don't want to download and run a .exe in your computer, you can also use K9s, which is a command line UI for interacting with Kubernetes clusters. This, you can run inside your virtual machine itself.